This tutorial will teach you how to use project Lombok in the Spring Boot application.
Overview
No doubt Java is a wonderful language, but one of the drawbacks of Java is its verbose nature. This makes it fairly complicated for everyday tasks such as composing a simple POJO object. For example, constructing of methods like Getters(), Setters(), Constructors(), toString() and HashCode() etc.
Although most modern IDE can generate these methods automatically, this still requires manual intervention for each Java class. Therefore, this is very time-consuming. Using Lombok, these unwanted lines of code can be reduced drastically. In turn, it saves many developers time wasted earlier while writing boilerplate code. Additionally, it also increases the readability of the code and conserves space.
Preparation:
In this tutorial, I’ll be using the following tools:
- JDK 1.8
- Intellij Idea for IDE
- Maven
- Spring boot Application
- Lombok
This tutorial has two main steps for better understanding:
- Step 1: Application Example without Project Lombok
- Step 2: Application example with project Lombok
In the next step, we will check how a normal spring-boot java class looks like without project Lombok
Step 1 – Application Example Without Project Lombok
In this step, I have created a very simple Spring Boot application. You can follow this tutorial, “Create a Simple Web Service Project with Spring Boot” to learn how to create a very simple Web App with Spring Boot.
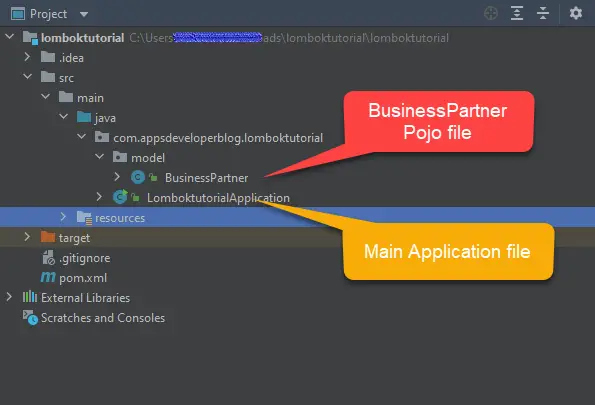
Once the project is imported to IDE, we will create a sub-package called ‘Model’ inside our project. Afterward, we will create our POJO file called “BusinessPartner.java”. This object file contains the entity BusinessPartner, which we will use in our next class.
In the end, the file structure of this project should look like something below.
Now, we will add private member variables to our class. Also, we will create helper methods for all four member variables like getters() ,setter() , toString() etc.
The Code of “BusinessPartner.java” file is as follows:
package com.appsdeveloperblog.lomboktutorial.model;

import java.util.Objects;

public class BusinessPartner {

    private String firstName;
    private String lastName;
    private String uid;
    private String address;

    public String getFirstName() {
        return firstName;
    }

    public String getLastName() {
        return lastName;
    }

    public String getUid() {
        return uid;
    }

    public String getAddress() {
        return address;
    }

    public void setFirstName(String firstName) {
        this.firstName = firstName;
    }

    public void setLastName(String lastName) {
        this.lastName = lastName;
    }

    @Override
    public String toString() {
        return "BusinessPartner{" +
                "firstName='" + firstName + '\'' +
                ", lastName='" + lastName + '\'' +
                ", uid='" + uid + '\'' +
                ", address='" + address + '\'' +
                '}';
    }

    public void setUid(String uid) {
        this.uid = uid;
    }

    public void setAddress(String address) {
        this.address = address;
    }

    @Override
    public boolean equals(Object o) {
        if (this == o) return true;
        if (o == null || getClass() != o.getClass()) return false;
        BusinessPartner that = (BusinessPartner) o;
        return Objects.equals(getFirstName(), that.getFirstName()) && Objects.equals(getLastName(), that.getLastName()) && Objects.equals(getUid(), that.getUid()) && Objects.equals(getAddress(), that.getAddress());
    }

    @Override
    public int hashCode() {
        return Objects.hash(getFirstName(), getLastName(), getUid(), getAddress());
    }
}
Afterward, we will modify our main application class. Here, we will initialize our business partner object and populate it with dummy data. In the end, we will print this object.
Secondly, copy the logic of “MainApplication” as below :
package com.appsdeveloperblog.lomboktutorial;

import com.appsdeveloperblog.lomboktutorial.model.BusinessPartner;
import org.springframework.boot.SpringApplication;
import org.springframework.boot.autoconfigure.SpringBootApplication;
import java.util.logging.Level;
import java.util.logging.Logger;

@SpringBootApplication

public class LomboktutorialApplication {
    private final static Logger LOGGER =
                Logger.getLogger(Logger.GLOBAL_LOGGER_NAME);
        public static void main(String[] args) {

            SpringApplication.run(LomboktutorialApplication.class, args);
            BusinessPartner bp = new BusinessPartner();
            bp.setFirstName("Bill");
            bp.setLastName("Mark");
            bp.setUid("BP-U2323");
            bp.setAddress("3/2 New Avenue Road,UK");
            LOGGER.log(Level.INFO, "Output is my BP class is ---> \n"+ bp.toString());
        }

}
Next, if we run our application, IDE should print the below output.
2021-09-29 23:25:26.689 INFO 15740 --- [ main] o.s.b.w.embedded.tomcat.TomcatWebServer : Tomcat started on port(s): 8080 (http) with context path ''
2021-09-29 23:25:26.695 INFO 15740 --- [ main] c.a.l.LomboktutorialApplication : Started LomboktutorialApplication in 3.892 seconds (JVM running for 4.772)
2021-09-29 23:25:26.700 INFO 15740 --- [ main] global : Output is my BP class is --->
BusinessPartner{firstName='Bill', lastName='Mark', uid='BP-U2323', address='3/2 New Avenue Road,UK'}
Everything has been great till now.
However, If we retrospect our code development till now, we will notice that even though our main object class, i.e. BusinessPartner has just 4 private member variables. Still, the developer has to write more than 70+ lines to create supporting helper methods. Assume developing a production-grade application with many classes present, then the developer has to individually write it for all the object classes. This is lots and lots of boilerplate code and is too time-consuming.
Now we will see how to optimize this in the next step.
Step 2 – Application Example with Project Lombok
Firstly, to use Lombok, we need to perform some basic settings in our IDE. This can be done as below:
Enabling Lombok in your IDE
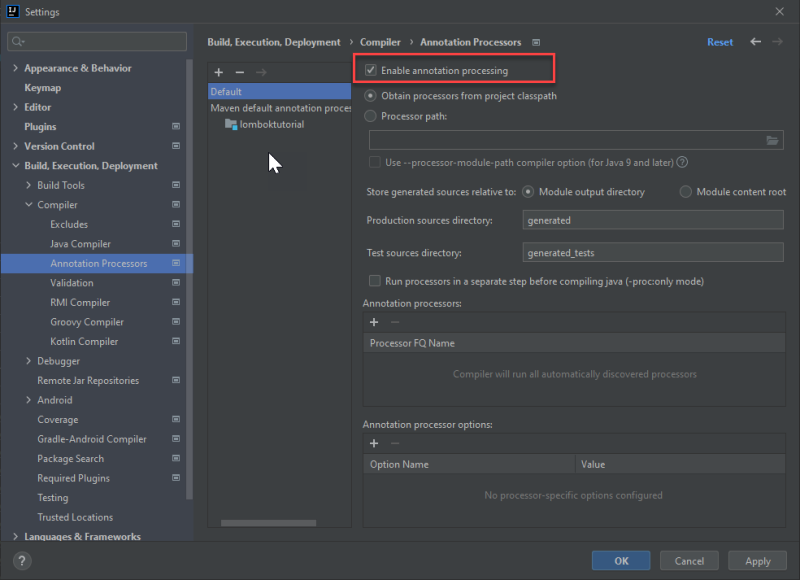
- The IntelliJ IDEA IDE is compatible with Lombok without any plugins as of version 2020.3. For older versions, you can add the Lombok IntelliJ plugin to add Lombok. For other IDE, you can visit the site https://projectlombok.org/setup/overview
and need to install the corresponding plugin - Enable annotation processing from settings as below. (You can find it inside File -> Settings for Intellij Idea)
Afterward, you need to add the following Lombok dependency in your pom.xml.
<dependency>
   <groupId>org.projectlombok</groupId>
   <artifactId>lombok</artifactId>
   <version>1.18.20</version>
</dependency>
In the next step, we will optimize our code.
We will again navigate to our BusinessPartner class, which contains our boilerplate code. Firstly, we will remove all the methods, i.e. Getters(), Setters(), Constructors(), toString() and HashCode etc. and replace them will annotations as below.
(Also, don’t forget to include import lombok.Data; in your class )
package com.appsdeveloperblog.lomboktutorial.model;

import lombok.Data;

@Data
public class BusinessPartner {
    private String firstName;
    private String lastName;
    private String uid;
    private String address;
}
Now our application is ready to execute. If you have noticed, our boilerplate code for getter(), setters(), toString(), etc., is not needed to address in new logic. Our BusinessPartner object logic is reduced to 4+ lines of code from 60+ lines compared to earlier code. All repetitive code of @Getter, @Setters,@ToString, etc., is replaced just with a single @Data annotation. This is the power of Lombok.
Additionally, there few other powerful annotations are in Lombok we will see in the next section.
Lombok Annotations
-
- @AllArgsConstructor: This annotation generates a constructor with one parameter for each field in your class.
- @NoArgsConstructor: This annotation generates a constructor with no parameters.
- @Data: This annotation is a shortcut annotation to combine multiple annotations. For example, @Getter, @EqualsAndHashCode @ToString,.@Setter, and @RequiredArgsConstructor annotations into a single annotation.
- @NonNull: This annotation on the parameter of a constructor or a method generates a null check.
- @Synchronized: This annotation is used on methods to make Java methods synchronized. This is for thread safety. Look at the tutorial Synchronized Blocks and Methods in Java for additional examples of implementing synchronized Java methods.
- @slf4j: This annotation generates a logger instance with the default name ‘log’.
Conclusion
In this tutorial, we’ve looked at how the use of Lombok can write better Java code. Additionally, Lombok annotations can considerably reduce the boilerplate code. Also, it makes project development faster plus makes your code clean, clear & easier to read.