In this tutorial, you will learn how to register a new OAuth Client application with Keycloak and how to request an access token using the Client Credentials grant type.
For video lessons on how to secure your Spring Boot application with OAuth 2.0. and Spring Security 5, please checkout my complete video course OAuth 2.0. in Spring Boot applications.
If you are interested to learn how to perform other OAuth 2 authorization flows with Keycloak, then have a look at the following tutorials as well.
- PKCE Verification in Authorization Code Grant
- Keycloak: Authorization Code Grant Example
- Keycloak: Requesting Token with Password Grant
Enable The Client Credentials Grant
The first step will be to create a new OAuth Client in Keycloak. If the client application is already created in Keycloak then we need to make sure it is enabled for the Client Credentials Grant type.
To learn how to create a new OAuth Client application in Keycloak please follow this tutorial: Creating a new OAuth Client in Keycloak.
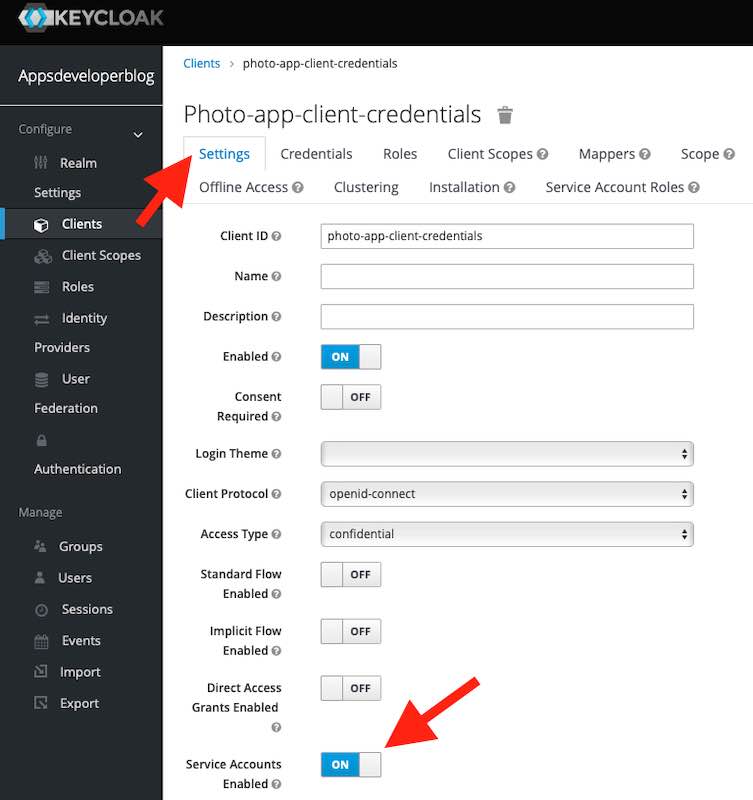
To enable the Client Credentials Grant flow for the OAuth client application in Keycloak, follow these steps:
- Open the Client application,
- Select the Settings tab,
- Enable the Service Accounts as it is shown in the image below,
- Click on the Save button.
Now when the Service Accounts option is enabled, we can copy the Client Credentials and used them in HTTP Request.
Client Credentials
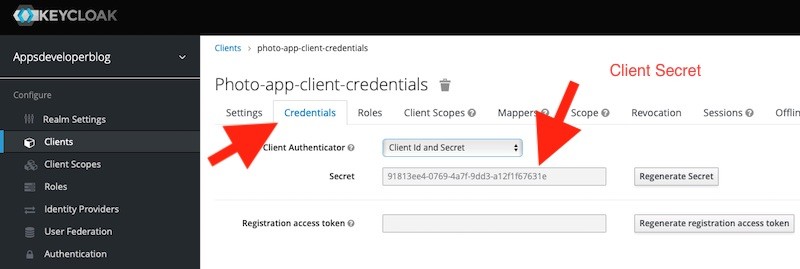
The Client Credentials Grant flow requires the client application to authenticate with the Authorization Server. To do that, the client application will need to include the client_id and the client_secret values in HTTP Post request for an Access Token. Follow the below steps to find the client_id and the client_secret values for your OAuth client application in Keycloak.
- Open the Client application details in Keycloak,
- Switch to Credentials tab,
- Copy the Client Secret value.
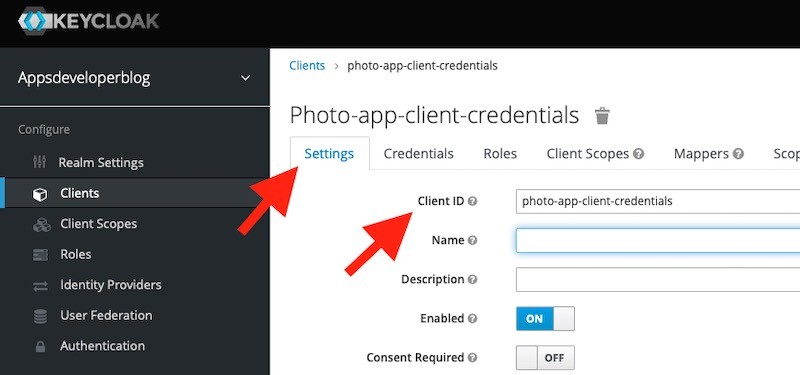
You will find the Client Id value on the Settings tab.
Request an Access Token
To request an access token using the Client Credentials Grant flow the client application will need to send an HTTP POST request directly to a /token endpoint.
curl --location --request POST 'http://localhost:8080/auth/realms/appsdeveloperblog/protocol/openid-connect/token' \
--header 'Content-Type: application/x-www-form-urlencoded' \
--data-urlencode 'client_id=photo-app-client-credentials' \
--data-urlencode 'client_secret=91813ee4-0769-4a7f-9dd3-a12f1f67631e' \
--data-urlencode 'scope=email' \
--data-urlencode 'grant_type=client_credentials'
Where:
- client_id – is a Client ID of OAuth Client Application registered with the Authorization Server,
- client_secret – is a Client Secret value of an OAuth Client application,
- scope – Optional Scope value,
- grant_type – must be client_credentials for a Client Credentials Grant type.
If all is good with the request and the client credentials get successfully validated by the authorization server, the authorization server will respond back with an access token right away.
{
    "access_token": "eyJhbGciOiJSUzI1NiIsInR5cCIgOiAiSldUIiwia2lkIiA6ICItNUlsX2I0cUktdWFvaEI3d244UHY3WEM2UEktU3BNbmZCRnlJZUx6QTJNIn0.eyJleHAiOjE1OTQyMTY0OTQsImlhdCI6MTU5NDIxNjE5NCwianRpIjoiZjVmNTBjMzEtNWIwNC00OWQ2LTljYmMtM2YwMWU5OTg5ZWQxIiwiaXNzIjoiaHR0cDovL2xvY2FsaG9zdDo4MDgwL2F1dGgvcmVhbG1zL2FwcHNkZXZlbG9wZXJibG9nIiwic3ViIjoiNTlmODFhMzYtYTIyMC00ZmE4LTlhZWEtMzRlN2JhNjY4OTAxIiwidHlwIjoiQmVhcmVyIiwiYXpwIjoicGhvdG8tYXBwLWNsaWVudC1jcmVkZW50aWFscyIsInNlc3Npb25fc3RhdGUiOiI3NTAyY2YzMS1iMjEwLTQ3NTQtYjkxOS0wN2UxZDg0OTNmYTMiLCJhY3IiOiIxIiwic2NvcGUiOiJlbWFpbCIsImNsaWVudElkIjoicGhvdG8tYXBwLWNsaWVudC1jcmVkZW50aWFscyIsImNsaWVudEhvc3QiOiIxMjcuMC4wLjEiLCJjbGllbnRBZGRyZXNzIjoiMTI3LjAuMC4xIn0.fQVsLpQJchcofA18FOSr0gtjeo01s9bMFF1ewsI-trrzzNL28QABmm_rsb4-p0iw5fGG3-bEInFe-Owxm9sZbQ_O7je_BVMDrlJEs-bAY5cLIQWVqy3P5xCsyFt-F6y89LAOCUCGI127W18zoUagLAoi5bGCIgxKled-MYRK8MQ-PcZzYCp5FkPFMv6Wd8I5m6TZJ6xK0eG79LVDPqj-s9YGfjY_n64uiT9VneYHG261SisgZ978ZMF-gkjit9CsSTQEW2cBlyeriy133s0E0ycvybLwnHYsGzRs5k8xhgqa3ZYovtZeK2SWARoNSXWQjUCBcndT9teWcZSgQxPIzw",
    "expires_in": 300,
    "refresh_expires_in": 1800,
    "refresh_token": "eyJhbGciOiJIUzI1NiIsInR5cCIgOiAiSldUIiwia2lkIiA6ICJlYWQyMDZmOS05MzczLTQ1OTAtOGQ4OC03YWNkYmZjYTU5MmMifQ.eyJleHAiOjE1OTQyMTc5OTQsImlhdCI6MTU5NDIxNjE5NCwianRpIjoiMDQ0MDEwMjItY2QwNy00MTczLTkwMjctMTQwMGU4Yjg1MzdlIiwiaXNzIjoiaHR0cDovL2xvY2FsaG9zdDo4MDgwL2F1dGgvcmVhbG1zL2FwcHNkZXZlbG9wZXJibG9nIiwiYXVkIjoiaHR0cDovL2xvY2FsaG9zdDo4MDgwL2F1dGgvcmVhbG1zL2FwcHNkZXZlbG9wZXJibG9nIiwic3ViIjoiNTlmODFhMzYtYTIyMC00ZmE4LTlhZWEtMzRlN2JhNjY4OTAxIiwidHlwIjoiUmVmcmVzaCIsImF6cCI6InBob3RvLWFwcC1jbGllbnQtY3JlZGVudGlhbHMiLCJzZXNzaW9uX3N0YXRlIjoiNzUwMmNmMzEtYjIxMC00NzU0LWI5MTktMDdlMWQ4NDkzZmEzIiwic2NvcGUiOiJlbWFpbCJ9.9qWVA-pyBp0AZ7BUj2Z_RAlQlDSU15kyvpcwEGfXj1k",
    "token_type": "bearer",
    "not-before-policy": 0,
    "session_state": "7502cf31-b210-4754-b919-07e1d8493fa3",
    "scope": "email"
}
According to OAuth 2.0 specs, the Refresh Token should not be included in the response. But apparently, Keycloak does include the refresh token anyways.
Having received an access token, the client application can then send a request to a resource server, using that access token.
I hope this tutorial was helpful to you. If you are interested to learn more about Keycloak and how to use it with other OAuth authorization flows, then have a look at other Keycloak tutorials on this site. I hope you will find them helpful as well.
Happy learning!