Spring Boot offers various methods and techniques for setting up your database. It can automatically create and initialize the database using the information in the data source. Spring Boot looks for SQL files in specific locations in your project’s classpath, such as “schema.sql” and “data.sql”. In this tutorial, you will learn how to configure your application to use these files for initialization and loading SQL scripts.
Database Initialization Flow:

Spring Boot application starts and reads the application.properties file, and from there, the configuration settings are done. For the Spring Boot application to initialize relational databases like MySql, PostgreSql we use need to define the following property in the application.properties file:
spring.datasource.initialization-mode = always
For Embedded Databases like H2, HSQL Spring Boot automatically creates the schema (Data Definition Language Script) and initializes it (Data Manipulation Language Script). By default, Spring Boot picks the schema.sql or data.sql on the startup of the application.
Note: If Hibernate or JPA is being used for handling data entities in the database, set the spring.jpa.hibernate.ddl-auto value to none.
Demonstration
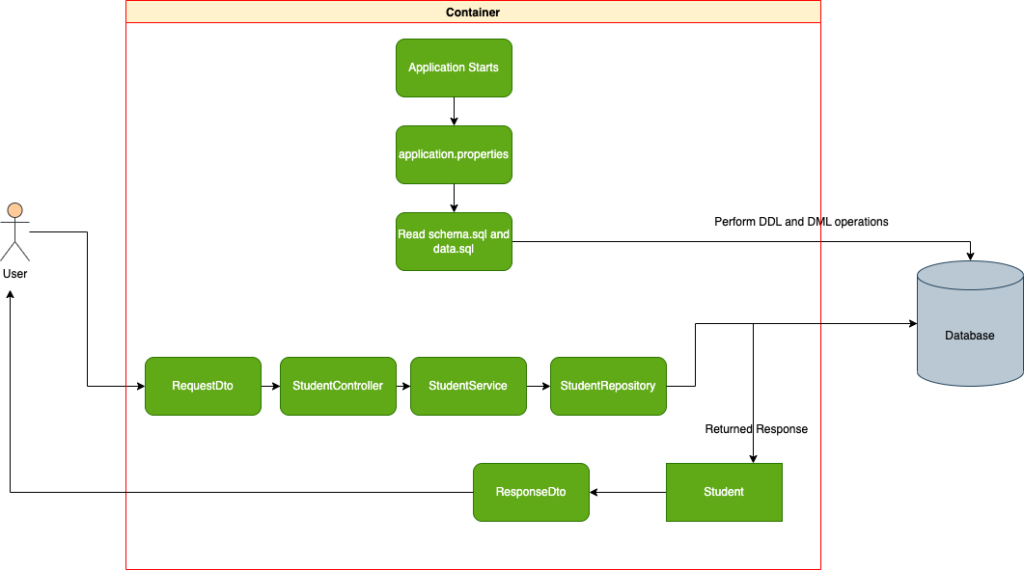
Let’s use a demonstration project where the database is set up. The project works like this: when the Spring Boot application starts, it reads the settings from the application.properties file. In this file, the database initialization setting is configured, and the schema.sql and data.sql scripts are run.
Here is a diagram of the project flow and the parts of the code that are relevant:
- Following is the configuration setting of the project written in the application.properties file, all the database connection-related settings, and ORM settings are configured.
server.port = 8080
spring.application.name = databaseinitialization
spring.datasource.username = root
spring.datasource.password =
spring.jpa.show-sql = true
spring.jpa.hibernate.dialect = org.hibernate.dialect.SQLServer2012Dialect
spring.jpa.defer-datasource-initialization = true
spring.batch.initialize-schema = always

spring.datasource.url = jdbc:mysql://localhost:3306/studentdb
spring.sql.init.mode = always
spring.datasource.initialization-mode = always
spring.jpa.hibernate.ddl-auto = none
- The Student is an entity that is interlinked with the database and will be inserted or retrieved from the database according to the desired operation performed by the client.
package com.tutorial.databaseinitialize.model;

import jakarta.persistence.*;
import lombok.AllArgsConstructor;
import lombok.Data;
import lombok.NoArgsConstructor;

import java.time.LocalDateTime;

@Entity
@AllArgsConstructor
@NoArgsConstructor
@Data
public class Student {
    @Id
    @GeneratedValue(strategy=GenerationType.IDENTITY)
    @Column(name = "id")
    private Long id;
    @Column(name = "student_name")
    private String name;
    @Column(name = "email")
    private String email;
    @Column(name = "created_time")
    private LocalDateTime createdTime;
}
- The DTOs are the objects which are used to carry information between the database and the client. The Entity is kept private so that transparency can be maintained to secure the application.
package com.tutorial.databaseinitialize.dto;

import lombok.AllArgsConstructor;
import lombok.Data;
import lombok.NoArgsConstructor;

@Data
@AllArgsConstructor
@NoArgsConstructor
public class StudentRequestDto {
    private String name;
    private String email;
}
package com.tutorial.databaseinitialize.dto;

import lombok.AllArgsConstructor;
import lombok.Data;
import lombok.NoArgsConstructor;

import java.time.LocalDateTime;

@Data
@AllArgsConstructor
@NoArgsConstructor
public class StudentResponseDto {
    private String name;
    private String email;
    private LocalDateTime createdTime;
}
- The controller is the way the client interacts with the application.
package com.tutorial.databaseinitialize.controller;


import com.tutorial.databaseinitialize.dto.StudentRequestDto;
import com.tutorial.databaseinitialize.dto.StudentResponseDto;
import com.tutorial.databaseinitialize.service.StudentService;
import org.springframework.beans.factory.annotation.Autowired;
import org.springframework.http.ResponseEntity;
import org.springframework.web.bind.annotation.*;

@RestController
@RequestMapping("api/v1/student")
public class StudentController {

    @Autowired
    public StudentService service;
    @PostMapping
    public StudentResponseDto addStudent(@RequestBody StudentRequestDto studentRequestDto){
       return service.addStudent(studentRequestDto);
    }

    @GetMapping
    public StudentResponseDto getStudent(@RequestParam Long id){
        return service.findStudent(id);
    }

    @DeleteMapping
    public ResponseEntity<String> deleteStudent(@RequestParam Long id){
         service.deleteStudent(id);
         return ResponseEntity.ok("Deleted Student");
    }
}
- The StudentRepository creates an abstraction between the data access layer and the business logic layer of the application. It is used inside of the StudentServiceImpl to perform the desired operations on the data stored inside of the database.
package com.tutorial.databaseinitialize.repository;

import com.tutorial.databaseinitialize.model.Student;
import org.springframework.data.jpa.repository.JpaRepository;
import org.springframework.stereotype.Repository;

@Repository
public interface StudentRepository extends JpaRepository<Student, Long> {
}
- The StudentService layer contains all the business logic of the application.
package com.tutorial.databaseinitialize.service;

import com.tutorial.databaseinitialize.dto.StudentRequestDto;
import com.tutorial.databaseinitialize.dto.StudentResponseDto;

public interface StudentService {
    StudentResponseDto findStudent(Long id);

    String deleteStudent(Long id);

    StudentResponseDto addStudent(StudentRequestDto studentRequestDto);

}
package com.tutorial.databaseinitialize.service;

import com.tutorial.databaseinitialize.dto.StudentRequestDto;
import com.tutorial.databaseinitialize.dto.StudentResponseDto;
import com.tutorial.databaseinitialize.model.Student;
import com.tutorial.databaseinitialize.repository.StudentRepository;
import com.tutorial.databaseinitialize.util.ConversionUtil;
import lombok.extern.slf4j.Slf4j;
import org.springframework.beans.factory.annotation.Autowired;
import org.springframework.stereotype.Service;


import java.time.LocalDateTime;
import java.util.Objects;

@Service
@Slf4j
public class StudentServiceImpl implements StudentService {

    @Autowired
    public StudentRepository studentRepository;
    @Autowired
    public ConversionUtil conversionUtil;

    @Override
    public StudentResponseDto findStudent(Long id) {
        LocalDateTime now = LocalDateTime.now();
        log.info("Entering into StudentService of method findStudent at: %s", now);
        Student response = studentRepository.findById(id).get();
        StudentResponseDto studentResponseDto = new StudentResponseDto(response.getName(), response.getEmail(), response.getCreatedTime());
        return studentResponseDto;
    }

    @Override
    public String deleteStudent(Long id) {
        LocalDateTime now = LocalDateTime.now();
        log.info("Entering into StudentService of method deleteStudent at: %s", now);
        StudentResponseDto studentResponseDto =  conversionUtil.mapItem(studentRepository.findById(id), StudentResponseDto.class);
        if(Objects.nonNull(studentResponseDto)){
            studentRepository.deleteById(id);
            return "Deleted";
        }
        return "No Student Found with the id" + id;
    }

    @Override
    public StudentResponseDto addStudent(StudentRequestDto studentRequestDto) {
        LocalDateTime now = LocalDateTime.now();
        log.info("Entering into StudentService of method deleteStudent at: %s", now);
        Student student = conversionUtil.mapItem(studentRequestDto,Student.class);
        student.setCreatedTime(now);
        StudentResponseDto responseDto = conversionUtil.mapItem(studentRepository.save(student), StudentResponseDto.class);
        return responseDto;
    }
}
- The ConversionUtil class is a utility class that uses the ModelMapper dependency to convert the Entity to Dto and vice versa. It has two methods one converts the list to another desired type of list, and the other converts the single entity only.
package com.tutorial.databaseinitialize.util;

import org.modelmapper.ModelMapper;
import org.springframework.context.annotation.Bean;
import org.springframework.stereotype.Component;

import java.util.List;
import java.util.stream.Collectors;

@Component
public class ConversionUtil {

    @Bean
    public ModelMapper modelMapper() {
        return new ModelMapper();
    }

    public <T,D> D mapItem(T item,Class<D> cl){
        return modelMapper().map(item,cl);
    }
    public <T,D> List<D> map(List<T> list, Class<D> cl){
        return list.stream()
                .map(item -> modelMapper().map(item, cl))
                .collect(Collectors.toList());
    }
}
- The schema.sql (DDL) contains the script inside of the resource file which gets executed at the start of an application.
CREATE TABLE students (
    id   INTEGER      NOT NULL AUTO_INCREMENT,
    name VARCHAR(128) NOT NULL,
    email VARCHAR(128) NOT NULL,
    created_time DATETIME DEFAULT CURRENT_TIMESTAMP,
    PRIMARY KEY (id)
);
- The data.sql (DML) contains the script inside of the resource file which gets executed at the start of an application.
INSERT INTO students (id, name, email, created_time) VALUES (1, 'Segera', '[email protected]', now());
INSERT INTO students (id, name, email, created_time) VALUES (2, 'Ibrahim Alvi', '[email protected]', now());
Custom Name Scripts:
“By default, Spring Boot automatically looks for the ‘schema.sql’ or ‘data.sql’ file to initialize the database. However, if you have different names for your DML or DDL scripts, like ‘schema-dump.sql’, you need to specify the script name in the configuration settings using ‘spring.datasource.schema‘ or ‘spring.datasource.data‘.”
spring.datasource.initialization-mode = always
spring.datasource.schema = classpath:schema-dump.sql
Integration Testing with Data Loading
Different annotations can be used to load the data at the test level. These annotations can be of class level or method level. Let’s look at the different annotations available for the Integration Testing with Data Loading:
1. @Sql
Spring framework provides a declarative way to initialize and populate test schema using annotation @Sql. Let’s see how to load the data on the test and create a new table with the initial data:
@Sql({"/student_schema.sql")
public class SpringBootInitialLoadIntegrationTest {

    @Autowired
    private StudentRepository studentRepository;

    @Test
    public void testLoadDataForTestClass() {
        assertEquals(2, studentRepository.findAll().size());
    }
}
@Sql annotation can be used at the class level or at the method level to load the data:
@Test
@Sql({"/import_student_dump.sql"})
public void testLoadDataForTestCase() {
    assertEquals(2, studentRepository.findAll().size());
}
Using @Sql annotation, we can declare multiple inline SQL statements.
@SpringBootTest
@Sql(statements = {
    "truncate table student;",
    "insert into `student` values (1, 'Serega', '[email protected]', now());",
    "insert into `student` values (2, 'Ibrahim Alvi', '[email protected]', now());"
    }
)
public class Student_Test extends BaseTest {
  @Autowired
  private StudentRepository studentRepository;
  @Test
  void getStudentTest() {
    Student created = studentRepository.findById(Long.valueOf(2)).get();
    assertTrue(created.getName().equals("Ibrahim Alvi"));
  }
}
2. @SqlConfig
@SqlConfig lets you define metadata that determines to parse and execute the SQL script configured by using the @SqlConfig annotation. @SqlConfigcan be used at the class level, which serves as a global configuration. Or, in the other place, we can use it to configure a particular @Sql annotation. Now let’s look at an example where we specify the transaction mode for executing the scripts along with the encoding of our SQL scripts as well :
@Test
@Sql(scripts = {"/import_student_dump.sql"},
  config = @SqlConfig(encoding = "utf-8", transactionMode = TransactionMode.ISOLATED))
public void testLoadDataForTestCase() {
    assertEquals(2, studentRepository.findAll().size());
}
3. @SqlGroup
Java 8 and above allow the use of custom composed repeated annotations. @SqlGroup annotation can also be used to group @Sql annotations with different configurations.
@SqlGroup({
  @Sql(scripts = "/students_dump_schema.sql",
    config = @SqlConfig(transactionMode = TransactionMode.ISOLATED)),
  @Sql("/student_dump.sql")})
public class StudentTestSqlGroupAnnotation {

    @Autowired
    private StudentRepository studentRepository;

    @Test
    public void testLoadDataForTestCase() {
        assertEquals(2, studentRepository.findAll().size());
    }
}
Final Words:
In summary, this tutorial discussed how to set up database initialization and load convention-named scripts such as data.sql, schema.sql, and custom-named SQL scripts. Additionally, it covered how to perform integration testing using the @Sql annotation while loading scripts.:
- Spring Boot loads the default named scripts data.sql and chema.sql automatically from the resource file for the embedded databases.
- When the project is created with multiple databases, create the script by using the platform name as a suffix like schema-h2.sql, data-h2.sql, etc., and then use spring.datasource.platform=h2 to load scripts for the H2 platform.
- For SQL scripts having customized names use spring.datasource.schema = classpath:customizename.sql, etc.
- While using the Relational Databases, you have to set spring.datasource.initialization-mode=always to load schema.sql and data.sql.
- For Integration Testing, use @SqlGroup, and @Sql annotations to load scripts to initialize the data.
I hope this tutorial was very helpful to you. To learn more, check out Spring Boot and Unit Testing tutorials for beginners.