In this tutorial, you will learn how to get an access token from the Keycloak authorization server using the OAuth Authorization Code Grant flow. You should use this authorization flow only if your application support redirects. For example, if your application is a Web application or a mobile application, then this authorization grant flow is a recommended one to use.
For video lessons on how to secure your Spring Boot application with OAuth 2.0. and Spring Security 5, please checkout my complete video course OAuth 2.0. in Spring Boot applications.
To follow this tutorial, you will need to have the Keycloak server running, a Keycloak Realm, and at least one user created. If you do not have Keycloak server running yet or did not create a user, please follow these two tutorials:
If you are interested to learn how to implement the OAuth Password Grant flow, please follow the below tutorial:
Enable the Authorization Code Flow
To be able to use the OAuth Authorization Code Grant Flow, you will need to enable it in the Keycloak admin panel for the OAuth Client.
- Login to Keycloak Administration Console,
- Switch to use the needed Realm,
- Follow the steps below to enable the OAuth Authorization Code Grant Flow.
For this tutorial, I have created a new OAuth Client called “photo-app-code-flow-client” in my custom Realm called “Appsdeveloperblog“.
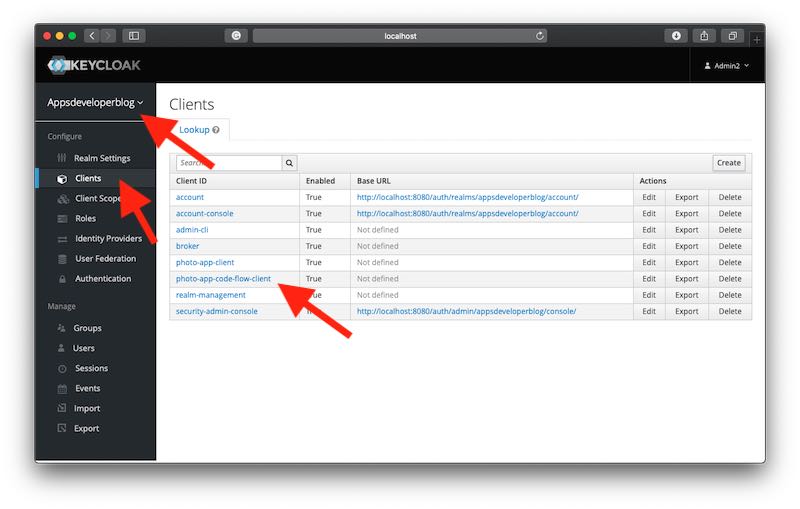
Open the OAuth client for which you would like to enable the Authorization Code Grant flow and turn on the “Standard Flow Enabled” option as it is shown in the image below.
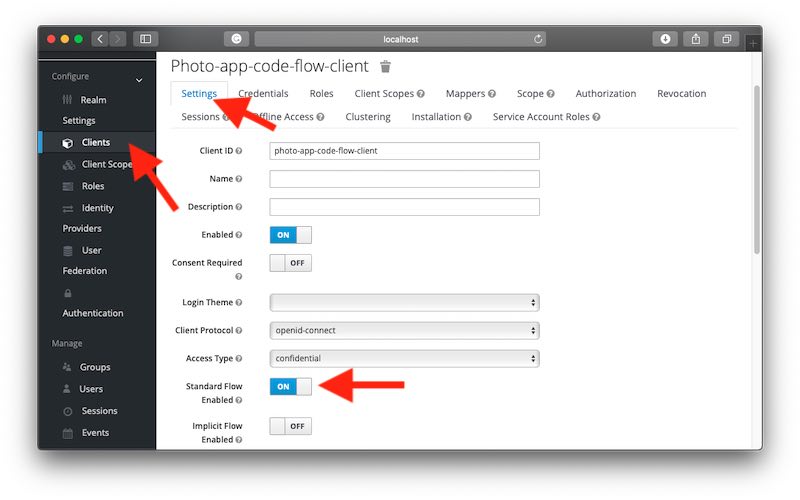
Once the Standard Flow is enabled for the OAuth Client, you can use this client to request the OAuth Authorization code.
Requesting OAuth Authorization Code
Before sending a request for an OAuth Authorization code, make sure that the Keycloak server is running.
Below is an example of a request URL that you can open in the browser windows to request an OAuth Authorization Code. Replace the parameter values with the ones relevant to your project.
Request
http://localhost:8080/auth/realms/appsdeveloperblog/protocol/openid-connect/auth
?client_id=photo-app-code-flow-client
&response_type=code
&state=fj8o3n7bdy1op5
Where:
- http://localhost:8080 – is the domain and the port number on which the Keycloak server is running,
- appsdeveloperblog – is a Realm name I have created in Keycloak for my project. In your case, the Realm name will be different. If you need to learn how to create a new Realm and a new user, please follow this tutorial: “Keycloak: Creating a New User“,
- photo-app-code-flow-client – is an OAuth client_id. You create OAuth clients in the Keycloak server. The client_id is a required parameter for the OAuth Code Grant flow,
- code – is a response_type (OAuth Response Type). This value must be “code” for the OAuth Code Grant flow to work. If you provide a different value here, the request will not work. The response_type is a required parameter in OAuth Code Grant flow,
- fj8o3n7bdy1op5 – is a RECOMMENDED, opaque value used by the client to maintain state between the request and callback. You will need to generate this random alphanumeric string of characters and include them in the request. The authorization server includes this value when redirecting the user-agent back to the client. The parameter SHOULD be used for preventing cross-site request forgery. The page that handles the response from the authorization server will need to read this value and compare it to the original one that was sent with this request. The two values must match.
Response
In the case of a successful request, the authorization server will generate the authorization code and will redirect the client application to a Redirect URI configured in the Keycloak server for this OAuth client.
http://localhost:8081/callback
?state=fj8o3n7bdy1op5
&session_state=f109bb89-cd34-4374-b084-c3c1cf2c8a0b
&code=0aaca7b5-a314-4c07-8212-818cb4b7e8d0.f109bb89-cd34-4374-b084-c3c1cf2c8a0b.1dc15d06-d8b9-4f0f-a042-727eaa6b98f7
Optional Request Parameters
A request for an authorization code can include other optional parameters:
- scope – OPTIONAL. The scope of the access request,
- redirect_uri – OPTIONAL. After completing its interaction with the resource owner, the authorization server directs the resource owner’s user-agent back to the client. The authorization server redirects the user-agent to the client’s redirection endpoint previously established with the authorization server during the client registration process or when making the authorization request. You will configure the redirect_uri when creating a new OAuth Client in the Keycloak authorization server. If you include this request parameter in the request, then its value must match the one configured in the Keycloak authorization server. Otherwise, an error will take place.
Below is a Request URL that contains all required, recommended, and optional request parameters you can use in the request for an OAuth Authorization Code.
http://localhost:8080/auth/realms/appsdeveloperblog/protocol/openid-connect/auth
?client_id=photo-app-code-flow-client
&response_type=code
&scope=profile
&redirect_uri=http://localhost:8081/callback&
state=fj8o3n7bdy1op5
Exchanging Authorization Code for Access Token
Once you have the Authorization Code, you are ready to exchange it for an access token. Below is an example of a curl command you can use to exchange an authorization code for an access token. Replace the request parameter values with the ones relevant to your project.
Request
curl --location --request POST 'http://localhost:8080/auth/realms/appsdeveloperblog/protocol/openid-connect/token' \
--header 'Content-Type: application/x-www-form-urlencoded' \
--data-urlencode 'grant_type=authorization_code' \
--data-urlencode 'client_id=photo-app-code-flow-client' \
--data-urlencode 'client_secret=3424193f-4728-4d19-8517-d450d7c6f2f5' \
--data-urlencode 'code=c081f6ca-ae87-40b6-8138-5afd4162d181.f109bb89-cd34-4374-b084-c3c1cf2c8a0b.1dc15d06-d8b9-4f0f-a042-727eaa6b98f7' \
--data-urlencode 'redirect_uri=http://localhost:8081/callback'
Where:
- http://localhost:8081/callback – is a redirect_uri which is REQUIRED, if the redirect_uri parameter was included in the authorization request to acquire the Authorization Code,
- authorization_code – is a REQUIRED grant_type parameter which value must be “authorization_code”. If you provide a different value here, the request will not be successful.
- The value of a code request parameter must be an OAuth Authorization Code that was received from an authorization server. It is this value we are exchanging for an access token.
Response
In case of a successful request, below is an example of a response that contains an access token and a refresh token.
{
    "access_token": "eyJhbGciOiJSUzI1NiIsInR5cCIgOiAiSldUIiwia2lkIiA6ICItNUlsX2I0cUktdWFvaEI3d244UHY3WEM2UEktU3BNbmZCRnlJZUx6QTJNIn0.eyJleHAiOjE1OTIzNDM5NDEsImlhdCI6MTU5MjM0MzY0MSwiYXV0aF90aW1lIjoxNTkyMzQwODA1LCJqdGkiOiJlYjlhNTc2NS1jYmVhLTQ2ZWMtYTk4NS0wOWFkYTM5NTk5YjIiLCJpc3MiOiJodHRwOi8vbG9jYWxob3N0OjgwODAvYXV0aC9yZWFsbXMvYXBwc2RldmVsb3BlcmJsb2ciLCJzdWIiOiIxZGRlM2ZjMy1jNmRiLTQ5ZmItOWIzZC03OTY0YzVjMDY4N2EiLCJ0eXAiOiJCZWFyZXIiLCJhenAiOiJwaG90by1hcHAtY29kZS1mbG93LWNsaWVudCIsInNlc3Npb25fc3RhdGUiOiJmMTA5YmI4OS1jZDM0LTQzNzQtYjA4NC1jM2MxY2YyYzhhMGIiLCJhY3IiOiIwIiwic2NvcGUiOiJwcm9maWxlIiwibmFtZSI6IkthcmdvcG9sb3YiLCJwcmVmZXJyZWRfdXNlcm5hbWUiOiJzZXJnZXkiLCJmYW1pbHlfbmFtZSI6IkthcmdvcG9sb3YifQ.KHCNF0Rn-I7iFosB3oEaWetRw9lhSkkP0-Ef6iW2GAZuuI-GQtZUBDAD_aEDtLTdUpvGL8MKx8Os0qbUZKJJhBhTAJyz2DycgY--ROc_vLbPtJSll-F68tHT6KgC2etbTjpz4Ira6PaLigkT80zGb6tpnQmm1o7a4IGQ40-faKC4fivdfblypGqgRnniOGXMLGpzO2Ln92w1azjFAyOCIBhe3Nlcofjupi26qNGrJKuwBudzZgZCla9RDWm2MUTqMW65AOUpOmiJCd5E4JxbwOuG6H2tbYI2Z-ajQXzzcodmCAWfWu2oRkMaAuNImph8W9tRrqCQ0wlb55tXnUvEuw",
    "expires_in": 300,
    "refresh_expires_in": 1800,
    "refresh_token": "eyJhbGciOiJIUzI1NiIsInR5cCIgOiAiSldUIiwia2lkIiA6ICJlYWQyMDZmOS05MzczLTQ1OTAtOGQ4OC03YWNkYmZjYTU5MmMifQ.eyJleHAiOjE1OTIzNDU0NDEsImlhdCI6MTU5MjM0MzY0MSwianRpIjoiOGE2NTdhMDktYTQ3My00OTAyLTk1MjItYWYxMGFkMzUwYzUyIiwiaXNzIjoiaHR0cDovL2xvY2FsaG9zdDo4MDgwL2F1dGgvcmVhbG1zL2FwcHNkZXZlbG9wZXJibG9nIiwiYXVkIjoiaHR0cDovL2xvY2FsaG9zdDo4MDgwL2F1dGgvcmVhbG1zL2FwcHNkZXZlbG9wZXJibG9nIiwic3ViIjoiMWRkZTNmYzMtYzZkYi00OWZiLTliM2QtNzk2NGM1YzA2ODdhIiwidHlwIjoiUmVmcmVzaCIsImF6cCI6InBob3RvLWFwcC1jb2RlLWZsb3ctY2xpZW50Iiwic2Vzc2lvbl9zdGF0ZSI6ImYxMDliYjg5LWNkMzQtNDM3NC1iMDg0LWMzYzFjZjJjOGEwYiIsInNjb3BlIjoicHJvZmlsZSJ9.WevUHYd7DV3Ft7mFJnM2iLlArotBvLlMfQxlcy0nig8",
    "token_type": "bearer",
    "not-before-policy": 0,
    "session_state": "f109bb89-cd34-4374-b084-c3c1cf2c8a0b",
    "scope": "profile"
}
I hope this tutorial was helpful to you. Have a look at other OAuth and Keycloak tutorials on this site and hopefully you will discover other helpful ones.