In this tutorial, you will learn how to enable OpenAPI(Swagger) in your Spring Boot version 3 application.
What is OpenAPI?
OpenAPI (formerly known as Swagger) is a specification for building and documenting RESTful APIs. It allows developers to describe their API operations, inputs, outputs, and other aspects in a structured and machine-readable format. This documentation can then be used by developers and users to understand and interact with the API.
In Spring Boot applications, OpenAPI can be used to automatically generate documentation for your REST APIs. By using annotations provided by libraries like Springdoc OpenAPI, you can document your APIs in a way that can be easily parsed and displayed by the OpenAPI specification.
1. Add OpenAPI Maven Dependency
To enable the generation of API documentation, we need to add a springdoc-openapi-starter-webmvc-ui dependency to our Spring Boot project.
You can check out the latest version through this mvnrepository link https://mvnrepository.com/artifact/org.springdoc/springdoc-openapi-ui.
Maven dependency
<!-- https://mvnrepository.com/artifact/org.springdoc/springdoc-openapi-starter-webmvc-ui -->
<dependency>
    <groupId>org.springdoc</groupId>
    <artifactId>springdoc-openapi-starter-webmvc-ui</artifactId>
    <version>2.0.2</version>
</dependency>
Gradle dependency
// https://mvnrepository.com/artifact/org.springdoc/springdoc-openapi-starter-webmvc-ui
implementation group: 'org.springdoc', name: 'springdoc-openapi-starter-webmvc-ui', version: '2.0.2'
This will enable swagger-ui and many features in your Spring Boot application without any additional configuration.
2. Create OpenAPI Configuration File
import org.springframework.context.annotation.Bean;
import org.springframework.context.annotation.Configuration;

import io.swagger.v3.oas.models.OpenAPI;
import io.swagger.v3.oas.models.info.Info;

@Configuration
public class OpenApiConfig {

    @Bean
    public OpenAPI usersMicroserviceOpenAPI() {
        return new OpenAPI()
                .info(new Info().title("Your API Title")
                                 .description("Your API Description")
                                 .version("1.0"));
    }
}
The code above is a configuration class that sets up OpenAPI (formerly known as Swagger) documentation for your Spring Boot 3 application.
- The
@Configurationannotation on theOpenApiConfigclass tells Spring to treat this class as a configuration class, which means that it will be used to configure various aspects of your application. - The
@Beanannotation on theusersMicroserviceOpenAPI()method indicates that this method will return an instance of theOpenAPIobject, which is used to define the OpenAPI documentation for your application. - The
new OpenAPI()statement creates a new instance of theOpenAPIclass, which is the main class used for setting up OpenAPI documentation. - The
.info(new Info().title("Your API Title").description("Your API Description").version("1.0"))method chain sets the basic information about your API, including its title, description, and version.
You can customize this information as needed to describe your specific API.
3. Open API Configuration Properties for Spring Boot 3
In a Spring Boot 3 application that uses OpenAPI, the following configuration properties are used to specify the path and enable/disable the Swagger UI.
# Specify the path of the OpenAPI documentation
springdoc.api-docs.path=/api-docs

# Specify the path of the Swagger UI
springdoc.swagger-ui.path=/swagger-ui.html

# Enable or disable Swagger UI
springdoc.swagger-ui.enabled=true
springdoc.api-docs.path=/api-docs: This property specifies the URL path for the OpenAPI documentation generated by Springdoc OpenAPI. By default, the OpenAPI documentation will be available athttp://<hostname>:<port>/<context-path>/api-docs.springdoc.swagger-ui.path=/swagger-ui.html: This property specifies the URL path for the Swagger UI. The Swagger UI is a web-based UI for interacting with your API documentation, and it is generated automatically by Springdoc OpenAPI. By default, the Swagger UI will be available athttp://<hostname>:<port>/<context-path>/swagger-ui.html.springdoc.swagger-ui.enabled=true: This property enables or disables the Swagger UI. By default, the Swagger UI is enabled and can be accessed at the URL specified byspringdoc.swagger-ui.path.
So, if you set springdoc.swagger-ui.enabled=false, then the Swagger UI will be disabled, and users will not be able to access it. This can be useful if you don’t want to expose the Swagger UI in your production environment.
4. Create a simple Rest Controller class
Let’s create a simple UsersController class.
import org.springframework.web.bind.annotation.GetMapping;
import org.springframework.web.bind.annotation.RequestMapping;
import org.springframework.web.bind.annotation.RestController;

@RestController
@RequestMapping("/users")
public class UsersController {

    @GetMapping("/status")
    public String statusCheck() {
        return "Working...";
    }
}
The code above sets up a REST endpoint in a Spring Boot application that can be accessed via a web browser or HTTP client. Here’s what’s going on in the code:
@RestController: This is a Spring annotation that indicates that theUsersControllerclass is a REST controller. REST controllers are responsible for handling incoming HTTP requests and returning HTTP responses.@RequestMapping("/users"): This annotation specifies the base URL path for all requests handled by this controller. In this case, all requests handled by theUsersControllerwill have a URL that starts with/users.public class UsersController { ... }: This is the main controller class that contains the methods responsible for handling HTTP requests.@GetMapping("/status"): This annotation specifies that this method will handle HTTP GET requests to the/users/statusURL path. Read the following tutorial to learn more about request mapping annotations.public String statusCheck() { ... }: This is the method that handles the HTTP GET request. It simply returns the string"Working..."as the response body.
When a user makes a GET request to the /users/status URL path, the statusCheck() method will be invoked, and the string "Working..." will be returned as the response body.
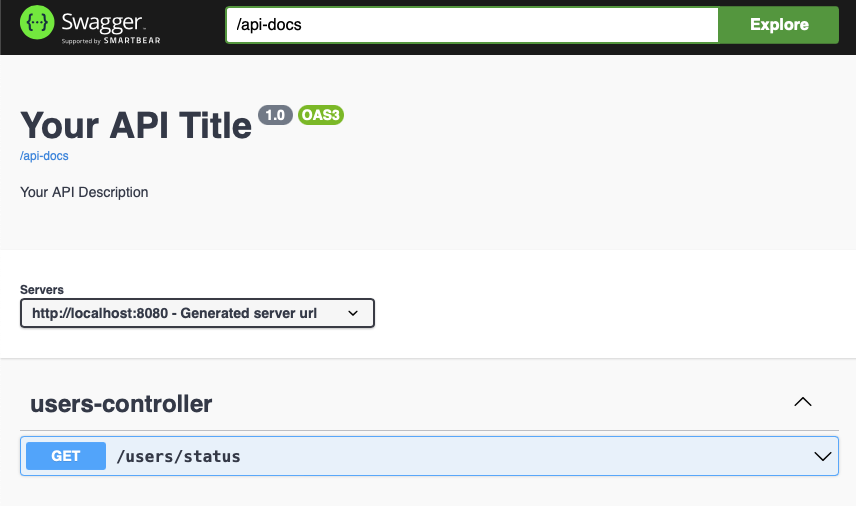
5. Open Swagger UI
Before you can open the OpenAPI documentation for your application, you need to build and run your Spring Boot application.
Once your application is up and running, open the following URL in the browser window.
http://localhost:8080/swagger-ui/index.html
Conclusion
I hope this tutorial was helpful to you. It demonstrates how to enable OpenAPI documentation for your Spring Boot application and how to view this documentation in Swagger UI. The springdoc-openapi is a powerful library to get your REST API documented.
Check out other OpenAPI-related tutorials to learn more about how to document your REST API endpoints.