This tutorial will guide you through the process of internationalizing your app, which is essential if you want to make your app available in multiple countries. Unlike frameworks such as native Android, Flutter does not have a fixed approach to localization. It offers a lot of flexibility, which can be beneficial if you have experience, but it can also be confusing if you are just starting out. In this tutorial, we will show you how to easily localize your app using JSON files to store strings in multiple languages. To achieve this, we will follow the steps below:
-
- Create a new Flutter App,
- Prepare the project,
- Update “pubspec.yaml” file,
- Localize material app,
- Working with the custom strings,
- Translate the UI.
Before we start here are two qustions that you might want to know the answer to:
What is Internationalization in Flutter?
Internationalization, often abbreviated as i18n, is the process of designing and developing software applications that can be adapted to different languages and cultures. In the context of Flutter, internationalization involves creating user interfaces and displaying text that are appropriate for the user’s preferred language and locale.
Flutter provides built-in support for internationalization through the intl package. This package contains classes and functions that make it easy to format and display dates, times, numbers, and currencies in different formats, as well as to localize strings and handle plurals.
Internationalization vs Localization in Flutter?
Internationalization (i18n) and localization (l10n) are related but distinct concepts in Flutter. Internationalization involves designing and developing apps that can be adapted to different languages and cultures. Localization involves actually translating the app’s user interface and other content into the target language and adapting it to the local culture.
In Flutter, internationalization is typically achieved through the intl package, which provides tools for formatting numbers, dates, times, and currencies in different locales, as well as handling plurals and selecting the appropriate localized text. Localization, on the other hand, involves translating the app’s content and adapting it to the target culture using tools such as the flutter_localizations package.
In summary, internationalization is the process of designing for localization, while localization is the actual process of translating and adapting an app to a specific locale.
1. Create a New Flutter Project
Go ahead and create a new Flutter app. If you don’t know how to create a project you can refer to the “Hello World App in Flutter” tutorial. For this tutorial, we will use the initial app that Flutter creates by default.
2. Prepare the project
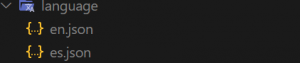
To access the JSON files with translated strings in your Dart code, you need to create these files and update the “pubspec.yaml” file first. Create a folder called “language” in the project root and place all the language files inside. For example, we can create “en.json” for English and “es.json” for Spanish. Once you have these files in place, you can start writing Dart code to use them in your app.
JSON files for localization contain simple key-value pairs of strings. Using JSON for localization is beneficial because it’s similar to XML, and it allows you to easily give the files to a translator without them needing to access your code. This makes the localization process more efficient and less error-prone.
Here is the code for en.json:
{
  "first_string": "Hello World!",
  "second_string": "I hope this tutorial helps you"
}
Here is the code for es.json:
{
 "first_string": "Hola Mundo!",
"second_string": "Espero que este tutorial te ayude."
}
3. Update “pubspec.yaml” file
Localization requires a dependency that comes directly from the Flutter SDK. Also, since we’ve just added new language JSON files, you need to specify them as assets in order to access them in code.
dependencies:
  flutter:
    sdk: flutter

  flutter_localizations:
    sdk: flutter

  assets:
   - language/en.json
   - language/es.json
4. Localize material app
To set up localization in a Flutter app, you need to modify the “MaterialApp” widget, which serves as the root of the app. Within this widget, you can specify which languages your app supports and what should happen if the user’s current language is not supported. This allows your app to provide a localized experience for users across different languages and regions.
import 'package:flutter/material.dart';
import 'package:flutter_localizations/flutter_localizations.dart';

import 'app_localizations.dart';

void main() => runApp(MyApp());

class MyApp extends StatelessWidget {
  @override
  Widget build(BuildContext context) {
    return MaterialApp(
      title: 'Flutter Demo',
      theme: ThemeData(
        primarySwatch: Colors.blue,
      ),

      supportedLocales: [
        Locale('en', 'US'),
        Locale('es', 'ES'),
      ],

      localizationsDelegates: [
        AppLocalizations.delegate,
        // Built-in localization of basic text for Material widgets
        GlobalMaterialLocalizations.delegate,
        // Built-in localization for text direction LTR/RTL
        GlobalWidgetsLocalizations.delegate,
      ],
      // Returns a locale which will be used by the app
      localeResolutionCallback: (locale, supportedLocales) {
        // Check if the current device locale is supported
        for (var supportedLocale in supportedLocales) {
          if (supportedLocale.languageCode == locale.languageCode &&
              supportedLocale.countryCode == locale.countryCode) {
            return supportedLocale;
          }
        }
        // If the locale of the device is not supported, use the first one
        // from the list (English, in this case).
        return supportedLocales.first;
      },
      home: MyHomePage(),
    );
  }
}
The “localizationDelegates” list may seem daunting in the code above, but it is essential for loading specific languages. A “LocalizationsDelegate” object is responsible for handling language-specific tasks. In addition to the “AppLocalizations” you will create, you can also include predefined material and widgets localizations.
Widgets in the material package often have built-in text, such as a “cancel” button in an alert dialog. These strings are already localized by Flutter, so you only need to specify the delegate.
5. Working with the custom strings
Similar to how there are “GlobalMaterialLocalizations”, you want to have localizations specific to your app, hence the class name “AppLocalizations”. Its most important method will be the translate() method. You can then call the translate() method throughout your UI widgets to specify localized strings.
Create a new file “app_localizations.dart” under the lib folder. First, create a class “AppLocalizations” which will have two methods – load() for loading the JSON into an in-memory Map<String, String>, and translate() for accessing the map of translated strings.
Here is the code for the file:
import 'dart:async';
import 'dart:convert';

import 'package:flutter/material.dart';
import 'package:flutter/services.dart';

class AppLocalizations {
  final Locale locale;

  AppLocalizations(this.locale);

  // Helper method to keep the code in the widgets concise
  // Localizations are accessed using an InheritedWidget "of" syntax
  static AppLocalizations of(BuildContext context) {
    return Localizations.of<AppLocalizations>(context, AppLocalizations);
  }

  Map<String, String> _localizedStrings;

  Future<bool> load() async {
    // Load the language JSON file from the "language" folder
    String jsonString =
        await rootBundle.loadString('language/${locale.languageCode}.json');
    Map<String, dynamic> jsonMap = json.decode(jsonString);

    _localizedStrings = jsonMap.map((key, value) {
      return MapEntry(key, value.toString());
    });

    return true;
  }

  // This method will be called from every widget which needs a localized text
  String translate(String key) {
    return _localizedStrings[key];
  }
}
The code above contains the essential logic for implementing localization in a Flutter app. However, to ensure that the app can determine when to call the “load()” method and which locale to use, you need to set up delegates. In Flutter localization, delegates are used for this initialization process. You can create a new package-private class “_AppLocalizationsDelegate” that extends “LocalizationsDelegate”. It’s private because it does not require instantiation in any other file. You can access this delegate by creating a new static field on the “AppLocalizations” class. By doing this, the delegate can be added to the “MaterialApp” widget to load the strings and translations.
import 'dart:async';
import 'dart:convert';

import 'package:flutter/material.dart';
import 'package:flutter/services.dart';

class AppLocalizations {
  ...
  // Static member to have a simple access to the delegate from the MaterialApp
  static const LocalizationsDelegate<AppLocalizations> delegate =
      _AppLocalizationsDelegate();
  ...
}

// LocalizationsDelegate is a factory for a set of localized resources
// In this case, the localized strings will be gotten in an AppLocalizations object
class _AppLocalizationsDelegate
    extends LocalizationsDelegate<AppLocalizations> {
  // This delegate instance will never change (it doesn't even have fields!)
  // It can provide a constant constructor.
  const _AppLocalizationsDelegate();

  @override
  bool isSupported(Locale locale) {
    // Include all of your supported language codes here
    return ['en', 'sk'].contains(locale.languageCode);
  }

  @override
  Future<AppLocalizations> load(Locale locale) async {
    // AppLocalizations class is where the JSON loading actually runs
    AppLocalizations localizations = new AppLocalizations(locale);
    await localizations.load();
    return localizations;
  }

  @override
  bool shouldReload(_AppLocalizationsDelegate old) => false;
}
6. Translate the UI
Once you have all of this setup done just call the “of()” helper static method on “AppLocalizations()” to get the instance properly set up by Flutter and then translate your content using the keys you’ve specified in the JSON files.
Here is the “main.dart” code:
import 'package:flutter/material.dart';
import 'package:flutter_localizations/flutter_localizations.dart';
import 'app_localization.dart';

void main() => runApp(MyApp());

class MyApp extends StatelessWidget {
  @override
  Widget build(BuildContext context) {
    return MaterialApp(
      title: 'Flutter Demo',
      theme: ThemeData(
        primarySwatch: Colors.blue,
      ),
      // List all of the app's supported locales here
      supportedLocales: [
        Locale('en', 'US'),
        Locale('es', 'ES'),
      ],
      // These delegates make sure that the localization data for the proper language is loaded
      localizationsDelegates: [
        // THIS CLASS WILL BE ADDED LATER
        // A class which loads the translations from JSON files
        AppLocalizations.delegate,
        // Built-in localization of basic text for Material widgets
        GlobalMaterialLocalizations.delegate,
        // Built-in localization for text direction LTR/RTL
        GlobalWidgetsLocalizations.delegate,
      ],
      // Returns a locale which will be used by the app
      localeResolutionCallback: (locale, supportedLocales) {
        // Check if the current device locale is supported
        for (var supportedLocale in supportedLocales) {
          if (supportedLocale.languageCode == locale.languageCode &&
              supportedLocale.countryCode == locale.countryCode) {
            return supportedLocale;
          }
        }
        // If the locale of the device is not supported, use the first one
        // from the list (English, in this case).
        return supportedLocales.first;
      },
      home: MyHomePage(),
    );
  }
}

class MyHomePage extends StatelessWidget {
  @override
  Widget build(BuildContext context) {
    return Scaffold(
      body: Center(
        child: Padding(
          padding: const EdgeInsets.all(8.0),
          child: Column(
            mainAxisSize: MainAxisSize.min,
            children: <Widget>[
              Text(
                AppLocalizations.of(context).translate('first_string'),
                style: TextStyle(fontSize: 25),
                textAlign: TextAlign.center,
              ),
              SizedBox(height: 10),
              Text(
                AppLocalizations.of(context).translate('second_string'),
                style: TextStyle(fontSize: 25),
                textAlign: TextAlign.center,
              ),
              SizedBox(height: 10),
              Text(
                'This will not be translated.',
                style: TextStyle(fontSize: 25),
                textAlign: TextAlign.center,
              ),
            ],
          ),
        ),
      ),
    );
  }
}
To test whether this internationalizing works on the device/emulator, try changing the device language from the settings.
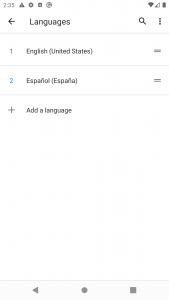
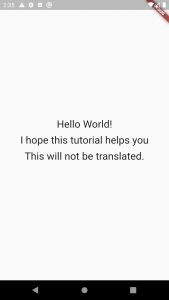
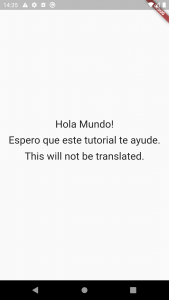
Here is the output:
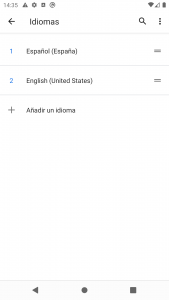
And here is what happens after changing the settings:
I hope this Flutter tutorial was helpful to you. If you are interested in learning Flutter, please check other Flutter tutorials on this site. Some of them have video tutorials included.
Frequently Asked Questions
- What is a localization delegate in Flutter?
A localization delegate is an object that helps Flutter load and manages translations for a specific locale. - How do I add a new language to my Flutter app?
To add a new language to your Flutter app, you need to create a new JSON file containing translated strings for that language, and add it to the “pubspec.yaml” file under the “assets” section. Then, update the localization delegate to include the new language. - How do I localize images and other assets in Flutter?
To localize images and other assets in Flutter, you can include them in the same folder as your language files, and use the same localization logic to load the appropriate assets for each language. - Can I test my app’s internationalization without changing my device’s language settings?
Yes, you can use the “Localizations.override” widget to test your app’s internationalization without changing your device language settings. - Can I change the language of my Flutter app at runtime?
Yes, you can change the language of your Flutter app at runtime by updating the current locale using the “Locale” class, and then rebuilding the app’s UI using the “setState” method.
Happy learning Flutter!