In this tutorial, you will learn how to create a Splash Screen in your Flutter mobile application.
What is a Splash Screen?
The splash screen is an introductory screen that displays a company’s logo or tagline. A plain white screen can make the app seem unprofessional, so it’s important to create a splash screen for your Flutter-built mobile app to make it look more polished and appealing to users. A well-designed splash screen can also improve the user experience by providing a visual cue that the app is loading and reducing perceived wait times.
Adding a splashscreen package
To add a splash screen to our Flutter mobile app, we don’t need to do much as there is a package available named “splashscreen“ which makes it a breeze. By utilizing this package, we can quickly incorporate a basic splash screen in our application with minimal effort.
To get started, we first need to open the pubspec.yaml file in our Flutter project and add the “splashscreen” package. It is vital to ensure that we add the package exactly as it is demonstrated in the example provided below. Once we have added the package, we can proceed with configuring and customizing the splash screen to our liking by adjusting the various parameters and settings available with the package. With the help of this package, we can provide our users with a visually appealing splash screen that adds an extra touch of professionalism and polish to our Flutter mobile app.
dependencies:
  flutter:
    sdk: flutter
  splashscreen: ^1.3.5

  # The following adds the Cupertino Icons font to your application.
  # Use with the CupertinoIcons class for iOS style icons.
  cupertino_icons: ^1.0.0
In the example above, I have added a “splashscreen” package of version 1.3.5. Save the pubspec.yaml file and open the main.dart file.
Customizing the Splash Screen
To make your app display the splash screen with some text and images on it, you will use the SplashScreen widget which is highly customizable. Let’s have a look at a small code snippet first and then discuss its properties.
class _MyAppState extends State<MyApp> {
  @override
  Widget build(BuildContext context) {
    return new SplashScreen(
      seconds: 14,
      navigateAfterSeconds: new AfterSplash(),
      title: new Text('Welcome In SplashScreen',
      style: new TextStyle(
        fontWeight: FontWeight.bold,
        fontSize: 20.0
      ),),
      image: new Image.network('https://i.imgur.com/TyCSG9A.png'),
      backgroundColor: Colors.white,
      styleTextUnderTheLoader: new TextStyle(),
      photoSize: 100.0,
      loaderColor: Colors.red
    );
  }
}
Above we have created a simple app that uses a SplashScreen widget with the following properties:
- seconds: for how many seconds you want to show the Splash Screen,
- navigateAfterSeconds: the widget you want to navigate after the splash screen. It is usually an app Main Screen/Home Screen,
- title: the title you want to show on splash screen,
- style: it takes TextStyle() widget for styling the title or any text in the splash screen,
- image: it takes the image/logo you want to show on a splash screen. It can be from the app’s assets folder or from the Internet,
- backgroundColor: the background color you want to give to the splash screen,
- photoSize: the size of the image/logo in pixels,
- loaderColor: the color for CircularProgressIndicator() while the Splash Screen is active or showing.
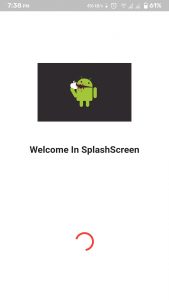
If you run the above code example in a device simulator, the app splash screen will look like the one illustrated with an image below.
 Complete Code Example
Below is a complete code example for you to run and see how it works. It will display a splash screen that we have created in this tutorial.
import 'package:flutter/material.dart';
import 'package:splashscreen/splashscreen.dart';

void main() {
  runApp(new MaterialApp(
    home: new MyApp(),
  ));
}

class MyApp extends StatefulWidget {
  @override
  _MyAppState createState() => new _MyAppState();
}

class _MyAppState extends State<MyApp> {
  @override
  Widget build(BuildContext context) {
    return new SplashScreen(
        seconds: 5,
        navigateAfterSeconds: new AfterSplash(),
        title: new Text(
          'Welcome In SplashScreen',
          style:
              new TextStyle(fontWeight: FontWeight.bold, fontSize: 20.0),
        ),
        image: new Image.network('https://i.imgur.com/TyCSG9A.png'),
        backgroundColor: Colors.white,
        styleTextUnderTheLoader: new TextStyle(),
        photoSize: 100.0,
        loaderColor: Colors.red);
  }
}

class AfterSplash extends StatelessWidget {
  @override
  Widget build(BuildContext context) {
    return new Scaffold(
      appBar: new AppBar(
          title: new Text("Welcome In SplashScreen Package"),
          automaticallyImplyLeading: false),
      body: new Center(
        child: new Text(
          "Done!",
          style:
              new TextStyle(fontWeight: FontWeight.bold, fontSize: 30.0),
        ),
      ),
    );
  }
}
I hope this Flutter tutorial was helpful for you. If you are interested in learning Flutter, please check other Flutter tutorials on this site. Some of them have video tutorials included.
Happy mobile app development with Flutter 🙂!