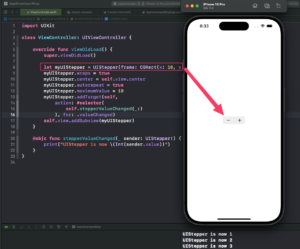
UIStepper is a control in iOS that is used to increment or decrement a numeric value.
In this tutorial, you will learn how to create a UIStepper programmatically, add it as a subview, position it in the center of the UIView, make the UIStepper value continuously increment when a user taps and holds the button, and make the UIStepper resume from the beginning when the maximum value is reached.
If you are interested in video lessons on how to write Unit tests and UI tests to test your Swift mobile app, check out this page: Unit Testing Swift Mobile App
Step 1: Initialize UIStepper
Your first will be to initialize a UIStepper object. You can specify the frame of the UIStepper, but in this case, you’ll just give it a temporary frame and adjust it later.
let myUIStepper = UIStepper(frame: CGRect(x: 10, y: 150, width: 0, height: 0))
Step 2: Set UIStepper Properties
Next, you can set the properties of the UIStepper object according to your requirements.
- To make the UIStepper value resume from the beginning when the maximum value is reached, set the
wrapsproperty totrue. - To position the UIStepper in the center of the view, set the
centerproperty toself.view.center. - To make the UIStepper value continuously increment when a user taps and holds the button, set the
autorepeatproperty totrue. - To set the maximum value of the UIStepper, assign the desired value to the
maximumValueproperty.
myUIStepper.wraps = true
myUIStepper.center = self.view.center
myUIStepper.autorepeat = true
myUIStepper.maximumValue = 10
Step 3: Add a Function Handler
To call a function when the UIStepper value changes, add a target action to it. Here, you’re calling the stepperValueChanged(_:) function whenever the .valueChanged event occurs.
myUIStepper.addTarget(self, action: #selector(self.stepperValueChanged(_:)), for: .valueChanged)
Step 4: Define the Function Handler
Next, you can define a function handler that gets called when the UIStepper value changes. In this case, the function prints the current value of the UIStepper.
@objc func stepperValueChanged(_ sender: UIStepper!) {
    print("UIStepper is now \(Int(sender.value))")
}
Step 5: Add UIStepper as a Subview
Finally, add the UIStepper as a subview to your view.
self.view.addSubview(myUIStepper)
UIStepper: Complete Code Example
Below is the complete code example using all the above code snippets together. It will create a new UIStepper programmatically, configure it with custom values and create a handler function which will be triggered when the value of UIStepper changes.
import UIKit

class ViewController: UIViewController {

    override func viewDidLoad() {
        super.viewDidLoad()

        let myUIStepper = UIStepper(frame: CGRect(x: 10, y: 150, width: 0, height: 0))
        myUIStepper.wraps = true // Make UIStepper resume from the beginning when the maximum value is reached
        myUIStepper.center = self.view.center
        myUIStepper.autorepeat = true
        myUIStepper.maximumValue = 10
        myUIStepper.addTarget(self, action: #selector(self.stepperValueChanged(_:)), for: .valueChanged)
        self.view.addSubview(myUIStepper)
    }

    @objc func stepperValueChanged(_ sender: UIStepper!) {
        print("UIStepper is now \(Int(sender.value))")
    }
}
Conclusion
I hope this tutorial was helpful to you. You now know how to create and customize UIStepper programmatically.
To learn more about Swift and to find other code examples, check the following page: Swift Code Examples.
