In this tutorial, you will learn how to create and customize UISlider programmatically in Swift.
Creating and customizing a UISlider programmatically in Swift involves several steps.
Here’s how you can do it:
Step 1: Create UISlider Programmatically
First, you need to create a UISlider programmatically. You can do this by creating a new instance of the UISlider object. This is done by specifying the frame where the slider will be located on the screen. Here’s how you can do it:
let mySlider = UISlider(frame:CGRect(x: 10, y: 100, width: 300, height: 20))
This will create a UISlider with a width of 300 and a height of 20, positioned at x=10 and y=100 on the screen.
Step 2: Position UISlider within a UIView
Next, you need to add the UISlider to our view. This can be done by calling the addSubview method on the parent view and passing the slider as the argument:
self.view.addSubview(mySlider)
This will add the slider to the main view of the current view controller.
Step 3: Set UISlider Minimum and Maximum Values
You can specify the minimum and maximum values for the slider by setting the minimumValue and maximumValue properties:
mySlider.minimumValue = 0
mySlider.maximumValue = 100
This will set the minimum value of the slider to 0 and the maximum value to 100.
Step 4: Change UISlider Tint Color
You can change the color of the slider by setting the tintColor property:
mySlider.tintColor = UIColor.green
This will change the color of the slider to green.
Step 5: Handle UISlider Value Changed Event
You can handle the event when the slider value changes by adding a target-action pair to the slider. The target is the object that will receive the action message, and the action is the selector that identifies the method to be called:
mySlider.addTarget(self, action: #selector(self.sliderValueDidChange(_:)), for: .valueChanged)
This will call the sliderValueDidChange method whenever the slider value changes.
Step 6: Make UISlider Slide Continuously
By default, the slider slides continuously.
mySlider.isContinuous = true
This will make the slider slide continuously. However, if you want to change this behaviour, you can set the isContinuous property to false:
mySlider.isContinuous = false
If you set the isContinuous property to false, the slider only sends one update event when the user releases the thumb and sets the final value. This means you will not receive any feedback or perform any actions until the user stops sliding the thumb.
Step 7: Make UISlider Move in Steps by 10 or Make UISlider Snap to Specific Values
Finally, if you want the slider to snap to specific values or move in steps, you can do so by adjusting the slider value in the sliderValueDidChange method:
@objc func sliderValueDidChange(_ sender:UISlider!)
{
    print("Slider value changed")

    // Use this code below only if you want UISlider to snap to values step by step
    let roundedStepValue = round(sender.value / step) * step
    sender.value = roundedStepValue

    print("Slider step value \(Int(roundedStepValue))")
}
This will make the slider snap to values step by step.
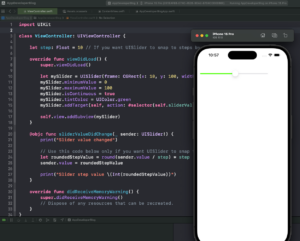
Complete Code Example
Here is the complete code example using the above code snippets together:
import UIKit

class ViewController: UIViewController {

    let step: Float = 10 // If you want UISlider to snap to steps by 10

    override func viewDidLoad() {
        super.viewDidLoad()

        let mySlider = UISlider(frame: CGRect(x: 10, y: 100, width: 300, height: 20))
        mySlider.minimumValue = 0
        mySlider.maximumValue = 100
        mySlider.isContinuous = true
        mySlider.tintColor = UIColor.green
        mySlider.addTarget(self, action: #selector(self.sliderValueDidChange(_:)), for: .valueChanged)

        self.view.addSubview(mySlider)
    }

    @objc func sliderValueDidChange(_ sender: UISlider!) {
        print("Slider value changed")

        // Use this code below only if you want UISlider to snap to values step by step
        let roundedStepValue = round(sender.value / step) * step
        sender.value = roundedStepValue

        print("Slider step value \(Int(roundedStepValue))")
    }

    override func didReceiveMemoryWarning() {
        super.didReceiveMemoryWarning()
        // Dispose of any resources that can be recreated.
    }
}
Conclusion
If you are interested in video lessons on how to write Unit tests and UI tests to test your Swift mobile app, check out this page: Unit Testing Swift Mobile App
I hope this tutorial was helpful to you. You now know how to create and customize UISlider programmatically.
To learn more about Swift and to find other code examples, check the following page: Swift Code Examples.