In this blog post, I will share the Spring annotations used to map HTTP requests to specific handler methods. These annotations include @PostMapping, @GetMapping, @PutMapping, and @DeleteMapping.
While most Spring Boot applications use the @RequestMapping annotation, which I will also cover in this post, I’ll begin with the newer shortcut annotations that have been available since Spring 4.3.
New Spring Boot REST Request Annotations
Spring Boot provides a set of new REST request annotations that simplify the process of building RESTful web services. These annotations are designed to be more specific and descriptive than the classic @RequestMapping annotation.
One key difference between the new annotations and the classic @RequestMapping annotation is that the new annotations are more concise and easier to read. They also provide more specific functionality and help to reduce the amount of boilerplate code required to build a RESTful web service.
Here are some of the new Spring Boot REST request annotations and the parameters that each of them can accept:
The @GetMapping Annotation
This annotation is used to handle HTTP GET requests. It can be translated to @RequestMapping(method = RequestMethod.GET). And it accepts the following parameters:
value: A string that specifies the URL path that this method should handle.produces: A string or an array of strings that specifies the media type(s) of the response that this method produces.params: An array of strings that specifies the request parameters that must be present for this method to be invoked.headers: An array of strings that specifies the headers that must be present for this method to be invoked.
This example shows how to use @GetMapping to handle an HTTP GET request for retrieving a user by ID. The value parameter specifies the URL path, and the @PathVariable annotation is used to extract the user ID from the URL path.
@GetMapping("/users/{userId}")
public User getUserById(@PathVariable Long userId) {
    return userService.getUserById(userId);
}
The @PostMapping Annotation
This annotation is used to handle HTTP POST requests. It can be translated to @RequestMapping(method = RequestMethod.POST). And it accepts the following parameters:
value: A string that specifies the URL path that this method should handle.consumes: A string or an array of strings that specifies the media type(s) of the request body that this method consumes.produces: A string or an array of strings that specifies the media type(s) of the response that this method produces.params: An array of strings that specifies the request parameters that must be present for this method to be invoked.headers: An array of strings that specifies the headers that must be present for this method to be invoked.
Consider the following example where I show you how to use @PostMapping to handle an HTTP POST request for creating a new user. The value parameter specifies the URL path, and the @RequestBody annotation is used to extract the user object from the request body. The ResponseEntity is used to return a 201 Created status code and the location of the newly created user in the response header.
@PostMapping("/users")
public ResponseEntity<User> createUser(@RequestBody User user) {
    User savedUser = userService.createUser(user);
    return ResponseEntity.created(URI.create("/users/" + savedUser.getId())).body(savedUser);
}
The @PutMapping Annotation
This annotation is used to handle HTTP PUT requests. It can be translated to @RequestMapping(method = RequestMethod.PUT). And it accepts the same parameters as @PostMapping.
This example shows how to use @PutMapping to handle an HTTP PUT request for updating a user. The value parameter specifies the URL path, and the @PathVariable annotation is used to extract the user ID from the URL path. The @RequestBody annotation is used to extract the updated user object from the request body.
@PutMapping("/users/{userId}")
public User updateUser(@PathVariable Long userId, @RequestBody User updatedUser) {
    return userService.updateUser(userId, updatedUser);
}
The @DeleteMapping Annotation
This annotation is used to handle HTTP DELETE requests. It can be translated to @RequestMapping(method = RequestMethod.DELETE). And it accepts the same parameters as @GetMapping.
The example below shows how to use @DeleteMapping to handle an HTTP DELETE request for deleting a user. The value parameter specifies the URL path, and the @PathVariable annotation is used to extract the user ID from the URL path.
@DeleteMapping("/users/{userId}")
public void deleteUser(@PathVariable Long userId) {
    userService.deleteUser(userId);
}
By using these new REST request annotations, you can build RESTful web services in Spring Boot more easily and with less code. They provide a more concise and descriptive way of defining the URLs and parameters for each RESTful operation, which can make your code more readable and easier to maintain.
Returning JSON or XML in Spring Boot using ‘produces’ and ‘consumes’ parameters
In Spring Boot, you can use the produces and consumes parameters in the request mapping annotations to specify the format of the request and response body. This is useful if you want to return data in JSON or XML format, depending on the content type of the request.
The produces parameter specifies the media type that the method can produce, i.e., the format of the response body. The consumes parameter specifies the media type that the method can consume, i.e., the format of the request body. By default, Spring Boot supports several media types, such as JSON (application/json) and XML (application/xml).
Here is an example of using produces and consumes parameters in a request mapping annotation:
@PostMapping("/users", consumes = "application/json", produces = "application/json")
public ResponseEntity<User> createUser(@RequestBody User user) {
    User savedUser = userService.createUser(user);
    return ResponseEntity.created(URI.create("/users/" + savedUser.getId())).body(savedUser);
}
In this example, the @PostMapping annotation specifies that the method should handle HTTP POST requests to the /users endpoint. The consumes parameter specifies that the method can only consume requests in JSON format, and the produces parameter specifies that the response should also be in JSON format.
You can also specify multiple media types by using an array of strings, like this:
@GetMapping("/users/{id}", produces = { "application/json", "application/xml" })
public ResponseEntity<User> getUser(@PathVariable Long id) {
    User user = userService.getUser(id);
    return ResponseEntity.ok().body(user);
}
In this example, the @GetMapping annotation specifies that the method should handle HTTP GET requests to the /users/{id} endpoint. The produces parameter specifies that the method can produce responses in both JSON and XML formats, and Spring Boot will automatically choose the appropriate format based on the content type of the request.
In conclusion, using produces and consumes parameters in Spring Boot request mapping annotations is a powerful feature that allows you to easily return data in the format that the client expects, whether it’s JSON, XML, or another format.
Read Request Body with the @RequestBody annotation
Spring Boot provides the @RequestBody annotation to bind the request body of a HTTP POST, PUT or PATCH request to a method parameter in your controller. This annotation is useful when you need to extract data from the request body, for example when creating or updating a resource.
Here’s an example of how to use the @RequestBody annotation in your controller method:
@PostMapping("/users")
public ResponseEntity<User> createUser(@RequestBody User user) {
    User savedUser = userRepository.save(user);
    return ResponseEntity.ok(savedUser);
}
In the above example, the createUser method accepts a User object in the request body and returns a ResponseEntity with the saved user object.
By default, Spring Boot uses Jackson to deserialize the request body into a Java object. You can customize the deserialization process using Jackson annotations such as @JsonFormat and @JsonProperty.
If the request body is invalid or not present, Spring Boot returns a 400 Bad Request response by default. You can customize the response using exception handling.
In addition to JSON, Spring Boot also supports other media types such as XML and form data. You can specify the media type using the consumes attribute of the request mapping annotation, for example:
@PostMapping(value = "/users", consumes = MediaType.APPLICATION_FORM_URLENCODED_VALUE)
public ResponseEntity<User> createUser(@RequestBody MultiValueMap<String, String> formData) {
    // ...
}
In the above example, the createUser method accepts form data in the request body and returns a ResponseEntity with the saved user object.
Overall, the @RequestBody annotation is a powerful tool for handling HTTP request bodies in your Spring Boot REST endpoints.
Extract values from the request URI with the @PathVariable annotation
In Spring Boot REST APIs, it’s often required to extract values from the request URI to pass as parameters to the REST API methods. The @PathVariable annotation in Spring Boot provides a way to do that. The @PathVariable annotation is used to bind a method parameter to a URI template variable.
To use @PathVariable annotation, simply add it before the parameter in the method definition. The parameter name should match the URI template variable name. Here’s an example:
@GetMapping("/users/{id}")
public ResponseEntity<User> getUserById(@PathVariable Long id) {
    User user = userService.getUserById(id);
    return ResponseEntity.ok(user);
}
In the example above, the @PathVariable Long id binds the id parameter to the id variable in the URI template /users/{id}. So if a GET request is sent to /users/1, the value 1 will be extracted and passed to the getUserById() method.
It’s also possible to specify the URI template variable name in the @PathVariable annotation, in case it doesn’t match the parameter name. Here’s an example:
@GetMapping("/users/{userId}/posts/{postId}")
public ResponseEntity<Post> getPostByUserIdAndPostId(@PathVariable("userId") Long userId, @PathVariable("postId") Long postId) {
    Post post = postService.getPostByUserIdAndPostId(userId, postId);
    return ResponseEntity.ok(post);
}
In the example above, the @PathVariable("userId") Long userId binds the userId parameter to the userId variable in the URI template /users/{userId}/posts/{postId}, and the @PathVariable("postId") Long postId binds the postId parameter to the postId variable in the same URI template.
Class-level Shared Annotations
In addition to the annotations we’ve discussed so far, Spring Boot also provides the ability to define class-level shared annotations that apply to all the methods in the class. This can be useful if you have a set of endpoints that all require the same configuration.
To define class-level shared annotations, simply add the desired annotations to the class declaration. Here’s an example that demonstrates the use of both class-level shared annotations and method-level annotations within a Spring Boot REST controller:
@RestController
@RequestMapping("/users")
public class UserController {

    @Autowired
    private UserService userService;

    @GetMapping("/{userId}")
    public ResponseEntity<User> getUserById(@PathVariable Long userId) {
        User user = userService.getUserById(userId);
        if (user == null) {
            return ResponseEntity.notFound().build();
        } else {
            return ResponseEntity.ok(user);
        }
    }

    @PostMapping
    public ResponseEntity<User> createUser(@RequestBody User user) {
        User savedUser = userService.createUser(user);
        return ResponseEntity.created(URI.create("/users/" + savedUser.getId())).body(savedUser);
    }
}
In this example, the @RestController annotation is used to mark the class as a REST controller. The @RequestMapping annotation is used at the class level to define the base URL path for all of the controller’s methods. In this case, all of the methods in the UserController class are mapped to URLs that begin with “/users”.
The @Autowired annotation is used to inject an instance of the UserService class into the UserController.
The @GetMapping annotation is used on the getUserById method to specify that it should handle HTTP GET requests to the URL “/users/{userId}”. The @PathVariable annotation is used to indicate that the userId parameter should be populated with the value from the URL path.
The @PostMapping annotation is used on the createUser method to specify that it should handle HTTP POST requests to the URL “/users”. The @RequestBody annotation is used to indicate that the method should deserialize the request body into a User object. The method returns a ResponseEntity with a status of 201 Created and a Location header that points to the newly created user’s URL.
Complete Example
Creating the project
To apply the concepts you have learned, let’s work on an example project. First, create a Spring Boot project and then define a User class in the project. The User class can be structured as follows:
package com.example.demo;

import jakarta.persistence.Entity;
import jakarta.persistence.GeneratedValue;
import jakarta.persistence.GenerationType;
import jakarta.persistence.Id;

@Entity // This tells Hibernate to make a table out of this class
public class User {
    @Id
    @GeneratedValue(strategy=GenerationType.AUTO)
    private Integer id;

    private String name;

    private String email;

    public Integer getId() {
        return id;
    }

    public void setId(Integer id) {
        this.id = id;
    }

    public String getName() {
        return name;
    }

    public void setName(String name) {
        this.name = name;
    }

    public String getEmail() {
        return email;
    }

    public void setEmail(String email) {
        this.email = email;
    }
}
Create a UserRepository interface to manage user data. The UserRepository interface will be used to interact with the database and perform CRUD operations on user data.
package com.example.demo;

import org.springframework.data.repository.CrudRepository;

// This will be AUTO IMPLEMENTED by Spring into a Bean called userRepository
// CRUD refers Create, Read, Update, Delete

public interface UserRepository extends CrudRepository<User, Integer> {

}
Finally, you need to create a REST controller class where you can define the endpoints of your application. This class will be responsible for handling incoming requests from the client and sending back responses.
package com.example.demo;

import org.springframework.beans.factory.annotation.Autowired;
import org.springframework.http.ResponseEntity;
import org.springframework.web.bind.annotation.*;

import java.net.URI;
import java.util.Optional;


@RestController // This means that this class is a REST Controller
@RequestMapping("/users") // This means URL's start with /demo (after Application path)
public class MainController {
    @Autowired // This means to get the bean called userRepository
    // Which is auto-generated by Spring, we will use it to handle the data
    private UserRepository userRepository;

    @PostMapping // Map ONLY POST Requests
    public ResponseEntity<User> addNewUser (@RequestBody User user) {

        User savedUser = userRepository.save(user);
        return ResponseEntity.created(URI.create("/" + savedUser.getId())).body(savedUser);
    }

    @GetMapping
    public ResponseEntity<Iterable<User>> getAllUsers() {

        Iterable<User> users = userRepository.findAll();
        return ResponseEntity.ok(users);
    }

    @GetMapping("/{id}")
    public ResponseEntity<Optional<User>> getUserById(@PathVariable Integer id) {

        Optional<User> user = userRepository.findById(id);
        return ResponseEntity.ok(user);
    }
}
And this is what the default main class of your Spring Boot project looks like:
package com.example.demo;

import org.springframework.boot.SpringApplication;
import org.springframework.boot.autoconfigure.SpringBootApplication;

@SpringBootApplication
public class DemoApplication {

    public static void main(String[] args) {
        SpringApplication.run(DemoApplication.class, args);
    }

}
You can find my application.properties file below for reference:
spring.jpa.hibernate.ddl-auto=update
spring.datasource.url=jdbc:mysql://${MYSQL_HOST:localhost}:3306/db_example
spring.datasource.username=root
spring.datasource.password=
spring.datasource.driver-class-name=com.mysql.cj.jdbc.Driver
spring.jpa.show-sql= true
logging.level.org.hibernate=DEBUG
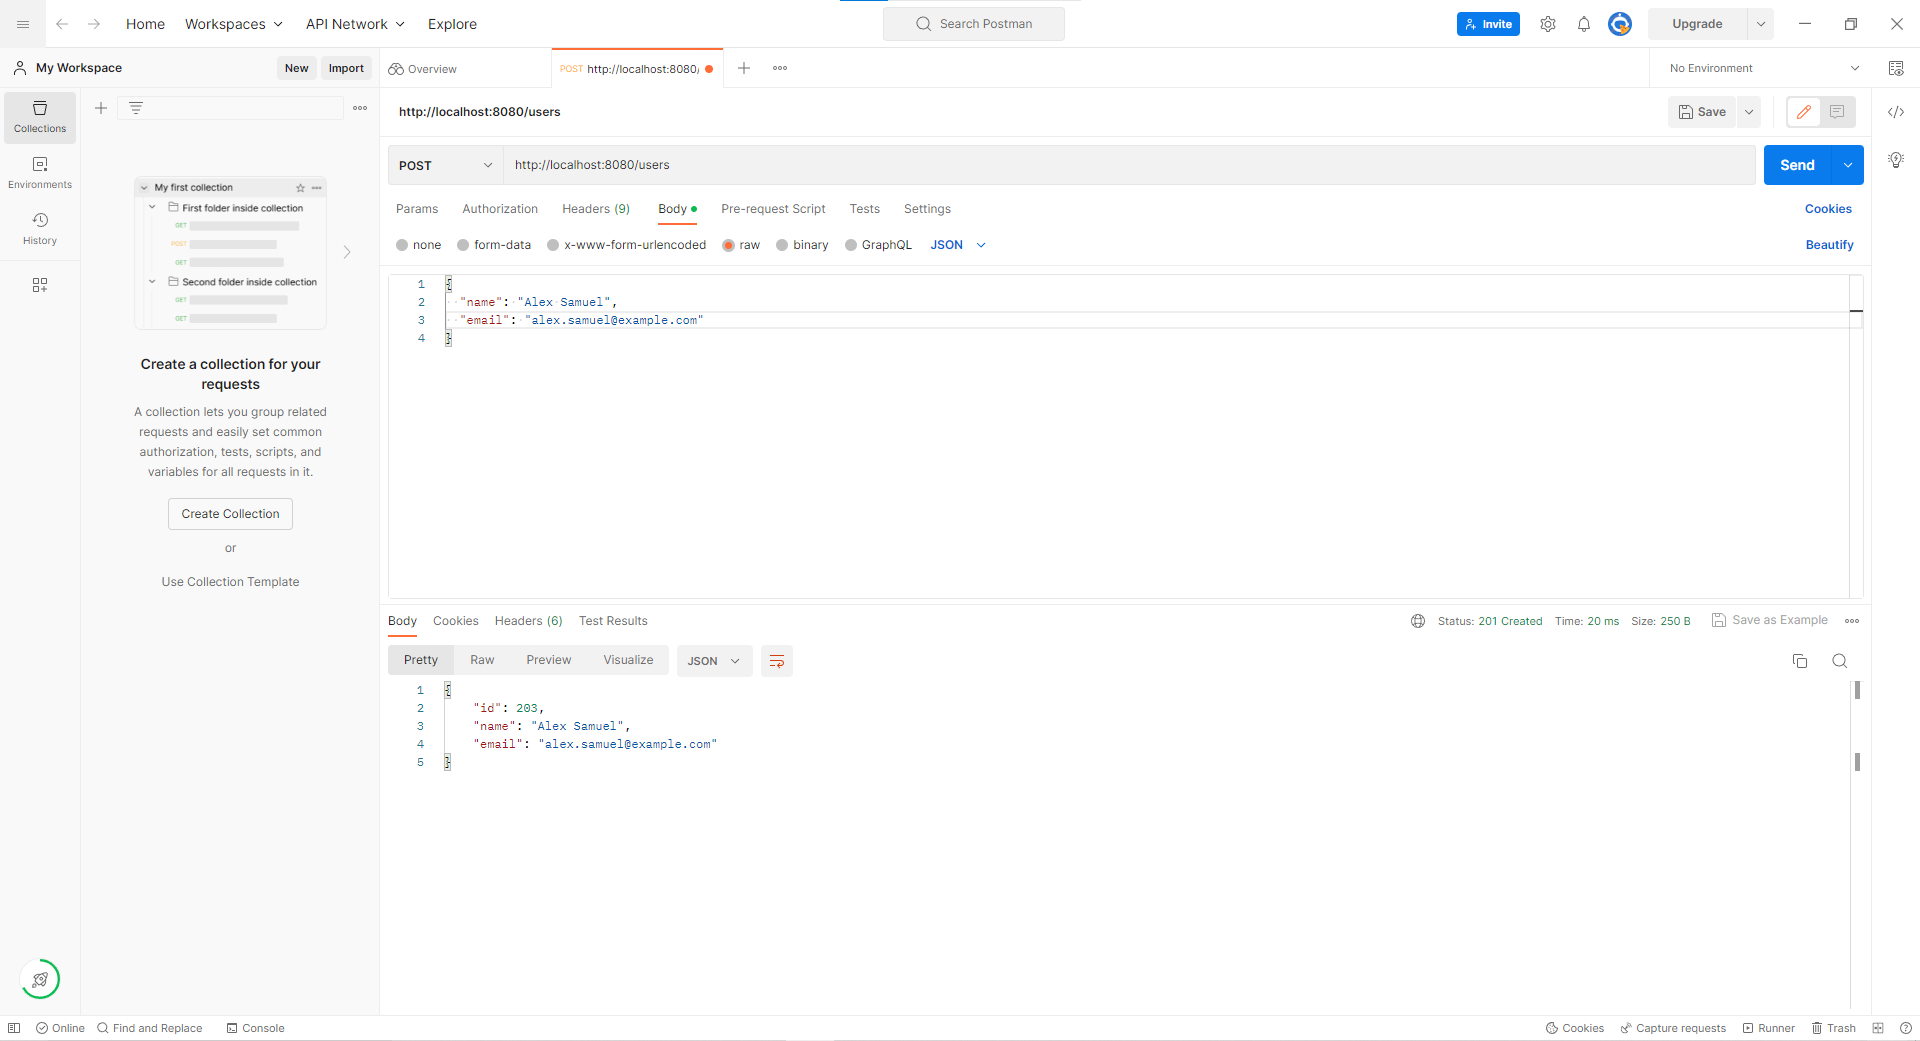
Testing the project using Postman
After running your Spring Boot application, you can test your API endpoints using a tool like Postman. Here are the steps to follow:
- Open Postman and create a new request.
- Set the request method to
POST. - Set the request URL to
http://localhost:8080/users. - Select the
Bodytab. - Select the
rawoption and set the type toJSON. - In the request body, enter the following JSON object:
{ "name": "John Doe", "email": "[email protected]" } - Click the
Sendbutton to submit the request. - If the request is successful, you should see a
Savedmessage in the response body.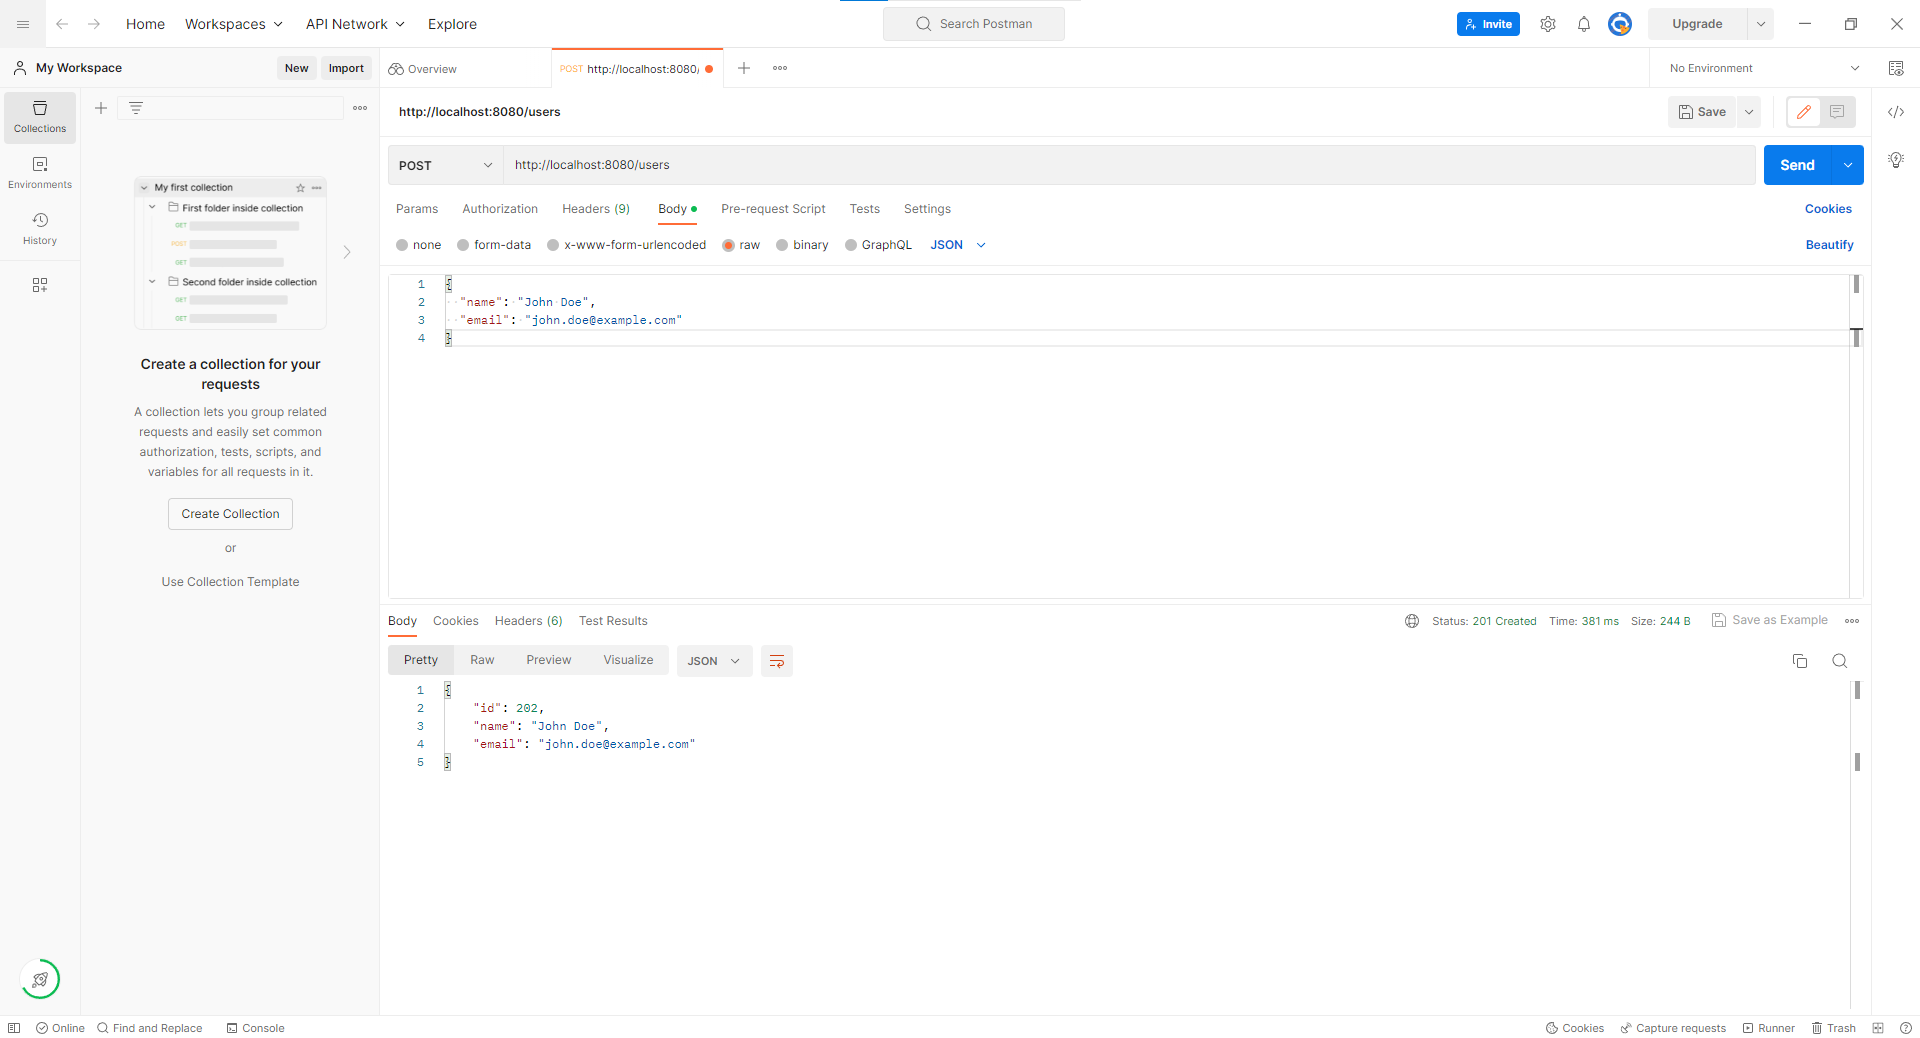
- To retrieve all users, set the request method to
GET. - Set the request URL to
http://localhost:8080/users. - Click the
Sendbutton to submit the request. - If the request is successful, you should see a JSON array of all users in the response body.
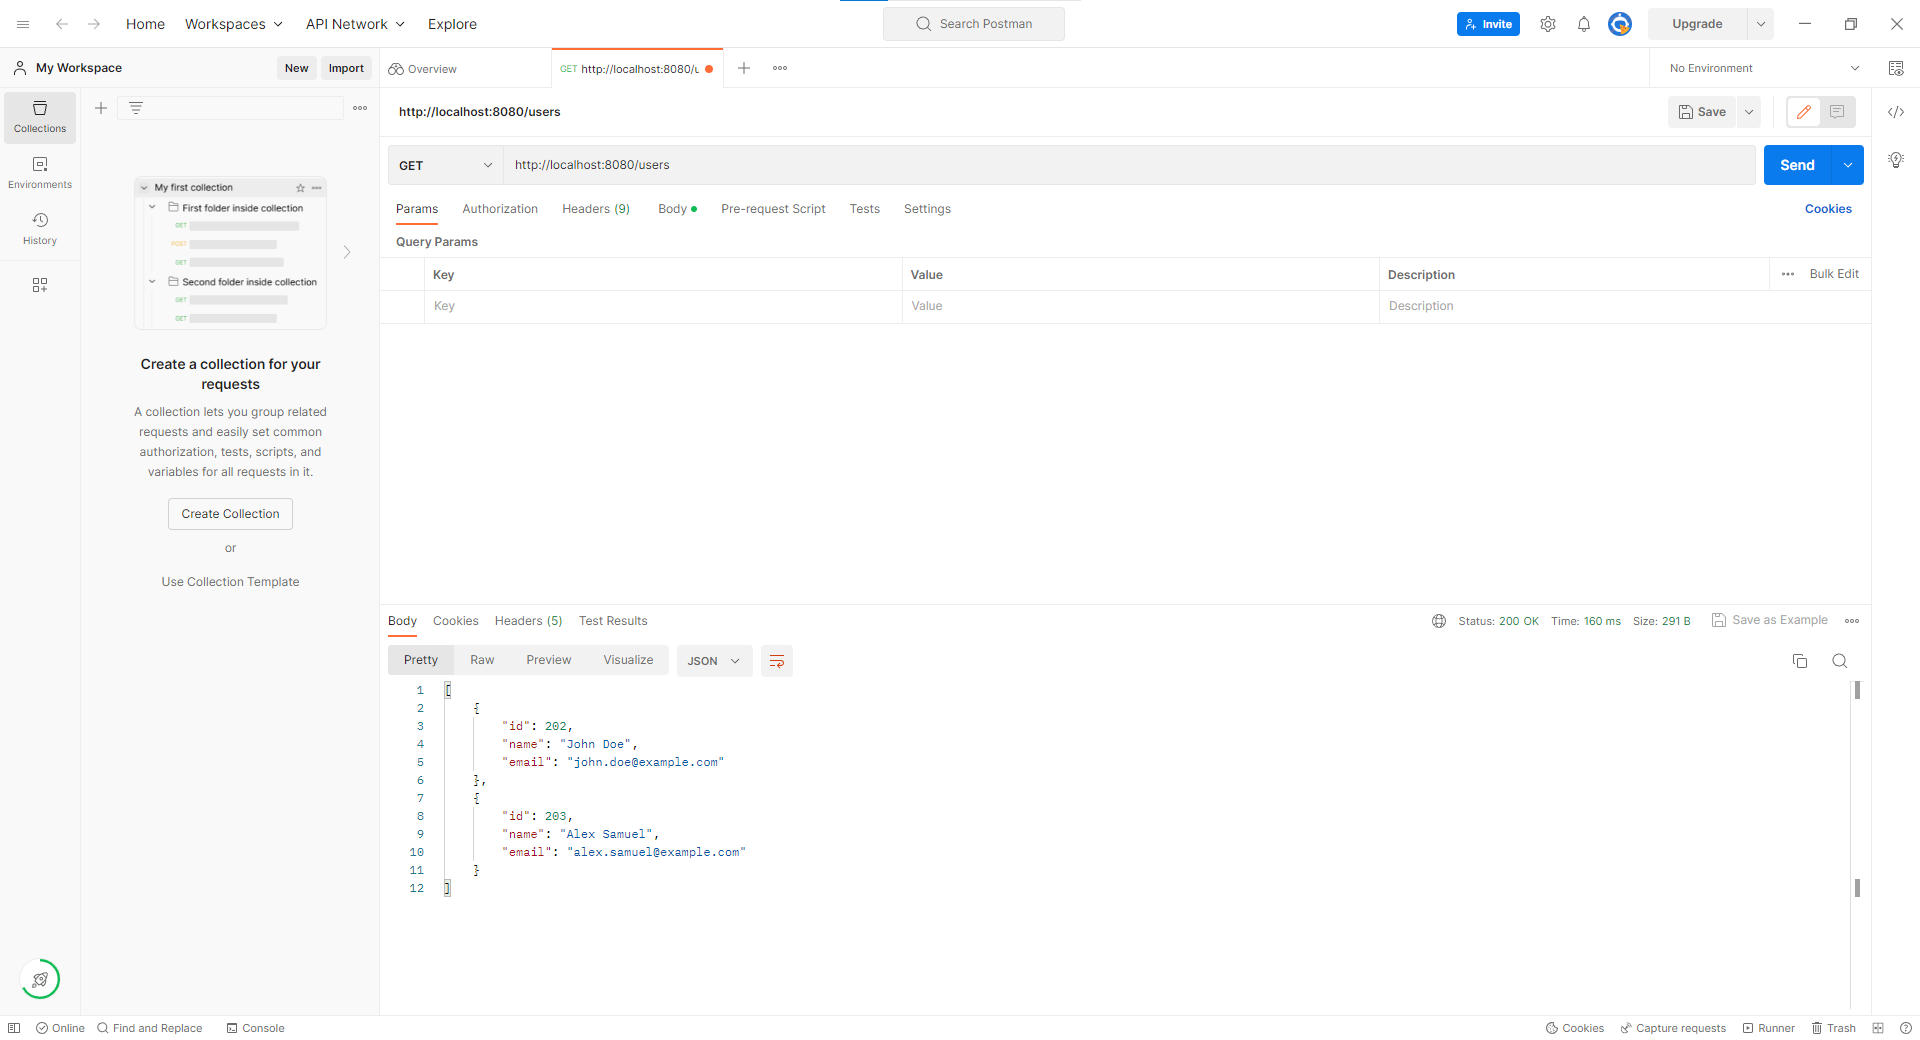
You can use similar steps to test other endpoints that you have defined in your controller class.
Conclusion
This tutorial covered the basics of using the new Spring Boot REST request annotations: @PostMapping, @GetMapping, @PutMapping, and @DeleteMapping. We also discussed how to return JSON or XML using the ‘produces’ and ‘consumes’ parameters, how to read the request body with @RequestBody, and how to extract values from the request URI with @PathVariable.
Finally, we learned about class-level shared annotations. With these tools, you can easily create powerful and flexible RESTful web services in Spring Boot. Make sure to explore more Spring Boot REST tutorials and examples to enhance your knowledge and skills in building RESTful web services with Spring Boot.