In this tutorial, you will learn how to create and configure the new Spring OAuth Authorization Server.
Video Demonstration
To demonstrate how to configure and use the new Spring Authorization Server, I have created a series of step-by-step video lessons. You can access these video lessons by enrolling in my video course called “OAuth 2.0 in Spring Boot applications“.
Spring Authorization Server Dependencies
The Spring Authorization Server project that I will create in this tutorial will be a maven-based Spring Boot project. So the very first step for you will be to create a very basic maven-based Spring Boot project.
Once you have created a new project, open the pom.xml file and add the following dependencies.
<dependencies>

    <dependency>
        <groupId>org.springframework.security</groupId>
        <artifactId>spring-security-oauth2-authorization-server</artifactId>
        <version>1.0.2</version>
    </dependency>
    <dependency>
        <groupId>org.springframework.boot</groupId>
        <artifactId>spring-boot-starter-security</artifactId>
    </dependency>
    <dependency>
        <groupId>org.springframework.boot</groupId>
        <artifactId>spring-boot-starter-web</artifactId>
    </dependency>
    <dependency>
        <groupId>org.springframework.boot</groupId>
        <artifactId>spring-boot-starter-test</artifactId>
        <scope>test</scope>
    </dependency>
    <dependency>
        <groupId>org.springframework.security</groupId>
        <artifactId>spring-security-test</artifactId>
        <scope>test</scope>
    </dependency>

</dependencies>
Authorization Server Basic Configuration
Now that you have added the necessary maven dependencies, we can do some basic server configuration.
Server port
Open the application.properties file and configure the authorization server port number. You can choose any available port number, but for this demonstration, I will make my authorization server run on port number 8000.
server.port=8000
Register OAuth Client
Now that we have configured the server port, we will configure OAuth Client credentials. These credentials will be used by a client application when it authenticates with the Authorization server.
import java.util.UUID;

import org.springframework.context.annotation.Bean;
import org.springframework.context.annotation.Configuration;
import org.springframework.security.oauth2.core.AuthorizationGrantType;
import org.springframework.security.oauth2.core.ClientAuthenticationMethod;
import org.springframework.security.oauth2.core.oidc.OidcScopes;
import org.springframework.security.oauth2.server.authorization.client.InMemoryRegisteredClientRepository;
import org.springframework.security.oauth2.server.authorization.client.RegisteredClient;
import org.springframework.security.oauth2.server.authorization.client.RegisteredClientRepository;

@Configuration
public class AuthorizationServerConfiguration {

    @Bean
    public RegisteredClientRepository registeredClientRepository() {

        RegisteredClient registeredClient = RegisteredClient.withId(UUID.randomUUID().toString())
                .clientId("client1")
                .clientSecret("{noop}myClientSecretValue")
                .clientAuthenticationMethod(ClientAuthenticationMethod.CLIENT_SECRET_BASIC)
                .authorizationGrantType(AuthorizationGrantType.AUTHORIZATION_CODE)
                .authorizationGrantType(AuthorizationGrantType.REFRESH_TOKEN)
                .redirectUri("http://127.0.0.1:8080/login/oauth2/code/users-client-oidc")
                .redirectUri("http://127.0.0.1:8080/authorized")
                .scope(OidcScopes.OPENID)
                .scope("read")
                //.clientSettings(ClientSettings.builder().requireAuthorizationConsent(true).build())
                .build();

        return new InMemoryRegisteredClientRepository(registeredClient);
    }
}
Notice that the method above returns an object of InMemoryRegisteredClientRepository. There is another implementation that supports JDBC. It is called JDBCRegiteredClientRepository, and it supports the save() method so that client details can be persisted. But for this demonstration, I will go with InMemoryRegisteredClientRepository.
- ClientId and ClientSecret are credentials that the OAuth Client application will use to authenticate with the server. There are two types of OAuth Clients: Public and Confidential. By providing value for ClientSecret, we make this OAuth client a confidential client. If the OAuth Client application is a Javascript application, then no need to configure the Client Secret value. Use PKCE instead.
- Client Authentication Method – is set to ClientAuthenticationMethod.CLIENT_SECRET_BASIC. There are different values of Client Authentication methods. The CLIENT_SECRET_BASIC is regular basic authentication using ClientID and Client Secret. When we use this type of authentication, the ClientID and Client Secret will be included in the HTTP request. The Client Secret and ClientID are concatenated into a single string, which is then base64 encoded. If the ClientId and the Client Secret values are submitted in the body of the HTTP Post request, then use CLIENT_SECRET_POST as the client authentication method.
- Authorization Grant Type is set to AuthorizationGrantType.AUTHORIZATION_CODE. This is because, for this demonstration, I use the Authorization Code grant type. You can enable more than one authorization flow. For example, in the above configuration, I also enable the AuthorizationGrantType.REFRESH_TOKEN.Apparently, not all authorization grant types will be supported by the new Spring Authorization Server. On the official Spring Authorization project page, it is mentioned that the Spring team is focused on delivering Authorization Server that supports the newer, Oauth 2.1 version. The Oauth 2.1 version supports fewer authorization grant types than Oauth version 2.0. For example, the Password grant and the Implicit grant are omitted in Oauth version 2.1. So the implementation of these grant types might not be fully supported.
- redirectUri – The two redirect URIs that I configure above participate in the redirect-base authorization flow. Once the user successfully authenticates with authorization server, the authorization code will be attached to http://127.0.0.1:8080/authorized. The 8080 is the port number on which the OAuth Client application is running. If your client application is a Spring Boot Web application, then port number 8080 is the port number on which your Client application is running. The users-client-oidc is a name of the client. We will configure it a bit later when working with the web client application.
- scope – You can add more than one scope if needed. The list of other scopes will depend on the functionality of your application. For example, read, write, or profile scope.
OAuth Server-Related Beans
Add the following @Beans to the same AuthorizationServerConfiguration class.
Apply Spring Security Defaults
import org.springframework.core.annotation.Order;
import org.springframework.core.Ordered;
import org.springframework.security.config.Customizer;
import org.springframework.security.config.annotation.web.builders.HttpSecurity;
import org.springframework.security.config.annotation.web.configuration.OAuth2AuthorizationServerConfiguration;
import org.springframework.security.web.SecurityFilterChain;
import org.springframework.security.oauth2.server.authorization.config.annotation.web.configurers.OAuth2AuthorizationServerConfigurer;

    @Bean
    @Order(Ordered.HIGHEST_PRECEDENCE)
    public SecurityFilterChain authorizationServerSecurityFilterChain(HttpSecurity http) throws Exception {

        OAuth2AuthorizationServerConfiguration.applyDefaultSecurity(http);

        http.getConfigurer(OAuth2AuthorizationServerConfigurer.class).oidc(Customizer.withDefaults());

        return http.formLogin(Customizer.withDefaults()).build();
    }
Authorization Server Settings
import org.springframework.security.oauth2.server.authorization.settings.AuthorizationServerSettings;

    @Bean
    public AuthorizationServerSettings authorizationServerSettings() {
        return AuthorizationServerSettings.builder()
                .issuer("http://auth-server:8000")
                .build();
    }
Notice the method that returns the ProviderSettings object. This method configures the issuer URL, that the Provider uses as its Issuer Identifier. The Issuer URL uses a custom domain auth-server. At the time of working on this tutorial, if you run your authorization server on localhost, and use localhost as the issuer URL, then it will not work. To make it work, add the following alias to /etc/hosts file on your computer.
127.0.0.1 auth-server
Authorization Client Settings
@Bean
public ClientSettings clientSettings() {
    return ClientSettings.builder()
            .requireAuthorizationConsent(false)
            .requireProofKey(false)
            .build();
}
The object returned by this method is an instance of the ClientSettings class, which represents the settings that apply to the clients that are registered with the authorization server.
The ClientSettings class has a builder method that allows you to create an instance with various properties. In this case, the properties are:
- requireAuthorizationConsent: This property determines whether the authorization server requires user consent for each authorization request or not. If set to false, the user consent screen is skipped, and the authorization server grants the requested scopes automatically.
- requireProofKey: This property determines whether the authorization server requires proof of possession of a key for each authorization request or not. If set to false, the authorization server does not enforce PKCE (Proof Key for Code Exchange) validation.
The method returns a ClientSettings object with these properties set to false, which means that the authorization server does not require user consent or proof of key for any client.
Methods for Signing the token
import com.nimbusds.jose.jwk.JWKSet;
import com.nimbusds.jose.jwk.RSAKey;
import com.nimbusds.jose.jwk.source.JWKSource;
import com.nimbusds.jose.proc.SecurityContext;
import org.springframework.security.oauth2.jwt.JwtDecoder;

import java.security.KeyPair;
import java.security.KeyPairGenerator;
import java.security.NoSuchAlgorithmException;
import java.security.interfaces.RSAPrivateKey;
import java.security.interfaces.RSAPublicKey;

@Bean
public JwtDecoder jwtDecoder(JWKSource<SecurityContext> jwkSource) {
    return OAuth2AuthorizationServerConfiguration.jwtDecoder(jwkSource);
}

@Bean
public JWKSource<SecurityContext> jwkSource() throws NoSuchAlgorithmException {
    RSAKey rsaKey = generateRsa();
    JWKSet jwkSet = new JWKSet(rsaKey);

    return (jwkSelector, securityContext) -> jwkSelector.select(jwkSet);
}

private static RSAKey generateRsa() throws NoSuchAlgorithmException {
    KeyPair keyPair = generateRsaKey();
    RSAPublicKey publicKey = (RSAPublicKey) keyPair.getPublic();
    RSAPrivateKey privateKey = (RSAPrivateKey) keyPair.getPrivate();

    return new RSAKey.Builder(publicKey)
            .privateKey(privateKey)
            .keyID(UUID.randomUUID().toString())
            .build();
}

private static KeyPair generateRsaKey() throws NoSuchAlgorithmException {
    KeyPairGenerator keyPairGenerator = KeyPairGenerator.getInstance("RSA");
    keyPairGenerator.initialize(2048);

    return keyPairGenerator.generateKeyPair();
}
Spring Security-related Configuration
Now that we have configured OAuth-related beans let’s add Spring Security configuration.
Create a new class called SpringSecurityConfiguration and add the following two methods.
import org.springframework.context.annotation.Bean;
import org.springframework.context.annotation.Configuration;
import org.springframework.security.config.Customizer;
import org.springframework.security.config.annotation.web.builders.HttpSecurity;
import org.springframework.security.config.annotation.web.configuration.EnableWebSecurity;
import org.springframework.security.core.userdetails.User;
import org.springframework.security.core.userdetails.UserDetails;
import org.springframework.security.core.userdetails.UserDetailsService;
import org.springframework.security.crypto.factory.PasswordEncoderFactories;
import org.springframework.security.crypto.password.PasswordEncoder;
import org.springframework.security.provisioning.InMemoryUserDetailsManager;
import org.springframework.security.web.SecurityFilterChain;

@Configuration
@EnableWebSecurity
public class SpringSecurityConfiguration {

    @Bean
    SecurityFilterChain configureSecurityFilterChain(HttpSecurity http) throws Exception {

        http
        .authorizeHttpRequests(authorizeRequests -> authorizeRequests.anyRequest().authenticated())
        .formLogin(Customizer.withDefaults());

        return http.build();

    }


    @Bean
    public UserDetailsService users() {

        PasswordEncoder encoder = PasswordEncoderFactories.createDelegatingPasswordEncoder();

        UserDetails user = User.withUsername("sergey")
                .password(encoder.encode("password"))
                .roles("USER")
                .build();

        return new InMemoryUserDetailsManager(user);

    }

}
Getting JWT Access Token
We are now ready to run our authorization server and try to acquire an access token. The first step in this process is to acquire an authorization code and then exchange it for an access token. Let’s get the authorization code first.
Acquite OAuth Code
Run your authorization server as a Spring Boot application and open the following URL in the browser window.
http://127.0.0.1:8000/oauth2/authorize?response_type=code&client_id=client1&redirect_uri=http://127.0.0.1:8080/authorized&scope=openid read
You will be redirected to authenticate. Use username and password we have configured in section 2.4. Spring Security Configuration.
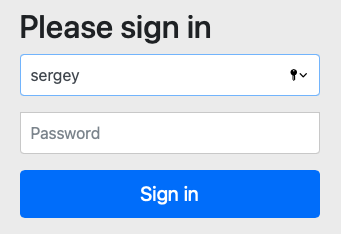
Once successfully authenticated, you will be redirected to a redirectUri that we have configured in section 2.2. Register OAuth Client.
http://127.0.0.1:8080/authorized?code=K5q0FysUc1m0h-fGQtrM6a_2G4LnohKpjS8StMnZIY-mhExqzKQoIRxvLe1DDH-79YDHIPn5wgJmksxPcGPG6KweUASSQbY5rFat41jAUxNYCLVCog2se923ESy2_abJ
The authorization code will be attached to a redirectUri as a query string request parameter. We can now use this code to exchange it for an access token.
Get JWT Access Token
Open Postman HTTP Client or any other HTTP Client that you know how to use. For this demonstration, I will use Postman HTTP Client.
Configure the Basic Authentication
The first step is to configure the Basic authentication. In section 2.2. Register OAuth Client, we have configured ClientID and ClientSecret. Use these ClientID and ClientSecret values as Username and Password.

Request Body
Now that we have configured Basic Authentication select the Body tab and configure the following request parameters. Once done, click on Send button.
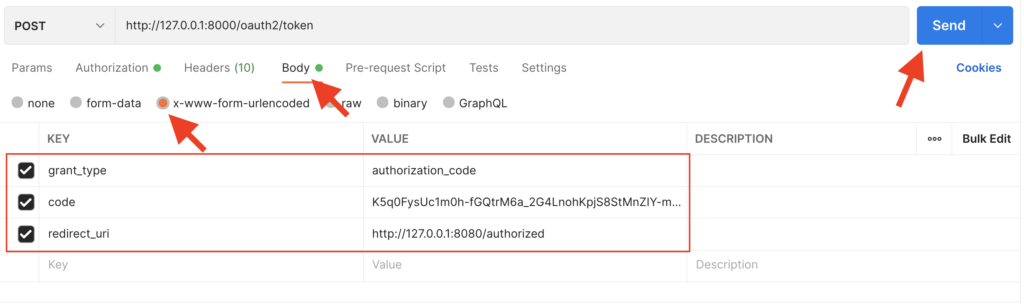
In response, you will get JWT tokens.
{
    "access_token": "eyJraWQiOiJiZWIyYjhkMC1jNjM1LTQ3OWItYTQzMy02MWMzZDliZTllMTkiLCJhbGciOiJSUzI1NiJ9.eyJzdWIiOiJzZXJnZXkiLCJhdWQiOiJjbGllbnQxIiwibmJmIjoxNjQ3NTM2Njc1LCJzY29wZSI6WyJyZWFkIiwib3BlbmlkIl0sImlzcyI6Imh0dHA6XC9cL2F1dGgtc2VydmVyOjgwMDAiLCJleHAiOjE2NDc1MzY5NzUsImlhdCI6MTY0NzUzNjY3NX0.Qn80d_Sl-ZUzJQNoipPddsAwCKpYVknreKTN6cydJOHJAVb_E3NVqc22hWgen8--JKzM10wDDXjr54dn0WhrAf4qxuMAMWCvCJyLXw5AvSILQSE-80Kj4oDf5SIKoAdy5p0SdCjpuZf3ylFMS41VcqnkpaUtvNYWxcPe-LpIZ7ZZeZBdMb73aBwsz_9LR8M20C4b1Q1w1Ry-fAdT-HG5-dZK-pevS_smFk7k6fUgP7IAO_sK2IncS5pEhtJ-jnvCfZuATWKcQZCIwYCugPIDuSUT9QIw6lmogsEBOR6Aw-KDWZsG_sJZ2SrEC-_oFr6AhSDcMZSXnadf3W1FQ-luEA",
    "refresh_token": "IeHFNgDxjJzZ99D3wWeTNolzN1G-KqV-NRzXGQV0_Npzw2UhcRM-q2x0-EW-eiuMkm1gEbvma2G1Ea3XxWonMab50HXkkMjUJJWDI1S19TniCGlIrTPBcJNuP_hqDUNc",
    "scope": "read openid",
    "id_token": "eyJraWQiOiJiZWIyYjhkMC1jNjM1LTQ3OWItYTQzMy02MWMzZDliZTllMTkiLCJhbGciOiJSUzI1NiJ9.eyJzdWIiOiJzZXJnZXkiLCJhdWQiOiJjbGllbnQxIiwiYXpwIjoiY2xpZW50MSIsImlzcyI6Imh0dHA6XC9cL2F1dGgtc2VydmVyOjgwMDAiLCJleHAiOjE2NDc1Mzg0NzUsImlhdCI6MTY0NzUzNjY3NX0.haVz6tbBQZJcQBRV8DZGha6TCW7OKt7WCDE6TKTeFYdo0muKcHFBju1qq8UKApNGw0MteQ2Oh49XJ9W5uh1qVf_IqlVCKY23Fj5ubzGKY7j6u9wU9c8fr9YwWvuJExPeejCaR-T4ge6crh3IG-pDs21_izqcUlmvSnHqmTvwGWYrCEYeNyAJkG0H7Har9LG1Ds-HKrY077evDJWNwQt5zJgWK9mCe7m1mo6DGmubzBY4pF49eJwRWyTMhttbXo8XEJ3hUQVF6QbwnnPbiEV6UkIsRZh-eg0tpBurqz9Mju1secpbL1ITrRQXDxWb5RvHZTqEsctME3_0POzPUoLgiQ",
    "token_type": "Bearer",
    "expires_in": 299
}
Role-based Access Control
When writing this tutorial, Spring Authorization Server does not include user roles in JWT. If you decode JWT issued by the new Spring Authorization Server, you will find a “scope” claim but not user roles. If you need to include user roles in JWT, read the following tutorial, “Add Roles to JWT Issued by Spring Authorization Server“.
Once you have the “roles” claim included in JWT, you can proceed and read how to implement Roles-based access control in your Resource server.
I hope this tutorial is helpful to you.
For video lessons on how to secure your Spring Boot application with OAuth 2.0. and Spring Security 5, please checkout my complete video course OAuth 2.0. in Spring Boot applications.
Happy learning!