In this tutorial, I’m going to walk you through how to execute a JUnit 5 test case from a command-line terminal without the use of Maven or Gradle.
If you’re just starting out with Java or JUnit, you’re in the right place. I’ll explain everything in detail, step-by-step, so you can follow along even if you’re a beginner.
By the end of this tutorial, you’ll have a solid understanding of how to run JUnit 5 tests from the terminal, which is a valuable skill for any Java developer. So, let’s get started.
Writing a Simple JUnit 5 Test Case
In this section, I’m going to show you how to write a simple JUnit 5 test case. We’ll start by creating a basic Java class that we’ll be testing, and then we’ll write two test methods – one for a positive scenario and one for a negative scenario.
Let’s start with our class under test. Suppose we have a class named Calculator with a method addNumbers(int a, int b) that simply adds two numbers. Here’s what it looks like:
public class Calculator {
    public int addNumbers(int a, int b) {
        return a + b;
    }
}
Now, let’s write our JUnit 5 test case. We’ll create a class named CalculatorTest with two test methods: testAddNumbersPositiveScenario() and testAddNumbersNegativeScenario(). Here’s what our test class looks like:
import org.junit.jupiter.api.Test;
import static org.junit.jupiter.api.Assertions.assertEquals;
import static org.junit.jupiter.api.Assertions.assertNotEquals;

public class CalculatorTest {
    Calculator calculator = new Calculator();

    @Test
    public void testAddNumbersPositiveScenario() {
        assertEquals(5, calculator.addNumbers(2, 3));
    }

    @Test
    public void testAddNumbersNegativeScenario() {
        assertNotEquals(6, calculator.addNumbers(2, 3));
    }
}
In testAddNumbersPositiveScenario(), we’re testing the addNumbers() method with the inputs 2 and 3, and we expect the output to be 5. If the output is indeed 5, our test passes; if not, it fails.
In testAddNumbersNegativeScenario(), we’re again testing the addNumbers() method with the inputs 2 and 3, but this time we expect the output to be anything but 6. If the output is 6, our test fails; if it’s anything else, the test passes.
These two test methods allow us to verify the functionality of our addNumbers() method under both positive and negative scenarios. This is a simple example, but it gives you a good idea of how you can write JUnit 5 test cases to test your Java classes. In the next sections, we’ll see how to run these tests from the terminal.
Executing all Test Methods in a Class from the Command Line
In this section, you will learn how to execute all the test methods in a class from the command line.
We will do it without using Maven or Gradle.
Download JUnit 5 JAR Files
Before we begin, you need to download two JAR files: junit-platform-console-standalone-1.8.2.jar and junit-jupiter-api-5.8.2.jar. These files are necessary for running JUnit tests from the command line. The junit-platform-console-standalone JAR includes the JUnit Platform Console Standalone, which allows you to run JUnit tests from the command line. The junit-jupiter-api JAR includes the JUnit Jupiter API for writing tests and extensions in JUnit 5.
You can download these JAR files from the JUnit website or Maven repository and add them to your classpath or place them in the same directory as your .java files. The classpath is a parameter that tells the Java Virtual Machine or the Java compiler where to look for user-defined classes and packages.
Compiling Your Java Code
Once you have the JAR files, you can compile your Java classes. Navigate to the directory where your .java files are located and run the following command:
javac -cp "junit-platform-console-standalone-1.8.2.jar:." Calculator.java CalculatorTest.java
This command compiles your Calculator.java and CalculatorTest.java files. The -cp flag sets the classpath. The : is a separator that separates different paths in the classpath. The . after the : represents the current directory, which means the compiler will look for classes in the current directory. On Windows, you would use a ; semicolon as a separator instead of a :.
If your JUnit JAR files are in a different directory than your .java files, you would include the path to the directory where the JAR files are located in the classpath. For example, if your JAR files are in a directory named libs, you would use the following command:
javac -cp "libs/junit-platform-console-standalone-1.8.2.jar:." Calculator.java CalculatorTest.java
Running Test Methods
Once your classes are compiled, you can run your tests. Use the following command:
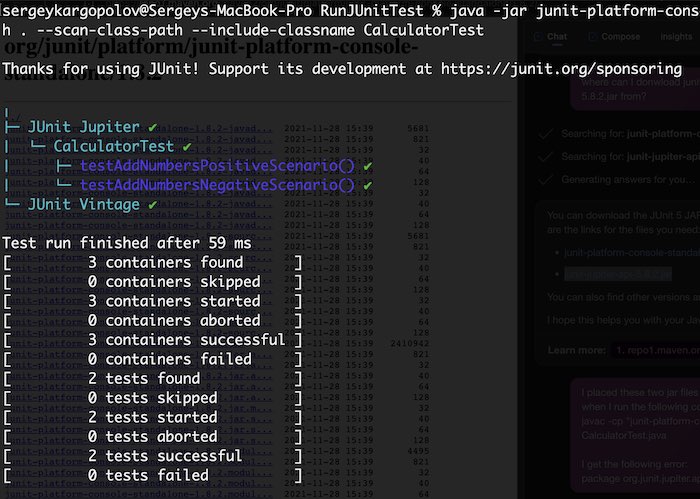
java -jar junit-platform-console-standalone-1.8.2.jar --class-path . --scan-class-path --include-classname CalculatorTest
This command runs the JUnit Platform Console Standalone, which executes your tests. The --class-path . option sets the classpath to the current directory. The --scan-class-path option tells the console to scan the classpath to find test classes. The --include-classname CalculatorTest option specifies that only tests in the CalculatorTest class should be run.
When you run this command, all test methods in the CalculatorTest class are executed, and you’ll see the results in the terminal. If a test passes, you’ll see a green checkmark next to it. If a test fails, you’ll see a red ‘X’ and an error message explaining why the test failed.
Remember, all of this is done without the use of Maven or Gradle. This approach gives you a more hands-on experience with running JUnit tests and can be especially useful in environments where Maven or Gradle are not available. In the next section, we’ll look at how to run a single test method.
If all is good, you should see the following output:
Executing Only One Test Method
In this section, I’ll show you how to execute just one test method from a class using the command line. This can be useful when you want to focus on a specific test without running all the tests in a class.
To run a single test method, you need to use the --select-method option followed by the fully qualified name of the method. The fully qualified name of a method includes the package name, the class name, and the method name, separated by dots.
Let’s say we want to run only the testAddNumbersPositiveScenario() method from our CalculatorTest class. Here’s how you can do it:
java -jar junit-platform-console-standalone-1.8.2.jar --class-path . --select-method CalculatorTest#testAddNumbersPositiveScenario
If JUnit 5 JAR file is in a different directory then you will need to provide a path to it. For example:
java -jar libs/junit-platform-console-standalone-1.8.2.jar --class-path . --select-method CalculatorTest#testAddNumbersPositiveScenario
In this command, CalculatorTest#testAddNumbersPositiveScenario is the fully qualified name of the method. Note that we’re using a # to separate the class name and the method name.
When you run this command, only the testAddNumbersPositiveScenario() method is executed, and you’ll see the result in the terminal.
Common Errors You Might Encounter
Running JUnit 5 tests from the terminal is straightforward most of the time, but occasionally, you might encounter some errors. In this section, I’ll discuss some common errors and how to debug them.
ClassNotFoundException
This error occurs when the Java Virtual Machine (JVM) tries to load a class by its string name but can’t find its definition. This could be due to a typo in the class name or the class not being in the classpath.
To debug this error, check the spelling of your class name and make sure it matches the name of the .java file. Also, ensure that the class is in the correct directory specified in your classpath.
NoTestsFoundException
This error occurs when no tests are found in the specified class. This could be because there are no methods annotated with @Test in your class, or the test methods are not public.
To debug this error, ensure that your test methods are annotated with @Test and that they are public. Also, make sure you’re running the correct class that contains your test methods.
Error: Unable to Access jarfile
This error occurs when the JVM cannot access the JUnit JAR files. This could be because the path to the junit-platform-console-standalone-1.8.2.jar or junit-jupiter-api-5.8.2.jar file is incorrect, or the files are not present in the specified location.
To debug this error, check the path to your JUnit JAR files and make sure it’s correct. The path should be either absolute or relative to the current directory. If the JAR files are in the same directory as your .java files, you can use . to represent the current directory. If the JAR files are in a different directory, make sure to include the full path to the directory in your classpath.
Also, ensure that the JUnit JAR files are present in the specified location. You might need to download the files again if they’re not present or if they’ve been moved or deleted.
Summary
We’ve come to the end of this tutorial, and I hope it has been helpful in understanding how to execute JUnit 5 test cases from the terminal in a basic Java project without Maven or Gradle. Here are the key takeaways:
- You learned how to set up your environment to run JUnit 5 tests from the terminal.
- You wrote a simple JUnit 5 test case.
- You learned how to execute all test methods in a class from the terminal.
- You also learned how to execute a single test method from the terminal.
- We discussed some common errors you might encounter when running JUnit 5 tests from the terminal and how to debug them.
I hope this tutorial has given you a solid foundation for running JUnit 5 tests from the terminal. Remember, practice is key when it comes to mastering these concepts, so don’t hesitate to get your hands dirty and try running your own tests.
If you’re interested in learning more about testing Java code with JUnit 5, I invite you to check out my other JUnit 5 tutorials. There, you’ll find a wealth of resources designed to help you become proficient in JUnit 5 testing.
Happy coding!