In this lesson, you will learn how to produce a message or how to send a message to Kafka’s topic using Kafka Producer CLI.
If your topic does not exist, it is better to create a new topic first.
If you are interested in video lessons then check my video course Apache Kafka for Event-Driven Spring Boot Microservices.
Message with a key or without a key
When sending a message to a Kafka topic, you have the option to include a message key or omit it. The key is an optional attribute that can be used to differentiate messages within a topic. Here’s what you need to know:
- Sending a message without a key: When you send a message without a key, Kafka will distribute the messages across partitions in a round-robin fashion. This means that each message will be assigned to a different partition in the topic. If you don’t require strict ordering or any specific partitioning scheme, sending messages without keys can be a simple and effective approach. So messages stored without a key are not ordered when you read them from a topic.
- Sending a message with a key: Including a key with your message allows you to control how messages are distributed across partitions. Kafka uses the key to determine the partition to which the message should be written. Messages with the same key will always go to the same partition, ensuring that they are processed in order. This can be useful when you need to maintain strict ordering or perform operations based on specific keys.
Sending Message Without a Key
To send a message to the Kafka topic, we use the following command:
./kafka-console-producer.sh --bootstrap-server localhost:9092 --topic my-topic
Let’s break it down step by step:
./kafka-console-producer.sh: This part of the command runs the Kafka Console Producer script. The./at the beginning indicates that the script is located in the current directory. Usually, this is a bin directory.--bootstrap-server localhost:9092: This option specifies the list of brokers that the producer should connect to. In this case, it connects to a broker running onlocalhost(your own machine) and listening to port9092.When you specify a single broker using the--bootstrap-serverparameter, the Kafka producer will only connect to that broker. If that broker goes down, the producer will not be able to send messages to Kafka until the broker is back up and running.On the other hand, when you specify multiple brokers, the producer will connect to all of them. This provides redundancy and fault tolerance in case one or more brokers go down. In addition, it can also help with load balancing by distributing messages across multiple brokers.When specifying multiple brokers, you can separate them using a comma (,) or use multiple--bootstrap-serverparameters.--topic my-topic: This option specifies the name of the topic to which you want to send your message. In this case, it sends the message to a topic namedmy-topic.
When you run this command, the Kafka Console Producer will start and wait for you to enter input. You can then type your message and press Enter to send it to the specified topic.
Sending Message with a Key
To send a message with a key, we use the following command:
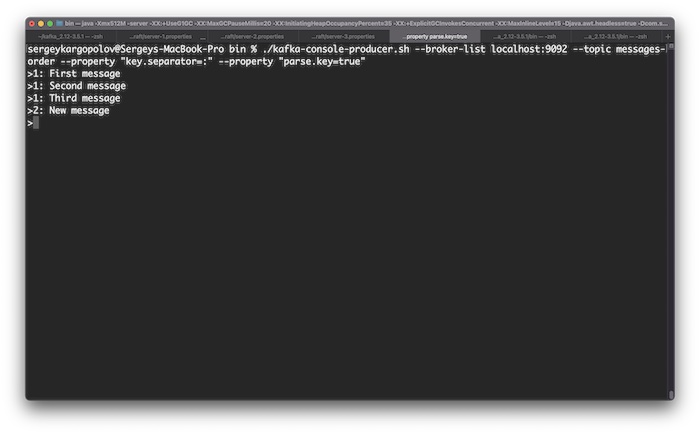
./kafka-console-producer.sh --bootstrap-server localhost:9092 --topic my-topic --property "parse.key=true" --property "key.separator=:"
Let’s break it down step by step:
./kafka-console-producer.sh: This part of the command runs the Kafka Console Producer script. The./at the beginning indicates that the script is located in the current directory. Usually, this is a bin directory.--bootstrap-server localhost:9092: This option specifies the list of brokers I initially want to connect to. In this case, I connect to a broker running onlocalhost(my local machine). If you have more than one broker running in your cluster, it is better to provide at least two brokers in this list. This is because if one broker is down, Kafka can use another broker in this list to connect to your cluster and send a message.--topic my-topic: This option specifies the name of the topic to which you want to send your message. In this case, it sends the message to a topic namedmy-topic.--property "parse.key=true": This option tells Kafka that you will be sending messages with keys.--property "key.separator=:": This option specifies the delimiter that separates the key from the value in your message. In this case, it uses a colon (:) as the separator.
When you run this command, the Kafka Console Producer will start and wait for you to enter input. You can then type your message with key-value pairs separated by a colon (:) and press Enter to send it to the specified topic.
Have a look at the image below. The first three messages have the same key “1”. Because these messages have the same key, they will be stored in the same partition. And because they will be stored in the same partition, they will be ordered when I read them.
Messages with different keys will be equally distributed among other topic partitions. This means that when I read those messages, they will not be in strict order.
What can I use as a message key?
A message key is an optional part of a message that can be used to identify or group the messages. The key can be any string of characters, such as a user ID, a product ID, a transaction ID, etc. The key can also be null, which means that the message has no key.
The format of the key is binary, which means that it is composed of bits (0s and 1s). However, you can use other formats, such as strings or numbers, and convert them to binary using a serializer. A serializer is a function that transforms a value into a binary format. For example, you can use a string serializer to convert a string key into a binary key.
The key is important for determining the partition of the topic where the message will be stored. Kafka uses a hash function to map the key to a partition. A hash function is a function that takes a value and returns a number. The hash function is deterministic, which means that it always returns the same number for the same value. For example, if you use the default hash function in Kafka, the key “foo” will always be mapped to the same partition.
The advantage of using a key is that you can ensure that messages with the same key will be stored in the same partition and will be read in order. This is useful when you want to preserve the sequence of events or transactions in your messages. For example, if you have a user ID as the key, you can guarantee that all the messages related to that user will be in the same partition and in the same order.
The disadvantage of using a key is that you may have an uneven distribution of messages across the partitions. This can happen if some keys are more frequent than others, or if some keys are null. For example, if you have a product ID as the key, and some products are more popular than others, you may have some partitions with more messages than others. This can affect the performance and scalability of your Kafka cluster.
Therefore, you need to choose your key carefully, depending on your use case and requirements. You can also use a custom partitioner to override the default hash function and implement your own logic for assigning messages to partitions. A partitioner is a function that takes a key and a number of partitions and returns a partition number. For example, you can use a custom partitioner to balance the load across the partitions, or to assign messages based on some criteria other than the key.
Final words
I hope this tutorial was helpful to you. To learn more about Apache Kafka, check out my other Apache Kafka tutorials for beginners.