In this tutorial, you will learn what is Spring Cloud Vault, how to install and run HashiCorp’s Vault using three different methods: from HashiCorp website, using Homebrew, or as Docker container.
What is Spring Cloud Vault?
How do we store secrets safe in a distributed system? Secrets are sensitive information that you don’t want to expose to anyone, such as passwords, API keys, tokens, certificates, etc. If you store them in plain text or hard-code them in your application, you risk leaking them to hackers or unauthorized users.
One way to protect your secrets is to use a tool called Vault. Vault is a service that securely stores and manages secrets for you. You can access your secrets from Vault using a web interface or a command line. You can also control who can access your secrets and how long they can use them. Vault can even generate temporary credentials for you to access external resources, such as databases, AWS, RabbitMQ, etc.
But how do you use Vault with your Spring Boot applications? That’s where Spring Cloud Vault comes in. Spring Cloud Vault is a Spring Project that provides client-side support for accessing secrets from HashiCorp’s Vault. It connects your application to HashiCorp Vault and lets you use Vault secrets as configuration properties for your application. You don’t have to write any code to access Vault secrets. You just have to annotate your application beans with @Value or @ConfigurationProperties and Spring Cloud Vault will inject the secrets for you.
Features and benefits of HashiCorp’s Vault for Spring Cloud
HashiCorp’s Vault is a service that securely stores and manages secrets for you. You can access your secrets from Vault using a web interface or a command line. You can also control who can access your secrets and how long they can use them. Vault can even generate temporary credentials for you to access external resources, such as databases, AWS, RabbitMQ, etc.
Spring Cloud is a framework that provides tools and libraries to build cloud-native applications with Spring Boot. Spring Cloud helps you to implement common patterns and best practices for microservices, such as configuration management, service discovery, load balancing, fault tolerance, distributed tracing, etc.
By using HashiCorp’s Vault with Spring Cloud, you can enjoy the following features and benefits:
- Seamless integration: Spring Cloud provides client-side support for accessing secrets from HashiCorp’s Vault. You don’t have to write any code to access Vault secrets. You just have to annotate your application beans with @Value or @ConfigurationProperties and Spring Cloud will inject the secrets for you.
- Flexible authentication: Spring Cloud supports various authentication methods to connect your application to HashiCorp’s Vault, such as token, app-id, app-role, client certificate, etc. You can choose the method that suits your needs and security requirements. You can also configure multiple authentication methods and fallback strategies in case one method fails.
- Dynamic credentials generation: Spring Cloud enables you to access external resources, such as databases, AWS, RabbitMQ, etc., using dynamic credentials from HashiCorp’s Vault. Dynamic credentials are temporary and unique credentials that Vault generates on demand and revokes after a specified time. This way, you can avoid storing or hard-coding credentials in your application and reduce the risk of credential leakage or misuse.
- Multiple secret backends: Spring Cloud allows you to access secrets from different secret backends in HashiCorp’s Vault, such as key-value, consul, etc. Secret backends are storage engines that Vault uses to store and manage secrets. You can use different secret backends for different types of secrets and configure them according to your preferences.
- Bootstrap application context: Spring Cloud can load secrets from HashiCorp’s Vault before your application starts and use them to initialize your application context. This way, you can use Vault secrets to configure your application properties, such as database URL, port number, etc., without exposing them in plain text or environment variables.
- Cloud foundry integration: Spring Cloud can integrate with cloud foundry using HashiCorp’s Vault service broker. The service broker allows you to provision and bind Vault services to your cloud foundry applications. You can use the service broker to create and manage Vault instances and policies for your applications and access them using Spring Cloud.
Download and Run Vault
In this section, we will learn how to download and run HashiCorp Vault. There are different ways to download and run HashiCorp Vault, depending on your preference and operating system. I will cover three methods in this tutorial:
- Download Vault file from HashiCorp website,
- Install Vault using Homebrew,
- Download and Run Vault as Docker container.
Let’s start with the first method.
Method 1: Download Vault from HashiCorp website
To download Vault from HashiCorp website, you need to follow these steps:
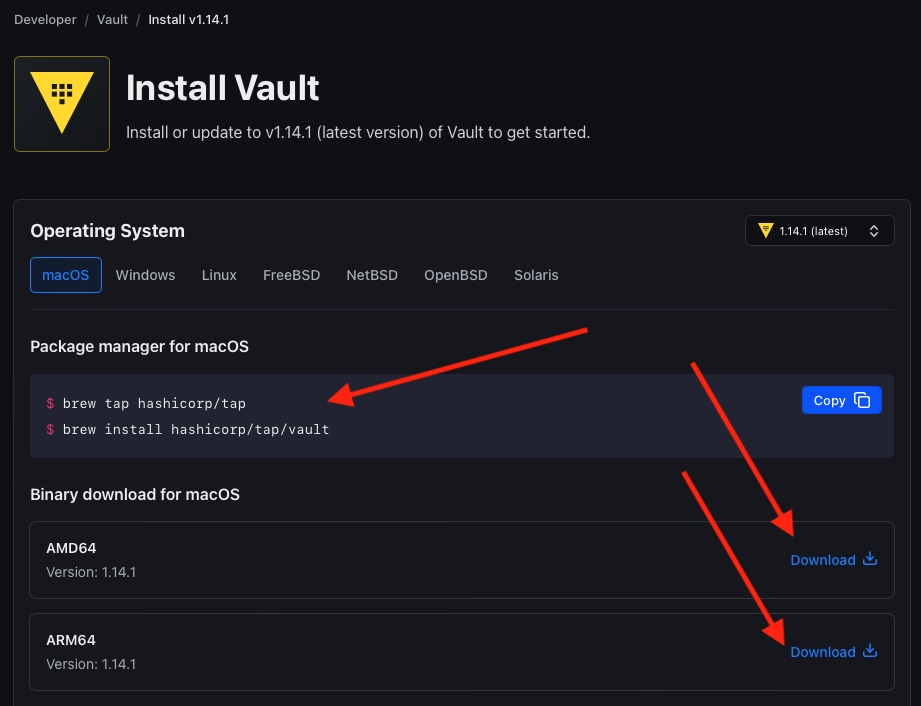
- Go to the HashiCorp downloads page. At the time of recording this lesson the Vault version is v1.14.1.
- Select your operating system and click on the Download.
Vault download page - Save the file to your preferred location and unzip it. You should see a file named vault,
- Open Terminal Window(Command line) and change the directory to where you have the vault file,
- To run Vault, you need to execute the vault file with some arguments. The basic syntax is
vault [command] [options] [arguments]. For example, to start a server with default settings, you can typevault server -dev. You should see some output messages indicating that the server is running and listening on port 8200.
Congratulations! You have successfully downloaded and run Vault from HashiCorp website.
Method 2: Install Vault using Homebrew
In this section, we will learn how to install HashiCorp Vault using Homebrew. Homebrew is a package manager that makes it easy to install and update software on your Mac or Linux machine. If you don’t have Homebrew installed, you can follow the instructions on the Homebrew website to install it.
Once you have Homebrew installed, you can install HashiCorp Vault by following these steps:
- Open a terminal window and type
brew tap hashicorp/tapto add the HashiCorp tap to your Homebrew repository. - Type
brew install hashicorp/tap/vaultto install Vault from the HashiCorp tap. You should see some output messages indicating that the installation is successful and showing the version number of Vault. - To check if the vault binary is available on your machine, type
which vaultin your terminal window. You should see something like/usr/local/bin/vault, which means that the vault binary is in the/usr/local/bindirectory, which is part of your system path. - To verify that Vault is working properly, type
vault --versionin your terminal window. You should see something likeVault v1.14.1, which means that you have installed Vault version 1.14.1.
And this is it! You have successfully installed HashiCorp Vault using Homebrew.
Method 3: Download and Run HashiCorp’s Vault as Docker Container
In this section, we will learn how to download and run HashiCorp’s Vault as Docker container. Docker is a platform that allows you to run applications in isolated environments called containers. If you don’t have Docker installed on your machine, you can follow the instructions in this tutorial to install it.
Once you have Docker installed, you can download and run HashiCorp’s Vault as Docker container by following these steps:
- Open a terminal window and type
docker pull hashicorp/vaultto pull the latest image of Vault from Docker Hub. - Type
docker run -p 8200:8200 -e 'VAULT_DEV_ROOT_TOKEN_ID=dev-only-token' hashicorp/vaultto run a container named vault from the image and expose port 8200 on your machine. - To check if the container is running, you can type
docker psand look for the container namedhashicorp/vaultin the output list. - To access the container’s logs, you can type
docker logs <CONTAINER ID OF hashicorp/vault>. You should see some output messages indicating that the server is running and listening on port 8200.
And this is it! You have successfully downloaded and run HashiCorp’s Vault as Docker container.
Conclusion
You have reached the end of this tutorial on how to install and run HashiCorp’s Vault for Spring Cloud. I hope you were able to get your Vault server running. If you want to learn more about Spring Cloud and how to use it to build microservices, you can check out my Spring Cloud tutorials for beginners.