In this tutorial, you will learn how to make your Flutter mobile application send HTTP GET requests.
Introduction
Network calls are required when you are dealing with APIs and you need to get some data from your server or post some data into your server.
The easiest way to make network calls with Flutter is by using the HTTP package. It has most of the requests built-in into the package, for example, GET, POST, DELETE, PATCH, etc and in this tutorial, you will learn to make a GET request call.
HTTP package
The HTTP package is made by Dart team. It provides all the functionalities to make HTTP requests.
Now, let’s create a new project. Open the terminal window on your computer and navigate to the directory where you want to create a new Flutter project. Then run the following command.
flutter create http_req_app
Then, we’ll add the HTTP package to pubspec.yaml file.
Under dependencies, add http
dependencies:
  flutter:
    sdk: flutter
  # The following adds the Cupertino Icons font to your application.
  # Use with the CupertinoIcons class for iOS style icons.
  cupertino_icons: ^1.0.0
  http:
HTTP GET Request
So, you might be wondering what is GET request? It’s actually very simple. Suppose you want to “get” some data from a remote database. But, Flutter (in fact, any client) does not communicate with the remote database directly, that’s why we have backends, which check what the client is asking for, fetches that resource from the database, and serves it to the client.
Think of a backend as a waiter ready to take your order, when you go to a restaurant. You obviously do not tell your order to the chef directly. So, in simple terms, a GET request is when you have to ask for some data. So, we make a GET request to the backend and it fetches and serves (or returns back) the appropriate data.
In this tutorial, as the backend API, we’ll be using the JSON placeholder: https://jsonplaceholder.typicode.com/posts.
If we make a GET request on this link, using a tool such as Postman, we can see that this URL returns some data in JSON.
Now, JSON is not some fancy term, it’s just a data exchange format so that the client and server can interact. JSON stands for JavaScript Object Notation. It is basically like a dictionary or a map. It has keys and values. The keys in JSON are strings. The values can be an Integer, a Boolean, String, Float, List, or JSON.
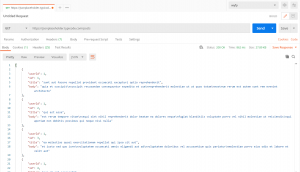
If you analyze it carefully, it’s a list of JSON objects.
{
"userId": 1,
"id": 1,
"title": "sunt aut facere repellat provident occaecati excepturi optio reprehenderit",
"body": "quia et suscipit\nsuscipit recusandae consequuntur expedita et cum\nreprehenderit molestiae ut ut quas totam\nnostrum rerum est autem sunt rem eveniet architecto"
},
Deserialization
First of all, we need to deal with serialization and deserialization.
Now, what does it mean?
Serialization is to convert Dart object to JSON and deserialization is to convert JSON to Dart object. Do not worry, it’s very easy to do once you get the hang of it.
Here we need to create a class for dealing with deserialization. It’s called a model class.
The easiest way to do it automatically is by heading over to app.quicktype.io and pasting the JSON output there. Once you do so, a class will be created. Don’t forget to change the language to Dart.
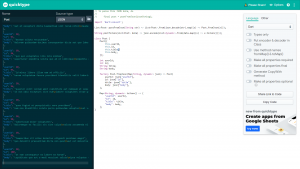
The following class will be created.
// To parse this JSON data, do
//
//     final post = postFromJson(jsonString);

import 'dart:convert';

List<Post> postFromJson(String str) => List<Post>.from(json.decode(str).map((x) => Post.fromJson(x)));

String postToJson(List<Post> data) => json.encode(List<dynamic>.from(data.map((x) => x.toJson())));

class Post {
    Post({
        this.userId,
        this.id,
        this.title,
        this.body,
    });

    int userId;
    int id;
    String title;
    String body;

    factory Post.fromJson(Map<String, dynamic> json) => Post(
        userId: json["userId"],
        id: json["id"],
        title: json["title"],
        body: json["body"],
    );

    Map<String, dynamic> toJson() => {
        "userId": userId,
        "id": id,
        "title": title,
        "body": body,
    };
}
This is your model class. Save it in a file called posts.dart in lib/src/models folder of your Flutter mobile application project.
But first, let’s just focus on the postFromJson method.
List<Post> postFromJson(String str) => List<Post>.from(json.decode(str).map((x) => Post.fromJson(x)));
The str is just our JSON string. Which is basically a list of JSONs.
The above functions generate a post object for each JSON in that list. Each post object has a userId, title, id, and body.
Now let’s call our API
You can make a file called posts_repo.dart under the lib/repos folder in our project. Repos basically deal with making the actual network call.
import 'package:http/http.dart' as http;
import 'package:jsontest/src/models/posts.dart';

class PostsRepository {
  Future<List<Posts>> getPosts() async {
    final response = await http.get("https://jsonplaceholder.typicode.com/posts");
    return postsFromJson(response.body);
  }
}
So, the getPosts function is an async function. A function is marked as async to make it a non-blocking call. In Flutter, we need function calls to be non-blocking since Flutter needs the main thread free for UI.
We use the get() method in the HTTP package, to make the network call with a remote URL.
Then we use the postsFromJson() function to take the response body, which is a string, parse it, and generate Dart objects.
Thus, we have successfully made a network call here.
For example, now if you want to show this data, you can use FutureBuilders.
Now, onto the app.dart file.
import 'package:flutter/material.dart';
import 'package:jsontest/src/repos/posts_repo.dart';

import 'models/posts.dart';

class MyApp extends StatelessWidget {
  @override
  Widget build(BuildContext context) {
    return MaterialApp(
      theme: ThemeData(
        primarySwatch: Colors.blue,
      ),
      home: HomeScreen(),
    );
  }
}
class HomeScreen extends StatelessWidget {
  @override
  Widget build(BuildContext context) {
    return Scaffold(
      appBar: AppBar(
        title: Text('test'),
      ),
      body: FutureBuilder<List<Posts>>(
        future: PostsRepository().getPosts(),
        builder: (context, snapshot) {
          if (snapshot.hasError) {
            showDialog(
              context: context,
              child: AlertDialog(
                title: Text("Error"),
                content: Text(snapshot.error.toString()),
              ),
            );
          } else if (snapshot.hasData) {
            return ListView.builder(
              itemCount: snapshot.data.length,
              itemBuilder: (context, index) => ListTile(
                title: Text(snapshot.data[index].title),
                subtitle: Text(
                  snapshot.data[index].body,
                  softWrap: false,
                  overflow: TextOverflow.ellipsis,
                ),
              ),
            );
          }
          return Center(
            child: CircularProgressIndicator(),
          );
        },
      ),
    );
  }
}
Don’t worry, let’s break it down into smaller sections.
MyApp class
class MyApp extends StatelessWidget {
  @override
  Widget build(BuildContext context) {
    return MaterialApp(
      theme: ThemeData(
        primarySwatch: Colors.blue,
      ),
      home: HomeScreen(),
    );
  }
}
This is a basic class that initializes the root widget, or MaterialApp.
HomeScreen
class HomeScreen extends StatelessWidget {
  @override
  Widget build(BuildContext context) {
HomeScreen is a basic stateless widget which lays the scaffold for our mobile application.
return Scaffold(
      appBar: AppBar(
        title: Text('test'),
      ),
      body: FutureBuilder<List<Posts>>(
        future: PostsRepository().getPosts(),
        builder: (context, snapshot) {
In the scaffold, we have defined the appbar widget and the body.
Inside the body, we have used a FutureBuilder.
If you noticed the posts_repo.dart file, we have a return type as Future<List<Post>>.
But why is the return type Future<List<Post>> and not List<Post>?
We are doing a network call. So obviously we won’t have a response as soon as we call the API. It will take some time. By definition, a Future is used to represent a potential value, or error, that will be available at some time in the future. Since our response will also be available sometime in the future, we use Futures. That’s why we have async functions and futures. That’s why we are using a FutureBuilder. You might have guessed what it does. It builds the screen when we get the data (potential value) which will come sometime in the future, after making the network call.
So, here, a FutureBuilder takes a Future, which is the function PostsRepository().getPosts().
This function returns a Future<List<Post>>, thus we have also added the type to FutureBuilder to help us with completion and type checking.
builder: (context, snapshot) {
          if (snapshot.hasError) {
            showDialog(
              context: context,
              child: AlertDialog(
                title: Text("Error"),
                content: Text(snapshot.error.toString()),
              ),
            );
          } else if (snapshot.hasData) {
            return ListView.builder(
              itemCount: snapshot.data.length,
              itemBuilder: (context, index) => ListTile(
                title: Text(snapshot.data[index].title),
                subtitle: Text(
                  snapshot.data[index].body,
                  softWrap: false,
                  overflow: TextOverflow.ellipsis,
                ),
              ),
            );
          }
          return Center(
            child: CircularProgressIndicator(),
          );
        },
Now, the builder. It takes in context and snapshot and returns a widget.
If the Future returns an error, it will execute the if condition, and show an alert dialog.
If the snapshot has data, then we show a ListView.
If the snapshot does not have data or error, it means the data is not returned yet, thus we return a CircularProgressIndicator.
Final Result
Happy mobile app development with Flutter 🙂!