In this Flutter tutorial, you will learn about different types of Switches in Flutter.
If you are interested in Flutter video tutorials, check this playlist: Flutter Video Tutorials. Also, there is a large collection of code examples if you check Flutter tutorials page.
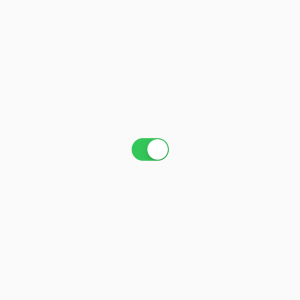
Simple/Material Switch
A Switch widget takes a boolean value parameter and onChanged function parameter.
Switch(
  value: value1, //boolean value
  onChanged: (val) {
    setState(() {
      value1 = val;
    });
  },
),


Material Switch
Cupertino Switch
A CupertinoSwitch is exactly the same as a normal (Material) Switch but it looks like an iOS Switch
CupertinoSwitch(
  value: value1,
  onChanged: (val) {
    setState(() {
      value1 = val;
    });
  },
),
If you want to change the switch appearance based on which platform it is running you can always use Switch.adaptive

Cupertino (iOS) Switch
Platform-Adaptive Switch
The Platform-Adaptive switch allows you to create a Switch widget which appearance will be based on the platform it is running on.
Switch.adaptive(
  value: value1,
  onChanged: (val) {
    setState(() {
      value1 = val;
    });
  },
),
As you can see, it is the same widget but it automatically adapts to the platform and shows a Material Switch for Android and a Cupertino Switch for iOS.
In fact, if you check out its source code you can see for yourself how it functions:
Widget build(BuildContext context) {
    switch (widget._switchType) {
      case _SwitchType.material:
        return buildMaterialSwitch(context);

      case _SwitchType.adaptive: {
        final ThemeData theme = Theme.of(context);
        assert(theme.platform != null);
        switch (theme.platform) {
          case TargetPlatform.android:
          case TargetPlatform.fuchsia:
          case TargetPlatform.linux:
          case TargetPlatform.windows:
            return buildMaterialSwitch(context);
          case TargetPlatform.iOS:
          case TargetPlatform.macOS:
            return buildCupertinoSwitch(context);
        }
      }
    }
    assert(false);
    return null;
}
- If the platform is Android, Fuschia, Linux, or Windows, then it will build a Material switch,
- If the platform is iOS or macOS, then build a Cupertino switch
SwitchListTile
A better way of using a switch can be using it in a ListTile widget. It gives you ample flexibility on how to customize the text around it and it makes the whole tile tappable which is very good for accessibility.
SwitchListTile(
  title: Text('Switch in list tile'),
  subtitle: Text('some subtitle'),
  value: value3,
  onChanged: (val) {
    setState(() {
      value3 = val;
    });
  },
),
ListTile(
  title: Text('Switch in list tile'),
  subtitle: Text('some subtitle'),
  trailing: Switch(
    value: value2,
    onChanged: (val) {
      setState(() {
        value2 = val;
      });
    },
  ),
),
SwitchListTile vs ListTile with Switch as a trailing widget
If you want to change how it looks based on target-platform, use SwitchListTile.adaptive!

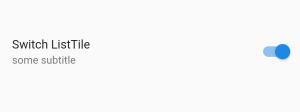
SwitchListTIle Widget in Flutter
I hope this Flutter tutorial was of good value to you. If you are interested in learning Flutter, please check other Flutter tutorials on this site. Some of them have video tutorials included.
Happy learning!