In this tutorial, you will learn about JUnit5 Lifecycle methods. A Lifecycle Method is any method that is directly annotated or meta-annotated with @BeforeAll, @AfterAll, @BeforeEach, or @AfterEach. Let’s have a look at these annotations one by one.
@BeforeAll
When a method is annotated with @BeforeAll it means that the method should be executed before all @Test, @RepeatedTest, @ParameterizedTest, and @TestFactory methods in the current class.
@BeforeEach
When a method is annotated with @BeforeEach it means that the method should be executed before each @Test, @RepeatedTest, @ParameterizedTest, or @TestFactory method in the current class.
@AfterEach
When a method is annotated with @AfterEach it means that the method should be executed after each @Test, @RepeatedTest, @ParameterizedTest, or @TestFactory method in the current class.
@AfterAll
When a method is annotated with @AfterAll it means that it should be executed after all @Test, @RepeatedTest, @ParameterizedTest, and @TestFactory methods in the current class.
The pom.xml File
Below are the necessary dependencies that you will need to add to your project.
junit-jupiter-engine dependency
JUnit Jupiter is the combination of the new programming model and extension model for writing tests and extensions in JUnit 5. We need to add at least a single TestEngine implementation to our project to get started with the JUnit Platform.
Let’s say if we want to write tests with Jupiter, we will add the test artifact junit-jupiter-engine to the dependencies in pom.xml. After that, we can create tests in our test source directory.
<dependency>
    <groupId>org.junit.jupiter</groupId>
    <artifactId>junit-jupiter-engine</artifactId>
    <version>5.8.2</version>
    <scope>test</scope>
</dependency>
maven-surefire-plugin
We use Surefire Plugin to execute the unit tests of an application during the test phase of the build lifecycle. It generates reports in two different file formats that include Plain text files and XML files.
<plugin>
    <groupId>org.apache.maven.plugins</groupId>
    <artifactId>maven-surefire-plugin</artifactId>
    <version>3.0.0-M5</version>
</plugin>
JUnit5 Lifecycle Method Examples
Now let’s see the working of the annotations discussed above to learn more about JUnit5 Lifecycle Methods. Here we have used @BeforeEach, @AfterEach, @BeforeAll, @AfterAll along with @Test. We have included simple print statements in our demo class so that we can understand the flow of execution of lifecycle methods.
DemoTestLifeCycleMethods.java
package com.junit5.lifecyle;

import org.junit.jupiter.api.AfterAll;
import org.junit.jupiter.api.AfterEach;
import org.junit.jupiter.api.BeforeAll;
import org.junit.jupiter.api.BeforeEach;
import org.junit.jupiter.api.Test;

public class DemoTestLifeCycleMethods {

       @BeforeAll
        static void demoBeforeAllTests() {
            System.out.println("This test will run before all tests");
        }

        @AfterAll
        static void demoAfterAllTests() {
            System.out.println("This test will run after all tests");
        }

        @BeforeEach
        void demoBeforeEachTest() {
            System.out.println("This test will run before each test");
        }

        @AfterEach
        void demoAfterEachTest() {
            System.out.println("This test will run after each test");
        }

        @Test
        void demoTestOne() {
            System.out.println("Demo Test One");
        }

        @Test
        void demoTestTwo() {
            System.out.println("Demo Test Two");
        }

}
Running JUnit test
Now let’s run the class as JUnit Test. Here we can clearly see that the method with @BeforeAll ran first, then the method with @BeforeEach annotation was executed before each test. Similarly, the method with @AfterEach annotation ran after each test. In the end method with @AfterAll annotation was executed.

Calculator.java
Now let’s take another example. Here we have a Calculator class with add, multiply, divide and subtract methods. Now we will be implementing a test class for our Calculator class.
package com.junit5.lifecyle;

public class Calculator {


    int add(int a, int b) {

        return a+b;

    }
    int multiply(int a, int b) {

        return a*b;

    }
    int divide(int a, int b) {

        return a/b;

    }
    int subtract(int a, int b) {

        return a-b;

    }


}
CalculatorTest.java
Following is CalculatorTest class. Let’s see what’s happening inside our test class.
- There is a method with @BeforeAll annotation with the name setUp. In this method, we are instantiating an object of the Calculator class along with a print statement. This method will run only once before all the methods.
- Then we have a method with name beforeEach() with annotation @BeforeEach. In this method, we have a simple print statement. Currently, it is not doing anything significant. But if there is a requirement we can add code that we need to run before each test method.
- Then we have methods with @Test annotations named testAdd(), testSub(), testMultiply(), and testDivide(). All these methods have assertEquals statement and a print statement. In the first argument, we have the expected output, then we are calling add, subtract, multiply and divide methods of the Calculator class with the reference of the object we instantiated in the setUp method that will return the actual output. Note that we can also display an error message in case the test fails.
- Then we have a method with annotation @AfterEach. It has a simple print statement that contains a message that will print after running each test method.
- In the end, the method with annotation @AfterAll will run. In this method, we are setting the Calculator object to null.
- Note that here we have used @DisplayName annotation. We use @DisplayName to declare a custom display name for the test class or test method.
package com.junit5.lifecyle;

import org.junit.jupiter.api.AfterAll;
import org.junit.jupiter.api.AfterEach;
import org.junit.jupiter.api.BeforeAll;
import org.junit.jupiter.api.BeforeEach;
import org.junit.jupiter.api.DisplayName;
import org.junit.jupiter.api.Test;
import static org.junit.jupiter.api.Assertions.assertEquals;


public class CalculatorTest {


 static Calculator calculator;

    @BeforeAll
    static void setUp(){
        System.out.println("Running before all tests");
        calculator = new Calculator();
    }
    @BeforeEach
    void beforeEach(){
        System.out.println("Running before each test");
    }
    @AfterEach
    void afterEach(){
        System.out.println("Running after each test");
    }


    @Test
    @DisplayName("Addition")
    void testAdd() {
          System.out.println("Testing addition");
        assertEquals(10, calculator.add(5, 5));
    }

    @Test
    @DisplayName("Subtraction")
    void testSubtract() {
          System.out.println("Testing subtraction");
        assertEquals(0, calculator.subtract(5, 5));
    }

    @Test
    @DisplayName("Multiplication")
    void testMultiply() {
          System.out.println("Testing multiplication");
        assertEquals(25, calculator.multiply(5, 5));
    }


    @Test
    @DisplayName("Division")
    void testDivide() {
          System.out.println("Testing division");
        assertEquals(1, calculator.divide(5, 5));
    }

    @AfterAll
    static void tearDown(){
        System.out.println("Running after all tests");
        calculator = null;
    }

}
Running JUnit test
Now when we run our test class as JUnit test, we can see the following statements printed on the console.
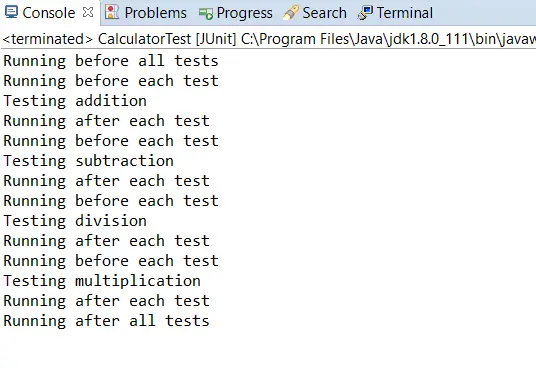
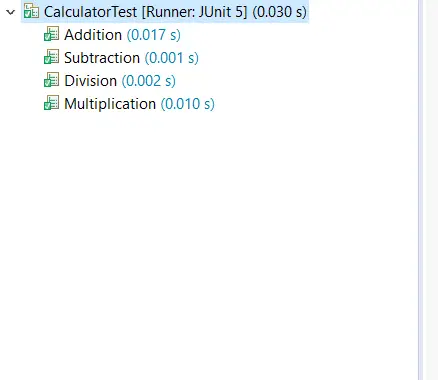
Here we can see that all our test methods have successfully passed as the expected output is equal to the actual output. We can also see the custom display names of test methods that we have provided using @DisplayName annotation.
Conclusion
With this, we have come to the end of our tutorial. In this tutorial, we learned about JUnit5 Lifecycle Methods. We looked at the annotations that we later used for implementing lifecycle methods. In the end, we did a hands-on and used the annotations in our demo classes.
If you’re eager to elevate your unit testing abilities, make sure to explore the Testing Java Code page. There, you’ll gain access to a range of informative tutorials that will empower you to construct well-structured and efficient test cases.
