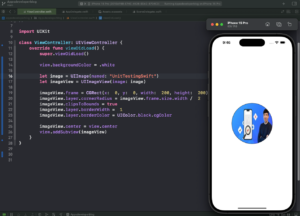
In this tutorial, you will learn how to make UIImage circular programmatically in Swift.
Making a UIImage circular programmatically in Swift involves several steps.
If you are interested in video lessons on how to write Unit tests and UI tests to test your Swift mobile app, check out this page: Unit Testing Swift Mobile App
Step 1: Create a UIImageView with Your Image
First, you need to create a UIImageView instance within your UIViewController. Then set the image you want to display UIImageView by initializing it with a named image from your assets.
import UIKit

class ViewController: UIViewController {
    override func viewDidLoad() {
        super.viewDidLoad()

        view.backgroundColor = .white

        let image = UIImage(named: "YourImageName")
        let imageView = UIImageView(image: image)

    }
}
Replace "YourImageName" with the actual name of your image asset.
Step 2: Set the Frame for the UIImageView
Define the dimensions of the UIImageView by setting its frame. The frame specifies the position and size of the view in the coordinate system of its superview.
imageView.frame = CGRect(x: 0, y: 0, width: 200, height: 200)
This sets the image view’s width and height to 200 points and positions it at the origin (top-left corner) of its parent view.
Step 3: Make the Image Circular
To make the image circular, set the cornerRadius property of the UIImageView‘s layer to half of the width or height of the image view. Then, enable the clipsToBounds property to ensure that the content is confined to the bounds of the view.
imageView.layer.cornerRadius = imageView.frame.size.width /  2
imageView.clipsToBounds = true
Step 4: Add a Border Around the UIImageView
To add a border around the circular image, set the borderWidth property of the UIImageView‘s layer to the desired thickness. Then, specify the color of the border using the borderColor property.
imageView.layer.borderWidth =  1
imageView.layer.borderColor = UIColor.black.cgColor
Here, you set a black border with a width of 1 point added around the image view.
Step 5: Change the UIImage Border Color
If you want to change the border color, simply assign a different CGColor value to the borderColor property.
imageView.layer.borderColor = UIColor.red.cgColor
This changes the border color to red.
Complete Code Example
Below is a complete code example combining all the above steps:
import UIKit

class ViewController: UIViewController {
    override func viewDidLoad() {
        super.viewDidLoad()

        view.backgroundColor = .white

        let image = UIImage(named: "YourImageName")
        let imageView = UIImageView(image: image)

        imageView.frame = CGRect(x:  0, y:  0, width:  200, height:  200)
        imageView.layer.cornerRadius = imageView.frame.size.width /  2
        imageView.clipsToBounds = true
        imageView.layer.borderWidth =  1
        imageView.layer.borderColor = UIColor.black.cgColor

        imageView.center = view.center
        view.addSubview(imageView)
    }
}

Conclusion
I hope this tutorial was helpful to you and you have a solid understanding of how to manipulate UIImageView layers to achieve a circular image with a customizable border.
For more Swift code examples and tutorials, please check the Swift Code Examples page on this website.