In this tutorial, you will learn about Unit Testing AWS Lambda Function with Java.
First, we will have a quick overview of Unit Testing. Then we will look at the required dependencies in order to do Unit Testing of AWS Lambda Function. After that, we will dive deep into the annotations that will be used in our HandlerTest class. We will also have a look at Assertions. In the end, we will look into the implementation of our basic HandlerTest class that tests our Lambda functions handleRequest method and checks whether it returns a welcome message or not.
To begin with, let’s see what Unit Testing is.
What is Unit Testing?
Unit testing refers to the testing of individual components in the source code, such as classes and their provided methods. We do Unit testing to test the correctness of isolated code.
One important thing to note over here is that let’s say in an application if a lot is going on inside a single method, it will be more difficult to write its test. On the other hand, if we break the application into clear classes and methods, then writing tests is pretty straightforward.
Now let’s look at the maven dependencies that we will be using to implement unit tests.
The pom.xml File
Below are the necessary dependencies that you will need to add to your project.
junit-jupiter-engine dependency
JUnit Jupiter is the combination of the new programming model and extension model for writing tests and extensions in JUnit 5. We need to add at least a single TestEngine implementation to our project to get started with the JUnit Platform.
Let’s say if we want to write tests with Jupiter, we will add the test artifact junit-jupiter-engine to the dependencies in pom.xml. After that, we can create tests in our test source directory.
<dependency>
    <groupId>org.junit.jupiter</groupId>
    <artifactId>junit-jupiter-engine</artifactId>
    <version>5.8.2</version>
    <scope>test</scope>
</dependency>
mockito-junit-jupiter dependency
Mockito is a java based mocking framework that is used in conjunction with other testing frameworks such as JUnit and TestNG. The reason for using the Mockito framework is to simplify the development of a test by mocking external dependencies and using them in the test code. Note that a mock object returns dummy data and avoids external dependencies. Mockito provides an implementation for JUnit5 extensions in the library with artifactID mockito-junit-jupiter.
<dependency>
    <groupId>org.mockito</groupId>
    <artifactId>mockito-junit-jupiter</artifactId>
    <version>4.3.1</version>
    <scope>test</scope>
</dependency>
maven-surefire-plugin
The Surefire Plugin is used to execute the unit tests of an application during the test phase of the build lifecycle. It generates reports in two different file formats that include Plain text files and XML files.
<plugin>

    <groupId>org.apache.maven.plugins</groupId>
    <artifactId>maven-surefire-plugin</artifactId>
    <version>3.0.0-M5</version>

</plugin>
Annotations
Now we will have a look at the annotations that we will be using in our HandlerTest class.
@Test
The @Test annotation on the public void method tells JUnit that we can run the method as a test case.
@ExtendWith
The @ExtendWith annotation is used to load a JUnit 5 extension. JUnit defines an extension API, which allows a third-party vendor like Mockito to hook into the lifecycle of running test classes and add additional functionality.
@Mock
The @Mock annotation is used to create and inject mocked instances. We do not create real objects, rather ask Mockito to create a mock for the class.
Read more about @Mock annotation.
@InjectMocks
In Mockito, we need to create the object of a class and then insert its dependencies to completely test the behaviour. Note that we will also mock the dependencies. To do this, we use @InjectMocks annotation. @InjectMocks marks a field on which injection should be performed.
Read more about @InjectMocks annotation.
Assertions
Assertions are utility methods to support asserting conditions in tests. These methods are accessible through the Assertions class in JUnit 5. We can use different assertions, such as:
- assertAll
- assertEquals
- assertNotEquals
- assertArrayEquals
- assertIterableEquals
- assertLinesMatch
- assertNotNull
- assertNull
- assertNotSame
- assertSame
- assertTimeout
- assertTimeoutPreemptively
- assertTrue
- assertFalse
- assertThrows
- fail
In the HandlerTest class, we will be using assertEquals.
Handler.java
Following is the Handler class of our Lambda function. It takes APIGatewayProxyRequestEvent as input and returns a welcome message that says “Welcome to AppsDeveloperBlog”. Now we are going to write a unit test for the handleRequest method of the Handler class.
package com.serverless.junit.lambda;

import com.amazonaws.services.lambda.runtime.Context;
import com.amazonaws.services.lambda.runtime.RequestHandler;
import com.amazonaws.services.lambda.runtime.events.APIGatewayProxyRequestEvent;

public class Handler implements RequestHandler<APIGatewayProxyRequestEvent, String>{

    public String handleRequest(APIGatewayProxyRequestEvent input, Context context) {

        return "Welcome to AppsDeveloperBlog";
    }


}
HandlerTest.java
Let’s build our test class
- First, we will attach the Mockito extension to our test class. We will attach the extension by adding @ExtendWith(MockitoExtension.class) to the test class.
- The MockitoExtension looks at the test class and finds member variables annotated with the @Mock annotation, and creates a mock implementation of those variables. Here we will have two objects with @Mock annotation APIGatewayProxyRequestEvent and Context. Both are passed as input arguments to the handleRequest method.
- It then finds member variables annotated with the @InjectMocks annotation and attempts to inject its mocks into those classes, using either construction injection or setter injection. Here we will have the Handler class object annotated with @InjectMocks.
- Then we will use assertEquals assertion that will verify that the expected and the actual values are equal or not. In assertEquals assertion, the first argument is the expected output and the second argument is the actual output.
- It’s also possible to specify a message to display when the assertion fails. Here if the lambda function does not return “Welcome to AppsDeveloperBlog” then the assert statement will throw an error that says “The Lambda function should return a welcome message”.
- Note that here we have imported the Assertion class statically in order to increase the readability of the test and of the assertions themselves. In this way, we can refer directly to the assertion method itself without representing class as a prefix. This is what we have done in our HandlerTest class.
import static org.junit.jupiter.api.Assertions.assertEquals;
package com.serverless.junit.lambda;

import org.junit.jupiter.api.Test;
import org.junit.jupiter.api.extension.ExtendWith;
import org.mockito.InjectMocks;
import org.mockito.Mock;
import org.mockito.junit.jupiter.MockitoExtension;
import com.amazonaws.services.lambda.runtime.Context;
import com.amazonaws.services.lambda.runtime.events.APIGatewayProxyRequestEvent;
import static org.junit.jupiter.api.Assertions.assertEquals;


@ExtendWith(MockitoExtension.class)
public class HandlerTest {

    @Mock
    APIGatewayProxyRequestEvent apiGatewayProxyRequestEvent;

    @Mock
    Context context;

    @InjectMocks
    Handler handler;


    @Test
    public void testHandleRequest() {

        String response =	handler.handleRequest(apiGatewayProxyRequestEvent, context);

        assertEquals("Welcome to AppsDeveloperBlog",response,"The Lambda function should return a welcome message");

    }

}
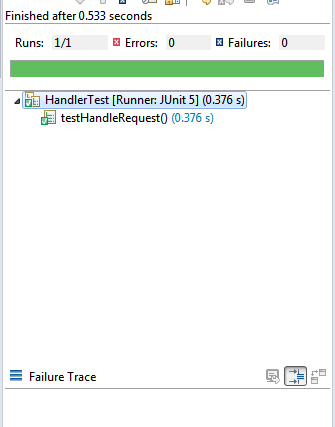
Unit Testing Lambda Function
Now let’s run our test. For that, we will right-click on the HandlerTest class then click on Run As > JUnit Test. Here we can see that our handleRequest method works as expected and there were no errors.
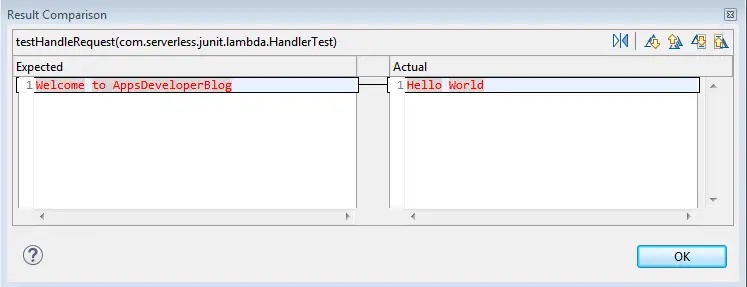
Now if we change the string that handleRequest method returns and run the test again, we can see that the test fails. Note that the assertEquals statement throws an error in this case.

On Result comparison, we can see the Expected output and the Actual output are not the same.
Conclusion
In this tutorial, we learned about the Unit Testing Lambda Function with Java. We implemented a basic Handler class for our Lambda function and learned how we can write a unit test for the handleRequest method in the test class.
Stay tuned for some more informative tutorials coming ahead. Feel free to leave any feedback in the comments section.
Happy learning!