Internationalization (i18n) is the process of making your application and services capable of delivering in different languages. This tutorial will show how the Spring Boot framework manages internationalization.
Overview
Preparation:
In this example, I’ll be using the following tools:
- JDK 1.8
- Intellij Idea
- Maven
- Springboot Application version 2.5.5
Structure of the post:
In addition, the development outline of this blog will be as follow:
- Create Spring Boot Web Application
- Include Dependencies
- Create Configuration beans
- Create Controller beans
- Multilingual properties
- Implement a View
- Running the Application
Step1: Create Spring Boot Web Application
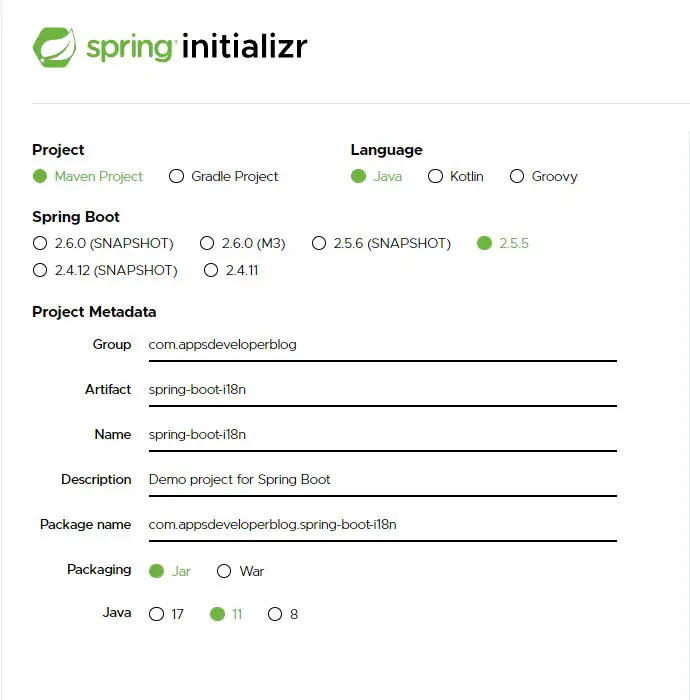
Firstly, we create a simple Spring Boot web application. You can use the Spring Initializr page to create an initial project template.
In this tutorial, we will be using a project with the following metadata.
After importing the project into IDE, we will be creating two sub-packages inside our main package ‘com.appsdeveloperblog.springbooti18n‘ as follows:
- Controller: This contains class ‘InternationalController‘ with filename ‘InternationalController.java‘
- Config: This contains class ‘InternationalizationConfig‘ with filename ‘InternationalizationConfig.java‘
In the end, the final project structure will look like this:
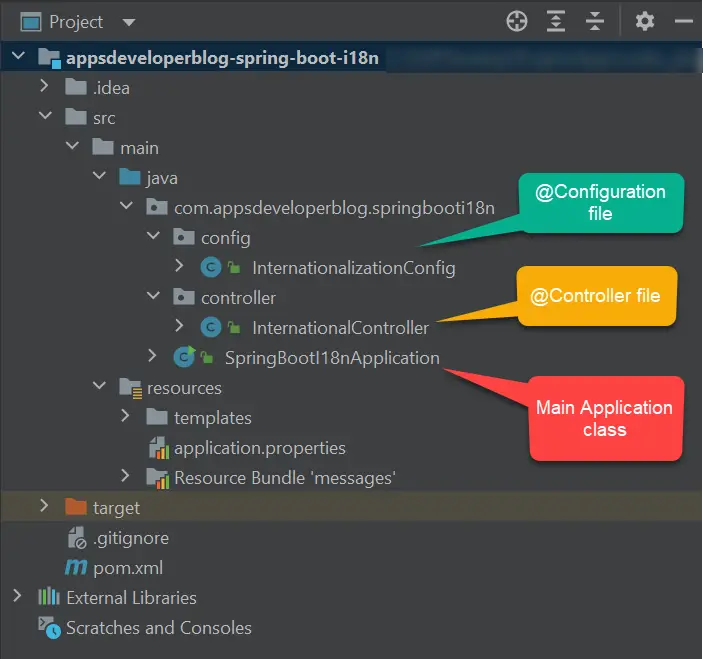
We will learn aspects about the config, and controller classes in detail in the next section.
Step 2: Include Dependencies
-
Spring Boot Starter Web,
-
Spring Boot Starter Thymeleaf
<?xml version="1.0" encoding="UTF-8"?>
<project xmlns="http://maven.apache.org/POM/4.0.0" xmlns:xsi="http://www.w3.org/2001/XMLSchema-instance"
         xsi:schemaLocation="http://maven.apache.org/POM/4.0.0 http://maven.apache.org/xsd/maven-4.0.0.xsd">
    <modelVersion>4.0.0</modelVersion>

    <groupId>com.appsdeveloperblog</groupId>
    <artifactId>spring-boot-i18n</artifactId>
    <version>0.0.1-SNAPSHOT</version>
    <packaging>jar</packaging>

    <name>appsdeveloperblog-spring-boot-i18n</name>
    <description>Spring Boot i18n demo</description>

    <parent>
        <groupId>org.springframework.boot</groupId>
        <artifactId>spring-boot-starter-parent</artifactId>
        <version>2.5.0</version>
        <relativePath/>
    </parent>

    <properties>
        <project.build.sourceEncoding>UTF-8</project.build.sourceEncoding>
        <project.reporting.outputEncoding>UTF-8</project.reporting.outputEncoding>
        <java.version>1.8</java.version>
    </properties>

    <dependencies>
        <dependency>
            <groupId>org.springframework.boot</groupId>
            <artifactId>spring-boot-starter-web</artifactId>
        </dependency>
        <dependency>
            <groupId>org.springframework.boot</groupId>
            <artifactId>spring-boot-starter-thymeleaf</artifactId>
        </dependency>
    </dependencies>
    <build>
        <plugins>
            <plugin>
                <groupId>org.springframework.boot</groupId>
                <artifactId>spring-boot-maven-plugin</artifactId>
            </plugin>
        </plugins>
    </build>
</project>
Step 3: Create Configuration Bean
Spring uses LocaleResolver to extract locale related to web requests and uses this locale object to select appropriate language messages. First, it requires a bean of LocaleResolver. We will discuss this in detail below:
Locale Resolver
There are many LocaleResolverType provided by spring, but the most common areas are below:
| Type | Explanation |
|---|---|
| AcceptHeaderLocaleResolver | This simply selects Locale from the Accept-Language header sent by the client web browser |
| CookieLocaleResolver | Get locale information using cookies. The setLocale() method stores Locale information in a cookie. Here, Resolved locale data is persisted as long as cookies are alive |
| SessionLocaleResolver | Get Locale information from the session. The setLocale() method stores Locale information in the session. Here, Resolved locale data is persisted in a single HTTP session. |
| FixedLocaleResolver | Fixed Locale is used. no setLocale() method |
Spring provides various other locale resolvers under the standard package “org.springframework.web.servlet.i18n“.
For more details, refer to the following official link: org.springframework.web.servlet.i18n.
Let’s understand CookieLocaleResolver and SessionLocaleResolver locale types in detail:
CookieLocaleResolver
If you use locale object based on the user’s PC or browser settings then, it cannot be changed when the client wants to view the webpage in a different language. Therefore, the Locale setting using Cookie is another option as below. Now, based on user preference we can set the locale in the cookies. A sample code for locale settings using CookieLocaleResolver is as below:
@Bean
public CookieLocaleResolver localeResolver() {
  CookieLocaleResolver localeResolver = new CookieLocaleResolver();
  localeResolver.setDefaultLocale(Locale.US);
  localeResolver.setCookieName("locale");
  localeResolver.setCookieMaxAge(60 * 60);
  localeResolver.setCookiePath("/");
  return localeResolver;
}
SessionLocaleResolver
If a user wants to set locale to each individual HTTP session, then SessionLocaleResolver is favored:
@Bean
public LocaleResolver localeResolver() {
    SessionLocaleResolver localeResolver = new SessionLocaleResolver();
    localeResolver.setDefaultLocale(Locale.US);
    return localeResolver;
}
In our example, we will use this “SessionLocaleResolver” for simplicity.
Interceptor
Secondly, we require another bean for the interceptor in our class.
@Bean
public LocaleChangeInterceptor localeChangeInterceptor() {
    LocaleChangeInterceptor localeChangeInterceptor = new LocaleChangeInterceptor();
    localeChangeInterceptor.setParamName("lang");
    return localeChangeInterceptor;
}

@Override
public void addInterceptors(InterceptorRegistry registry) {
    registry.addInterceptor(localeChangeInterceptor());
}
The complete source code for the configuration class “InternationalizationConfig.java” is as below:
package com.appsdeveloperblog.springbooti18n.config;

import org.springframework.context.annotation.Bean;
import org.springframework.context.annotation.Configuration;
import org.springframework.web.servlet.LocaleResolver;
import org.springframework.web.servlet.config.annotation.InterceptorRegistry;
import org.springframework.web.servlet.config.annotation.WebMvcConfigurer;
import org.springframework.web.servlet.config.annotation.WebMvcConfigurerAdapter;
import org.springframework.web.servlet.i18n.LocaleChangeInterceptor;
import org.springframework.web.servlet.i18n.SessionLocaleResolver;

import java.util.Locale;

@Configuration
public class InternationalizationConfig implements WebMvcConfigurer {

    @Bean
    public LocaleResolver localeResolver() {
        SessionLocaleResolver localeResolver = new SessionLocaleResolver();
        localeResolver.setDefaultLocale(Locale.US);
        return localeResolver;
    }

    @Bean
    public LocaleChangeInterceptor localeChangeInterceptor() {
        LocaleChangeInterceptor localeChangeInterceptor = new LocaleChangeInterceptor();
        localeChangeInterceptor.setParamName("lang");
        return localeChangeInterceptor;
    }

    @Override
    public void addInterceptors(InterceptorRegistry registry) {
        registry.addInterceptor(localeChangeInterceptor());
    }
}
Step 4: Create Controller
Next, we need the controller to serve our welcome page request. The complete source code for “InternationalController.java” is as below:
package com.appsdeveloperblog.springbooti18n.controller;

import org.springframework.stereotype.Controller;
import org.springframework.ui.Model;
import org.springframework.web.bind.annotation.RequestMapping;
import org.springframework.web.bind.annotation.RequestMethod;

@Controller
public class InternationalController {
    @RequestMapping(value = "/welcome", method= RequestMethod.GET)
    public String welcome() {
        return "welcome";
    }

    @RequestMapping("/")
    public String home(Model model) {
        return "redirect:welcome";
    }
}
Step 5: Multilingual Properties Files
The base has an internationalized application in the language files. In Spring Boot, we create multi-language message files like messages:
- properties,
- messages_es.properties,
- messages_en.properties, etc.
hello  = Hello!!!!!! (message_en.properties)
hello  = Bonjour!!!!!!(message_fr.properties)
hello  = Hallo!!!!!!(message_nl.properties)
hello  = こんにちは!!!!!! (message_jp.properties)
By default, these files need to be in the “src/main/resources” folder. In our example, we created two language files, i.e. English, and French message properties files.
The French language messages_fr.properties will be as indicated –
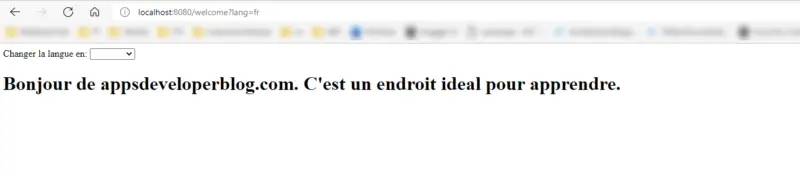
welcome.message=Bonjour de appsdeveloperblog.com. C'est un endroit ideal pour apprendre.
language.change=Changer la langue en
language.english=Englisch
language.french= francais
Default language messages.properties and messages_en.properties will be as indicated –
welcome.message=Hello from appsdeveloperblog.com. It's a great place for learning.
language.change=Change language to :
language.english=English
language.french= French
Step 6: Implement a View
To display internationalization messages in Thymeleaf, we must include the message key like this #{key} within a Thymeleaf tag. The most common will be to do it in th:text because it is the most typical to display text, but it can be used in any other tag, such as, for example th:value
We will create a webpage within the project’s resources/templates directory.
Here is the source code for “welcome.html“.
<!DOCTYPE HTML>
<html xmlns:th="https://www.thymeleaf.org">
<head>
    <script
            src="https://code.jquery.com/jquery-3.6.0.min.js"
            integrity="sha256-/xUj+3OJU5yExlq6GSYGSHk7tPXikynS7ogEvDej/m4="
            crossorigin="anonymous"></script>
</head>
<body>
<span th:text="#{language.change}"></span>:
<select id="locales">
    <option value=""></option>
    <option value="en" th:text="#{language.english}"></option>
    <option value="fr" th:text="#{language.french}"></option>
</select>
<h1 th:text="#{welcome.message}"></h1>
</body>
<script type="text/javascript">
      $(document).ready(function () {
          $("#locales").change(function () {
              var selectedOption = $('#locales').val();
              if (selectedOption != '') {
                  window.location.replace('?lang=' + selectedOption);
              }
          });
      });
   </script>
</html>
Step 7: Running the Application
Now, we can create the main class to start the Spring Boot Application:
package  com.appsdeveloperblog.springbooti18n;

import org.springframework.boot.SpringApplication;
import org.springframework.boot.autoconfigure.SpringBootApplication;

@SpringBootApplication
public class SpringBootI18nApplication {

    public static void main(String[] args) {

        SpringApplication.run(SpringBootI18nApplication.class, args);
    }
}
In the end, we will run our application either by executing the following command or using the ‘Run’ button from IDE. You will find that the application started on Tomcat port 8080.
mvn spring-boot:run
Once the application starts, go to the browser and open the following URL.
http://localhost:8080/
It will redirect to the welcome page, which is created in step 6.
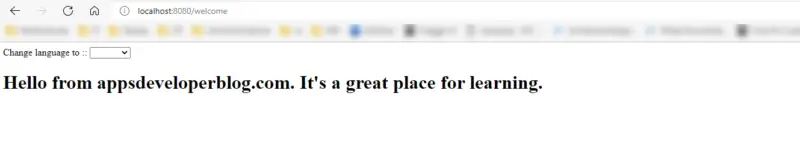
Thereafter, based on the language selected from the dropdown, the page is automatically updated with the selected language.
For example, the French page is as below
Exceptions with Locale Messages
To this end, we may also use the support of Spring Boot Internationalization to provide local exceptions or information messages.
We can define our error or information messages in the file messages.properties and other locale-specific files. Once the application encounters an error, Spring Boot will pick respective locale messages and construct the error message itself based on available locales.
For example, messages_en.properties
innboundrequest.200="Invalid inbound message payload."
innboundrequest.201="Unknown inbound message attribute {0}."
innboundrequest.202="Unknown attribute value {0} for Request ID {1}."
innboundrequest.203="Inbound message missing."
messages_fr.properties
innboundrequest.200="Donn\u00E9es utiles de message entrant non valides"
innboundrequest.201="Attribut {0} de message entrant inconnu"
innboundrequest.202="Valeur d'attribut inconnue {0} pour l'ID de demande {1}"
innboundrequest.203="Message entrant manquant"
Conclusion
In general, if your application serves many different clients around the world, the application must be able to respond based on the country and language.
In this post, we learned how Spring Boot provides out-of-box support for internalization. This makes our applications more intuitive and understandable for global users.
Check the Spring Boot tutorials page to learn more about building applications with Spring.
Happy Learning!