In this tutorial, you will learn how to create, schedule and handle local alert Notifications using the UNUserNotificationCenter in Swift.
If you are interested in video lessons on how to write Unit tests and UI tests to test your Swift mobile app, check out this page: Unit Testing Swift Mobile App
Local Notification vs Push Notification
One of the main differences between Local notification and a Push notification is that local notifications are created, scheduled and are sent from a user iOS device. Push notifications are created and are sent from a remote server.
Import UserNotifications Framework
To create and schedule a local notification you will need to use the UserNotifications framework. So the very first step is to import the UserNotifications framework into your ViewController.
import UserNotifications
Ask User Permission
For an app to be able to send user local alert notifications, a user will need to grant an app their permission to receive local notifications. Use the following swift code snippet to request user permission for sending alert notifications.
// Ask user permission
let center = UNUserNotificationCenter.current()
center.delegate = self
center.requestAuthorization(options: [.alert, .badge, .sound]) { (granted, error) in
    if granted {
        print("Permission granted. Scheduling notification")
        self.scheduleNotification()
    }
}
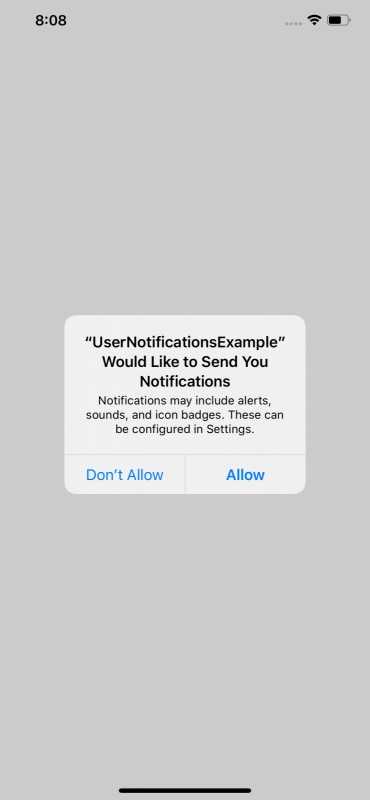
When a user is presented with a request for their permission they will see the following alert dialog.
Create and Schedule Local Notification
To create a new local notification you will need to create a new instance of UNMutableNotificationContent class. Then use it to create an object of UNNotificationRequest. And finally, add the UNNotificationRequest object to a notification center.
The below code snippet creates and schedules a local notification to be displayed 10 seconds after it is created.
let notificationCenter = UNUserNotificationCenter.current()

let notification = UNMutableNotificationContent()
notification.title = "Important Message"
notification.body = "It's a snow day tomorrow. No school busses."
notification.categoryIdentifier = "alarm"
notification.userInfo = ["additionalData": "Additional data can also be provided"]
notification.sound = UNNotificationSound.default

let trigger = UNTimeIntervalNotificationTrigger(timeInterval: 10, repeats: false)

let notificationRequest = UNNotificationRequest(identifier: UUID().uuidString, content: notification, trigger: trigger)

notificationCenter.add(notificationRequest)
Notice that the above code snippet schedules a new notification to be sent to a user 10 seconds after. If you want to schedule a notification to be presented at a particular time or date, you will need to use the DateComponents object.
var dateComponents = DateComponents()
dateComponents.hour = 8
dateComponents.minute = 0
For example, the following code snippet creates and schedules a new notification to be presented to a user at 8:00 am.
let notificationCenter = UNUserNotificationCenter.current()

let notification = UNMutableNotificationContent()
notification.title = "Important Message"
notification.body = "It's a snow day tomorrow. No school busses."
notification.categoryIdentifier = "alarm"
notification.userInfo = ["additionalData": "Additional data can also be provided"]
notification.sound = UNNotificationSound.default

var dateComponents = DateComponents()
dateComponents.hour = 8
dateComponents.minute = 0

let trigger = UNTimeIntervalNotificationTrigger(timeInterval: dateComponents, repeats: false)

let notificationRequest = UNNotificationRequest(identifier: UUID().uuidString, content: notification, trigger: trigger)


// Add Action button to notification
let actionButton = UNNotificationAction(identifier: "Show", title: "Tap to read", options: .foreground)
let notificationCategory = UNNotificationCategory(identifier: "alarm", actions: [actionButton], intentIdentifiers: [])
notificationCenter.setNotificationCategories([notificationCategory])

notificationCenter.add(notificationRequest)
Presenting Notification to a User
If you use the above code snippets to create a schedule a new local notification, it will be presented to the user only when the app is running in the background or is not running at all.
To make the local notification be presented to a user when the app is running in the foreground, you will need to implement one of the functions from UNUserNotificationCenterDelegate.
Make ViewController conform to a UNUserNotificationCenterDelegate.
extension UIViewController: UNUserNotificationCenterDelegate {

    public func userNotificationCenter(_ center: UNUserNotificationCenter, willPresent notification: UNNotification, withCompletionHandler completionHandler: @escaping (UNNotificationPresentationOptions) -> Swift.Void) {
        completionHandler( [.alert, .badge, .sound])
    }

}
Then specify delegate to a notification center.
let center = UNUserNotificationCenter.current()
center.delegate = self
Here is a complete code snippet.
import UIKit
import UserNotifications

class ViewController: UIViewController {

    override func viewDidLoad() {
        super.viewDidLoad()

       // Ask user permission
        let center = UNUserNotificationCenter.current()
        center.delegate = self
        center.requestAuthorization(options: [.alert, .badge, .sound]) { (granted, error) in
            if granted {
                print("Permission granted. Scheduling notification")
                self.scheduleNotification()
            }
        }
    }

    func scheduleNotification() {
        let notificationCenter = UNUserNotificationCenter.current()

        let notification = UNMutableNotificationContent()
        notification.title = "Important Message"
        notification.body = "It's a snow day tomorrow. No school busses."
        notification.categoryIdentifier = "alarm"
        notification.userInfo = ["additionalData": "Additional data can also be provided"]
        notification.sound = UNNotificationSound.default

        var dateComponents = DateComponents()
        dateComponents.hour = 8
        dateComponents.minute = 0

        let trigger = UNTimeIntervalNotificationTrigger(timeInterval: 10, repeats: false)

        let notificationRequest = UNNotificationRequest(identifier: UUID().uuidString, content: notification, trigger: trigger)

        notificationCenter.add(notificationRequest)
    }
}

extension UIViewController: UNUserNotificationCenterDelegate {

    public func userNotificationCenter(_ center: UNUserNotificationCenter, willPresent notification: UNNotification, withCompletionHandler completionHandler: @escaping (UNNotificationPresentationOptions) -> Swift.Void) {
        completionHandler( [.alert, .badge, .sound])
    }
}
This way, the user will receive a scheduled local notification either when the app is running or not.
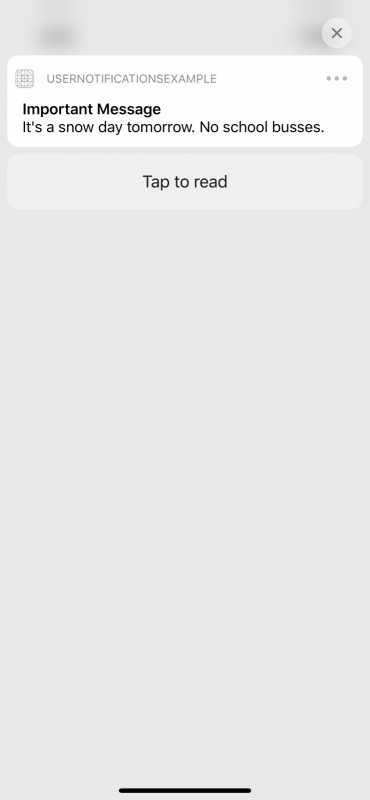
Add Action Button To Notification Alert
You can also add an Action button to a notification alert that is presented to user.
To add an action button to a notification alert you will need to use the UNNotificationAction struct.
// Add Action button to notification
let actionButton = UNNotificationAction(identifier: "TapToReadAction", title: "Tap to read", options: .foreground)
let notificationCategory = UNNotificationCategory(identifier: "alarm", actions: [actionButton], intentIdentifiers: [])
notificationCenter.setNotificationCategories([notificationCategory])
With the above code snippet, when user taps on a presented notification message, they will see an additional Action button. But for the action button to appear, the user will need to select the presented notification.
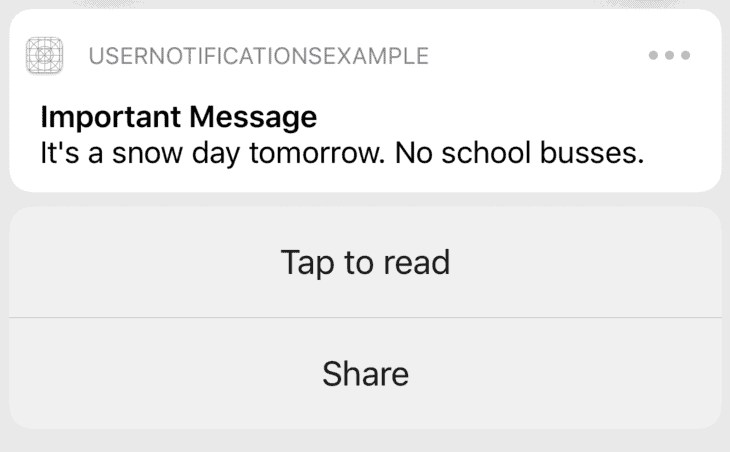
You can also attach more than one action button.
let actionButton = UNNotificationAction(identifier: "TapToReadAction", title: "Tap to read", options: .foreground)
let actionShareButton = UNNotificationAction(identifier: "TapToShareAction", title: "Share", options: .foreground)
let notificationCategory = UNNotificationCategory(identifier: "alarm", actions: [actionButton,actionShareButton], intentIdentifiers: [])
notificationCenter.setNotificationCategories([notificationCategory])
This way, when a user selects the presented notification, he or she will see two buttons.
To handle and action event when one of the action buttons is tapped you will need to implement one more function from a UNUserNotificationCenterDelegate.
public func userNotificationCenter(_ center: UNUserNotificationCenter, didReceive response: UNNotificationResponse, withCompletionHandler completionHandler: @escaping () -> Void) {

        let userInfo = response.notification.request.content.userInfo
        if let additionalData = userInfo["additionalData"] as? String {
            print("Additional data: \(additionalData)")
        }

        switch response.actionIdentifier {
        case UNNotificationDefaultActionIdentifier:
            print("User tapped on message itself rather than on an Action button")

        case "TapToReadAction":
            print("User tapped on Tap to read button")
            break

        case "TapToShareAction":
            print("User tapped on Share button")
            break

        default:
            break
        }

        completionHandler()
    }
Complete Code Example
Below is a complete code example you can use to see how the local notification works.
import UIKit
import UserNotifications

class ViewController: UIViewController {

    override func viewDidLoad() {
        super.viewDidLoad()


        // Ask user permission
        let center = UNUserNotificationCenter.current()
        center.delegate = self
        center.requestAuthorization(options: [.alert, .badge, .sound]) { (granted, error) in
            if granted {
                print("Permission granted. Scheduling notification")
                self.scheduleNotification()
            }
        }
    }

    func scheduleNotification() {
        let notificationCenter = UNUserNotificationCenter.current()

        let notification = UNMutableNotificationContent()
        notification.title = "Important Message"
        notification.body = "It's a snow day tomorrow. No school busses."
        notification.categoryIdentifier = "alarm"
        notification.userInfo = ["additionalData": "Additional data can also be provided"]
        notification.sound = UNNotificationSound.default

        var dateComponents = DateComponents()
        dateComponents.hour = 8
        dateComponents.minute = 0

        let trigger = UNTimeIntervalNotificationTrigger(timeInterval: 10, repeats: false)

        let notificationRequest = UNNotificationRequest(identifier: UUID().uuidString, content: notification, trigger: trigger)


        // Add Action button to notification
        let actionButton = UNNotificationAction(identifier: "TapToReadAction", title: "Tap to read", options: .foreground)
        let actionShareButton = UNNotificationAction(identifier: "TapToShareAction", title: "Share", options: .foreground)
        let notificationCategory = UNNotificationCategory(identifier: "alarm", actions: [actionButton,actionShareButton], intentIdentifiers: [])
        notificationCenter.setNotificationCategories([notificationCategory])

        notificationCenter.add(notificationRequest)
    }

}

extension UIViewController: UNUserNotificationCenterDelegate {

    public func userNotificationCenter(_ center: UNUserNotificationCenter, willPresent notification: UNNotification, withCompletionHandler completionHandler: @escaping (UNNotificationPresentationOptions) -> Swift.Void) {
        completionHandler( [.alert, .badge, .sound])
    }

    public func userNotificationCenter(_ center: UNUserNotificationCenter, didReceive response: UNNotificationResponse, withCompletionHandler completionHandler: @escaping () -> Void) {

        let userInfo = response.notification.request.content.userInfo
        if let additionalData = userInfo["additionalData"] as? String {
            print("Additional data: \(additionalData)")
        }

        switch response.actionIdentifier {
        case UNNotificationDefaultActionIdentifier:
            print("User tapped on message itself rather than on an Action button")

        case "TapToReadAction":
            print("User tapped on Tap to read button")
            break

        case "TapToShareAction":
            print("User tapped on Share button")
            break

        default:
            break
        }

        completionHandler()
    }

}
I hope this tutorial was of some value to you! But don’t leave just now 🙂. Have a look at other Swift tutorials on this site. You might find more code examples that might be helpful in your app development.
Happy Swift coding 🙋🏻♂️!