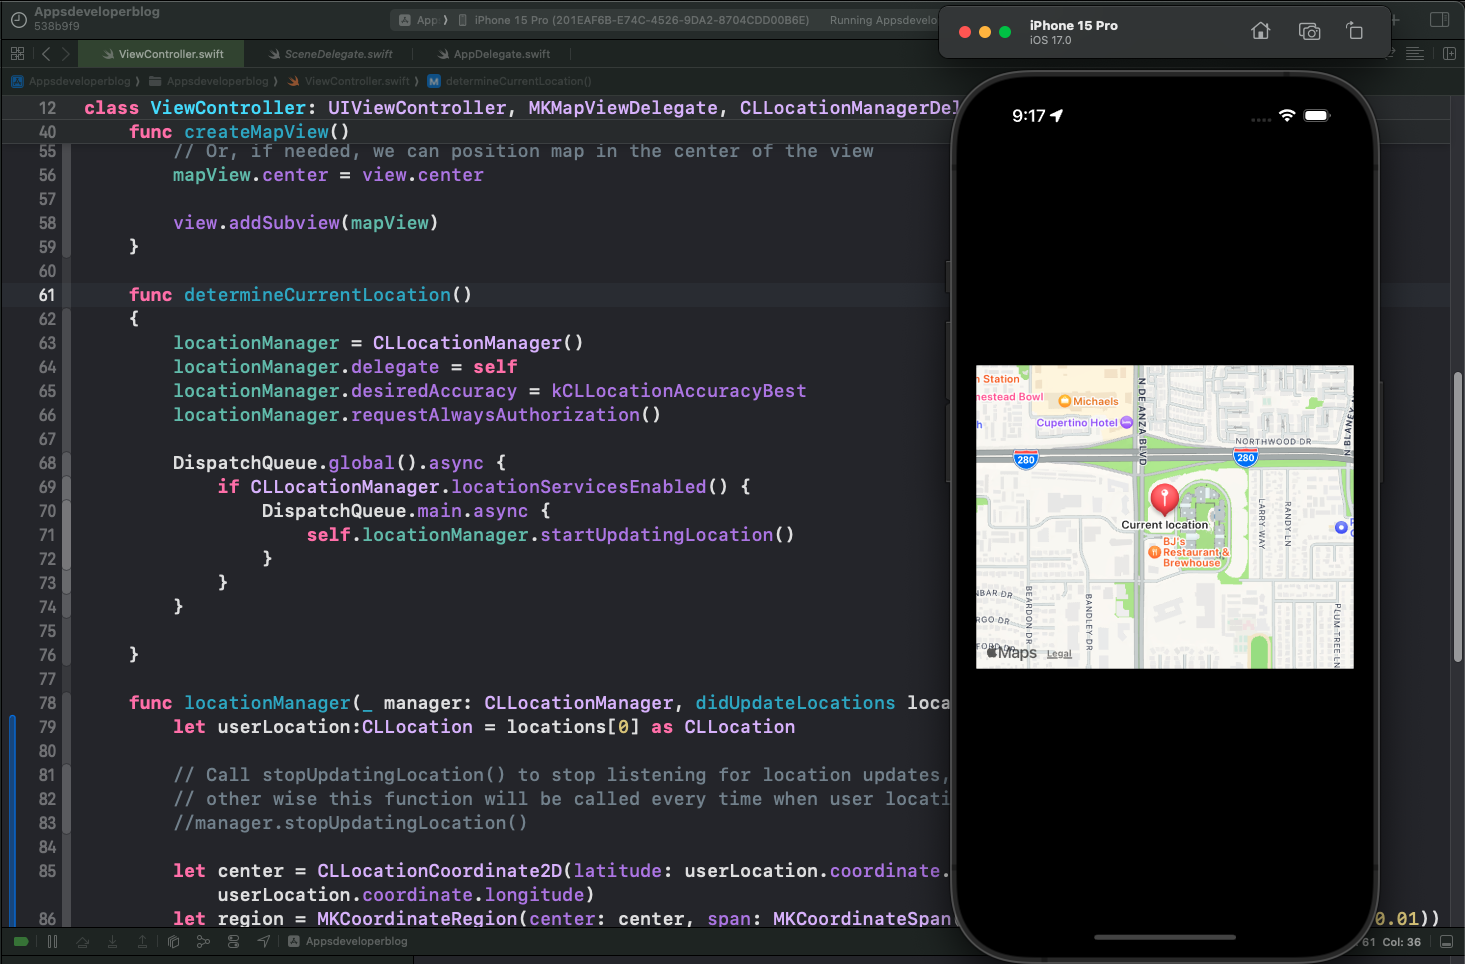
In this tutorial, you will learn how to drop a MKPointAnnotation pin on a MapView at user’s current location programmatically in Swift.
By the end of this tutorial, you will have a working Swift code example that you can use in your mobile application.
Step 1: Import MapKit and CoreLocation
Firstly, you need to import the necessary frameworks. MapKit is used for displaying maps and points of interest, while CoreLocation is used for determining the user’s current location.
import UIKit
import CoreLocation
import MapKit
Step 2: Create MKMapView Programmatically
Next, you create an instance of MKMapView programmatically. You can do this by initializing an MKMapView object and setting its properties such as the map type, zooming, and scrolling.
func createMapView() {
    mapView = MKMapView()

    let leftMargin:CGFloat =  10
    let topMargin:CGFloat =  60
    let mapWidth:CGFloat = view.frame.size.width-20
    let mapHeight:CGFloat =  300

    mapView.frame = CGRect(x: leftMargin, y: topMargin, width: mapWidth, height: mapHeight)

    mapView.mapType = MKMapType.standard
    mapView.isZoomEnabled = true
    mapView.isScrollEnabled = true

    // Position map in the center of the view
    mapView.center = view.center

    view.addSubview(mapView)
}
If you are new to MKMapView, you can check the details guide for creating MKMapView programmatically in Swift.
After creating the MKMapView, you need to add it as a subview to our main view. You can do it from the viewWillAppear method by calling the createMapView() function.
override func viewWillAppear(_ animated: Bool) {
    super.viewWillAppear(animated)
    createMapView()
}
Step 3: Update Info.plist for Location Permissions
Before requesting for the user’s current location you have to add a purpose string for getting the user’s location. To add the purpose string you will need to open Info.plist file as Source Code and add two new keys and corresponding values like for example I did:
<key>NSLocationAlwaysUsageDescription</key>
<string>Will you allow this app to always know your location?</string>
<key>NSLocationWhenInUseUsageDescription</key>
<string>Do you allow this app to know your current location?</string>
To write better purpose strings you can watch Apple’s official guideline video about how to write clear purpose strings.
Step 5: Determine User’s Current Location
To determine the user’s current location, you need to use the CLLocationManager class from the CoreLocation framework. To do that, you set the delegate to self, request the best accuracy for location updates, and start updating the location.
func determineCurrentLocation() {
    locationManager = CLLocationManager()
    locationManager.delegate = self
    locationManager.desiredAccuracy = kCLLocationAccuracyBest
    locationManager.requestAlwaysAuthorization()

    DispatchQueue.global().async {
        if CLLocationManager.locationServicesEnabled() {
            DispatchQueue.main.async {
                self.locationManager.startUpdatingLocation()
            }
        }
    }
}
You use startUpdatingLocation() function inside DispatchQueue.main.async to ensure that the efficient update UI-related code, which starts the location updates, is executed on the main thread. In iOS, all UI updates must be performed on the main thread. If you try to update the UI from a background thread, you may encounter unexpected behavior or even crashes.
To learn more about different types of dispatch queues you can check out this tutorial.
Step 6: Set the Current Region on the Map
Once you have the user’s location, you set the map’s region to center around the user’s location. This is done in the locationManager(_:didUpdateLocations:) delegate method.
func locationManager(_ manager: CLLocationManager, didUpdateLocations locations: [CLLocation]) {
    let userLocation:CLLocation = locations[0] as CLLocation
    let center = CLLocationCoordinate2D(latitude: userLocation.coordinate.latitude, longitude: userLocation.coordinate.longitude)
    let region = MKCoordinateRegion(center: center, span: MKCoordinateSpan(latitudeDelta:  0.01, longitudeDelta:  0.01))
    mapView.setRegion(region, animated: true)
}
Step 7: Create MKPointAnnotation with Custom Title
Next, you can create an MKPointAnnotation object with a custom title. This object represents a point of interest on the map.
let myAnnotation: MKPointAnnotation = MKPointAnnotation()
myAnnotation.coordinate = CLLocationCoordinate2DMake(userLocation.coordinate.latitude, userLocation.coordinate.longitude)
myAnnotation.title = "Current location"
Add this code to the locationManager(_:didUpdateLocations:) function we created above.
Step 8: Drop MKPointAnnotation as a Pin at User’s Current Location
Finally, you can add the annotation to the map view, which will drop a pin at the user’s current location.
mapView.addAnnotation(myAnnotation)
Add this code to the locationManager(_:didUpdateLocations:) function we created above.
Complete Code Example
Below is the complete code example that follows all the above steps above:
import UIKit
import CoreLocation
import MapKit

class ViewController: UIViewController, MKMapViewDelegate, CLLocationManagerDelegate {

    var locationManager:CLLocationManager!
    var mapView:MKMapView!

    override func viewDidLoad() {
        super.viewDidLoad()
        // Do any additional setup after loading the view, typically from a nib.
    }

    override func didReceiveMemoryWarning() {
        super.didReceiveMemoryWarning()
        // Dispose of any resources that can be recreated.
    }

    override func viewWillAppear(_ animated: Bool) {
        super.viewWillAppear(animated)

        // Create and Add MapView to our main view
        createMapView()
    }

    override func viewDidAppear(_ animated: Bool) {
        super.viewDidAppear(animated)

        determineCurrentLocation()
    }

    func createMapView()
    {
        mapView = MKMapView()

        let leftMargin:CGFloat = 10
        let topMargin:CGFloat = 60
        let mapWidth:CGFloat = view.frame.size.width-20
        let mapHeight:CGFloat = 300

        mapView.frame = CGRectMake(leftMargin, topMargin, mapWidth, mapHeight)

        mapView.mapType = MKMapType.standard
        mapView.isZoomEnabled = true
        mapView.isScrollEnabled = true

        // Or, if needed, we can position map in the center of the view
        mapView.center = view.center

        view.addSubview(mapView)
    }

    func determineCurrentLocation()
    {
        locationManager = CLLocationManager()
        locationManager.delegate = self
        locationManager.desiredAccuracy = kCLLocationAccuracyBest
        locationManager.requestAlwaysAuthorization()

        DispatchQueue.global().async {
            if CLLocationManager.locationServicesEnabled() {
                DispatchQueue.main.async {
                    self.locationManager.startUpdatingLocation()
                }
            }
        }

    }

    func locationManager(_ manager: CLLocationManager, didUpdateLocations locations: [CLLocation]) {
        let userLocation:CLLocation = locations[0] as CLLocation

        // Call stopUpdatingLocation() to stop listening for location updates,
        // other wise this function will be called every time when user location changes.
        // manager.stopUpdatingLocation()

        let center = CLLocationCoordinate2D(latitude: userLocation.coordinate.latitude, longitude: userLocation.coordinate.longitude)
        let region = MKCoordinateRegion(center: center, span: MKCoordinateSpan(latitudeDelta: 0.01, longitudeDelta: 0.01))

        mapView.setRegion(region, animated: true)

        // Drop a pin at user's Current Location
        let myAnnotation: MKPointAnnotation = MKPointAnnotation()
        myAnnotation.coordinate = CLLocationCoordinate2DMake(userLocation.coordinate.latitude, userLocation.coordinate.longitude);
        myAnnotation.title = "Current location"
        mapView.addAnnotation(myAnnotation)
    }

    private func locationManager(manager: CLLocationManager, didFailWithError error: NSError)
    {
        print("Error \(error)")
    }

}
Conclusion
By following the above steps, you can successfully drop a pin at the user’s current location on an MKMapView in an iOS application. I hope this tutorial was helpful to you.
To learn more about Swift and to find other code examples, check the following page: Swift Code Examples.
Happy learning!
