In this tutorial, you will learn how to create an OAuth 2 scope in Keycloak.
For video lessons on how to secure your Spring Boot application with OAuth 2.0. and Spring Security 5, please checkout my complete video course OAuth 2.0. in Spring Boot applications.
What is OAuth Scope?
A scope is used by OAuth 2 to restrict access to a resource. When requesting an access token from an authorization server, a client application will include a scope request parameter specifying a list of scopes or an amount of access to user Resources the generated access token should have. In turn, the authorization server uses the “scope” response parameter to inform the client of the scope of the access token issued.
The OAuth 2 documentation says that “Scope is a mechanism in OAuth 2.0 to limit an application’s access to a user’s account. An application can request one or more scopes, this information is then presented to the user in the consent screen, and the access token issued to the application will be limited to the scopes granted.”
“The value of the scope parameter is expressed as a list of space-delimited, case-sensitive strings. The strings are defined by the authorization server. If the value contains multiple space-delimited strings, their order does not matter, and each string adds an additional access range to the requested scope.”
How to Create OAuth Scopes in Keycloak?
Keycloak provides a very convenient user interface to create new OAuth Scopes that a Client application can use. I assume you already have the Keycloak server running, but if you do not, have a look at Keycloak tutorials on this site to learn how to download and run the Keycloak server as well as how to create new Realm and users.
To create a new OAuth 2 Scope in Keycloak:
- Login to Keycloak Server,
- Switch to needed Realm,
- From the left side navigation menu, select the Client Scopes section,
- Click on the Create button.

When you click on the Create button, you will be presented with a form you need to fill in to create a new scope.
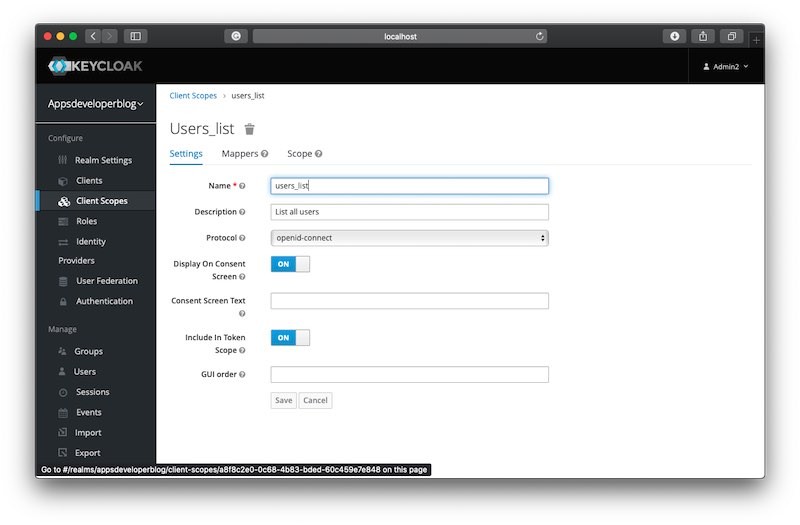
Provide the Scope Name and choose if you want this scope to be presented on the Consent Screen when it is presented to the user. Also, specify if the Scope should be included in a Token. Once the Scope is created, you can make the OAuth 2 Client application use it.
Configure OAuth 2 Client to Use the New Scope
Once you have created a new OAuth 2 Scope you can switch to a Clients section and make your OAuth 2 Client use the newly create Scope. To do that,
- From the left side navigation menu, select Clients,
- From the list of OAuth 2 Clients, select the client that needs to use the created scope,
- Select the Scope and assign it to a Client as a Default scope or as an Optional Scope. A default scope will always be included in the authorization server response while the optional scope will need to be specifically requested by an OAuth 2 Client application in the request to an authorization server.
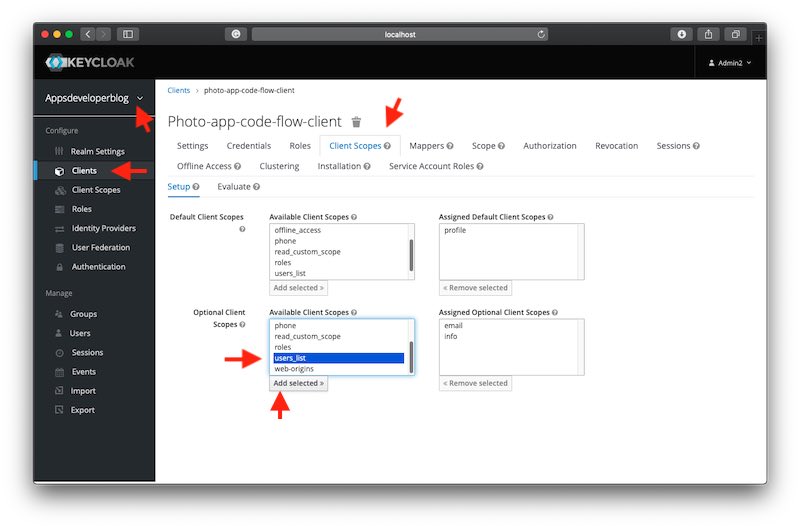
Note that you can assign more than one Scope to a Client.
I hope this tutorial was of some help to you. Check out other Keycloak tutorials on this site and hopefully, you will find them helpful too.
Happy learning!