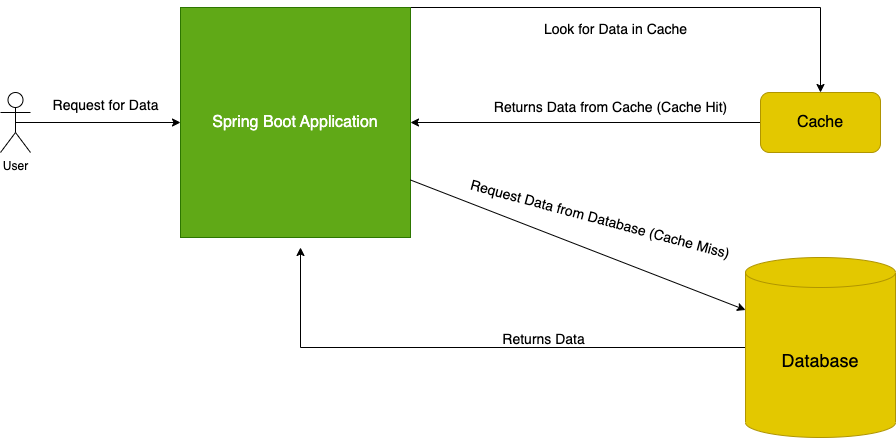
In this guide, I will walk you through the Caching Abstraction in Spring Boot and how to improve the application’s performance. I will walk you through how to enable default caching in Spring Boot with an example of different use cases.
What is Cache?
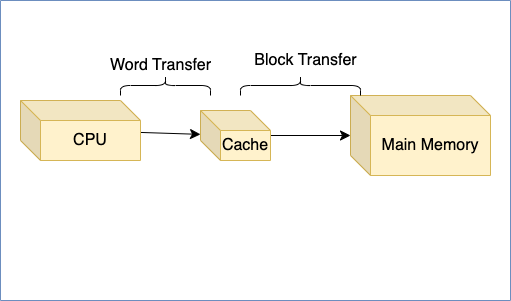
A cache is a small and fast, efficient memory space that an application or computer frequently uses to store or access important data. The main objective of a cache is to speed up the retrieval of data by making a copy of the data in a location that can be accessed faster than the original source or database.
Benefits of Caching
Caching frequently accessible data will improve the application’s performance. It will also reduce the costly backend calls and has the following benefits:
- Cost Effective,
- Scalability,
- Offline Access,
- Improved Performance,
- Reduced load on the server.
Getting Started with Caching in Spring Boot
Step 1: Add Maven Dependency
If we use Spring Boot to string working with caching, you need to add the spring-boot-starter-cache dependency.
<!-- https://mvnrepository.com/artifact/org.springframework.boot/spring-boot-starter-cache -->
<dependency>
<groupId>org.springframework.boot</groupId>
<artifactId>spring-boot-starter-cache</artifactId>
<version>3.0.2</version>
</dependency>
Step 2: Enable Caching using @EnableCaching
To enable caching in the Spring Boot application, we use @EnableCaching annotation at the class level.
@EnableCaching
@SpringBootApplication
public class MyApplication {
  public static void main(String[] args) {
    SpringApplication.run(MyApplication.class, args);
  }
}
Caching Annotations in Spring Boot
After activating caching, the following step is to connect the caching behaviour with functions using declarative annotations.
@Cacheable
@Cacheable annotation is used to mark a method as cacheable. When a method is called, its result is stored in the memory cache. Subsequent invocations of the method with the same provided arguments will retrieve the cached result instead of invoking the method again.
@Service
public class ApplicationService {
  @Cacheable(value = "myCache", key = "#id")
  public Object getData(String id) {
    // code to fetch data from a repository
  }
}
@CachePut
@CachePut annotation is used for the cache update without causing effects on the execution of the method. It can be used to update the cache before or after the execution of the method.
@Service
public class ApplicationService {
  @CachePut(value = "dataCache", key = "#data.id")
  public Student updateData(Student student) {
    // code to update data in repository
    return student;
  }
}
@CacheEvict
With insertion, data in the cache becomes large, and we could be holding quite on to a lot of unused data. @CacheEvict annotation is used to remove the entries from the cache. It can evict a single entry or all entries in a cache.
@Service
public class MyService {
  @CacheEvict(value = "dataCache", key = "#id")
  public void deleteData(Long id) {
    // code to delete data from repository
  }
}
@Caching
Let’s say you have a scenario where you want to use multiple annotations of the same type for caching a method. How would you do it?
The below example is an incorrect example of doing it.
@CacheEvict("studentInfo")
@CacheEvict(value="directory", key=student.rollNo)
public String getRollNumber(Student student) {
// code here returns rollNo
}
@Caching annotations allow you to use group multiple cache-related annotations together.
@Service
public class DataService {
  @Caching(put = {@CachePut(value = "dataCache", key = "#data.id")},
           evict = {@CacheEvict(value = "dataCache", key = "#data.id")})
  public DataObj updateAndDeleteData(DataObj data) {
    // code to update and delete data in repository
    return data;
  }
}
@CacheConfig
@CacheConfig annotation allow you to set common cache-related settings for all @CachePut, @CacheEvict, @Cacheable annotated methods inside of a class.
@Service
@CacheConfig(cacheNames = "dataCache")
public class ApplicationService {
  @Cacheable(key = "#id")
  public Object getData(String id) {
    // code to retrive data from a repository
  }

  @CachePut(key = "#data.id")
  public Data updateData(Data data) {
    // code to update data in repository
    return data;
  }

  @CacheEvict(key = "#id")
  public void deleteData(Long id) {
    // code to delete data from repository
  }
}
Final Words
In this article, we have gone through some of the important points of why we should use Cache in Spring Boot when designing an Application. Also, we have discussed the basic mechanism of how Cache works, along with its advantages and different annotations.
To learn about other Spring Boot annotations, check the:
- Spring Core Annotations tutorial,
- Spring Boot Stereotype Annotations tutorial.
To learn more about Spring Boot, check out my Spring Boot tutorials page.

