In this tutorial, we are going to see how to create a simple Spring Boot project containing a handler that takes the name of the user as a parameter and returns a welcome message. We are then going to deploy it as a serverless application on AWS Lambda and test it.
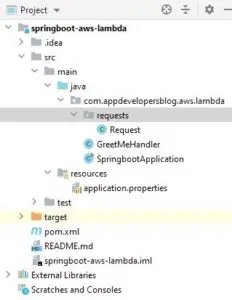
The first step is to create an empty Spring Boot project. Please follow the below project structure while creating packages and classes.
Importing Maven Dependencies
The next step is to import the maven dependencies required for the Spring Boot project. Copy the below-listed dependencies into the pom.xml file.
<dependencies>
    <dependency>
        <groupId>org.springframework.cloud</groupId>
        <artifactId>spring-cloud-function-adapter-aws</artifactId>
    </dependency>
    <dependency>
        <groupId>com.amazonaws</groupId>
        <artifactId>aws-lambda-java-events</artifactId>
        <version>2.0.2</version>
    </dependency>
    <dependency>
        <groupId>com.amazonaws</groupId>
        <artifactId>aws-lambda-java-core</artifactId>
        <version>1.1.0</version>
    </dependency>
    <dependency>
        <groupId>org.springframework.boot</groupId>
        <artifactId>spring-boot-starter-test</artifactId>
        <scope>test</scope>
        <exclusions>
            <exclusion>
                <groupId>org.junit.vintage</groupId>
                <artifactId>junit-vintage-engine</artifactId>
            </exclusion>
        </exclusions>
    </dependency>
    <dependency>
        <groupId>org.json</groupId>
        <artifactId>json</artifactId>
        <version>20090211</version>
    </dependency>
</dependencies>
<dependencyManagement>
    <dependencies>
        <dependency>
            <groupId>org.springframework.cloud</groupId>
            <artifactId>spring-cloud-dependencies</artifactId>
            <version>${spring-cloud.version}</version>
            <type>pom</type>
            <scope>import</scope>
        </dependency>
    </dependencies>
</dependencyManagement>
Next, create a requests package and a Request class to map the input to a specific format. It is required so that we can extract the input parameter and request type.
Request.java
This class contains two attributes – httpMethod and name. The incoming request type will be mapped to the attribute httpMethod. In this project, we implement logic to handle only GET requests. The name attribute takes the value of the input parameter in the GET request.
package com.appdevelopersblog.aws.lambda.requests;

public class Request {
    private String httpMethod;
    private String name;

    public String getHttpMethod() {
        return httpMethod;
    }

    public void setHttpMethod(String httpMethod) {
        this.httpMethod = httpMethod;
    }

    public String getName() {
        return name;
    }

    public void setName(String name) {
        this.name = name;
    }
}
The next step is to create an entry point to the Lambda Function that is nothing but the Handler class. Create a class named GreetMeHandler that extends the SpringBootRequestHandler interface. Create a method with the name handleGreetMeRequest that contains the logic to handle the get request with the user’s name as a parameter.
GreetMeHandler.java
The method handleGreetMeRequest maps the incoming request into the object Request class that we have created in the previous step. If the incoming request is of type GET, the message – “Hello “+name+”!!! Welcome to AppsDeveloperBlog…” is returned to the user.
package com.appdevelopersblog.aws.lambda;

import com.amazonaws.services.lambda.runtime.Context;
import com.appdevelopersblog.aws.lambda.requests.Request;
import org.springframework.cloud.function.adapter.aws.SpringBootRequestHandler;

public class GreetMeHandler extends SpringBootRequestHandler<String,Object> {
    public Object handleGreetMeRequest(Request request, Context context){
        switch (request.getHttpMethod()) {
            case "GET" :
                String name = request.getName();
                return "Hello "+name+"!!! Welcome to AppsDeveloperBlog...";
            case "default" :
                break;
        }
        return null;
    }
}
Now create a Jar file from the Spring Boot application by running the maven package command.
Deploying the application
To test how the application works, deploy the executable in AWS Lambda.
To learn how to deploy the Spring Boot project as a Lambda function, check out this tutorial.
Build and deploy a Serverless Spring Boot Web Application with AWS Lambda
Run the test by sending the input as follows:
{
  "httpMethod":"GET",
  "name" : "Sergey"
}
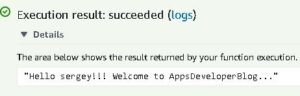
Run the test. In the Execution result, you can see the message – “Hello Sergey!!! Welcome to AppsDeveloperBlog…” as shown below.
Integrating with AWS API Gateway
If you would like, you can also create an API Gateway and add it as the trigger to this Lambda function.
To learn how to do that, check out this tutorial.
Trigger a Lambda Function Using AWS API Gateway
While creating a GET request in the API Gateway, specify the mapping template in the Integration response specified below. We need to map the field “httpMethod” to “$context.httpMethod” (GET in this case) and set the “name” field to “$input.params(‘name’)“. By doing so, the name filed takes whatever value the user sends as the parameter to the GET request.
Copy the invoke URL of the deployed API into a browser and replace {name} with any name. The welcome message is displayed as shown below.

Link to Code : GitHub
That’s it for this tutorial. Hope this has helped you.