In this tutorial, we are going to see how to handle exceptions from a Lambda function in the API Gateway. For Lambda exceptions, we have to map the error status returned by the Lamba functions to the HTTP Status of the methods in API Gateway. If not, the API Gateway returns a 200 OK status to the API users even if the Lambda function returns an error status.
Let me demonstrate this with the help of a simple Spring Boot project. The Spring Boot project implements two methods.
- A GET method to fetch the student with a particular id,
- A POST method to insert the details of a student into the database.
When we hit a GET request, if no student with the given id is present, the handler implemented in the Spring Boot application returns the 404-ResourceNotFound error. However, the API Gateway returns a 200 OK response. To avoid this, we need to map the errors from Lambda functions to the Integration response in the API Gateway. Let us get started with the implementation.
We will be using the AWS DynamoDB as the database to demonstrate this tutorial. Create a Student table in DynamoDB with the attribute id as the Partition Key(Primary key).
Once the database is ready, create a simple Spring Boot application to perform GET and POST operations on the Student table.
Firstly, add the necessary maven dependencies to the pom.xml file.
<dependency>
    <groupId>org.springframework.cloud</groupId>
    <artifactId>spring-cloud-function-adapter-aws</artifactId>
</dependency>
<dependency>
    <groupId>com.amazonaws</groupId>
    <artifactId>aws-lambda-java-events</artifactId>
    <version>2.0.2</version>
</dependency>
<dependency>
    <groupId>com.amazonaws</groupId>
    <artifactId>aws-lambda-java-core</artifactId>
    <version>1.1.0</version>
</dependency>
<dependency>
    <groupId>com.amazonaws</groupId>
    <artifactId>aws-java-sdk-dynamodb</artifactId>
    <version>1.11.163</version>
</dependency>
Next, create a Student class with id and name as attributes.
Student.java
Paste the following code consisting of the Student class definition, a constructor with all attributes, getters, and setters into the Student.java file. Annotate the class with @DynamoDBTable and set the value tableName to a student.
package com.appdevelopersblog.aws.lambda.model;

import com.amazonaws.services.dynamodbv2.datamodeling.DynamoDBAttribute;
import com.amazonaws.services.dynamodbv2.datamodeling.DynamoDBHashKey;
import com.amazonaws.services.dynamodbv2.datamodeling.DynamoDBTable;

@DynamoDBTable(tableName = "Student")
public class Student {

    @DynamoDBHashKey
    private int id;

    @DynamoDBAttribute
    private String name;

    public Student() {

    }
    public Student(int id , String name) {
        this.id = id;
        this.name = name;
    }
    public int getId() {
        return id;
    }
    public void setId(int id) {
        this.id = id;
    }
    public String getName() {
        return name;
    }
    public void setName(String name) {
        this.name = name;
    }
}
Create a custom Request class as follows.
Request.java
The Request class consists of name, id, and HTTP Status attributes.
package com.appdevelopersblog.aws.lambda.request;

import com.appdevelopersblog.aws.lambda.model.Student;

public class Request {
    private String httpMethod;
    private int id;
    private Student student;
    public String getHttpMethod() {
        return httpMethod;
    }
    public void setHttpMethod(String httpMethod) {
        this.httpMethod = httpMethod;
    }
    public int getId() {
        return id;
    }
    public void setId(int id) {
        this.id = id;
    }
    public Student getStudent() {
        return student;
    }
    public void setStudent(Student student) {
        this.student = student;
    }
}
Next, create a handler class that implements GET and POST methods and extends the SpringBootRequestHandler class.
RequestHandler.java
This class consists of an AmazonDynamoDBClientBuilder that connects to the Student table present in the DynamoDB.
package com.appdevelopersblog.aws.lambda;

import com.amazonaws.services.dynamodbv2.AmazonDynamoDB;
import com.amazonaws.services.dynamodbv2.AmazonDynamoDBClientBuilder;
import com.amazonaws.services.dynamodbv2.datamodeling.DynamoDBMapper;
import com.amazonaws.services.dynamodbv2.model.ResourceNotFoundException;
import com.amazonaws.services.lambda.runtime.Context;
import com.appdevelopersblog.aws.lambda.request.Request;
import com.appdevelopersblog.aws.lambda.model.Student;
import org.springframework.cloud.function.adapter.aws.SpringBootRequestHandler;

public class RequestHandler extends SpringBootRequestHandler<String,Object> {

    AmazonDynamoDB adb = AmazonDynamoDBClientBuilder.defaultClient();
    DynamoDBMapper mapper = new DynamoDBMapper(adb);
    public Object handleRequest(Request request, Context context){
        Student student = null;
        switch (request.getHttpMethod()) {
            case "GET" :
                student = mapper.load(Student.class,request.getId());
                if (student == null) {
                    throw new ResourceNotFoundException("Resource Not Found "+request.getId());
                }
                return student;
            case "POST" :
                student = request.getStudent();
                mapper.save(student);
                return student;
            case "default" :
                break;
        }
        return null;
    }
}
Once this is over, create a deployable from the application using the maven install command and create a Lambda function from the jar. Set the handler to ‘com.appdevelopersblog.aws.lambda.RequestHandler::handleRequest’.
Next, create an API Gateway and create methods for GET and POST operations.
Creation of API Gateway
- Go to API Gateway under the Network & Content Delivery tab, click on REST API.
- Give a name to the API Gateway and click on Create API.
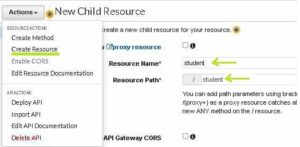
- Next, click on Actions, Create Resource.
- Give the resource name as a student and click on Create Resource.
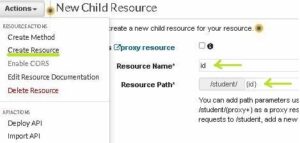
- Next, click on Action, create a resource, and give Resource name as id. Since this is a dynamic parameter, change the Resource Path to {id}. Click on Create Resource.
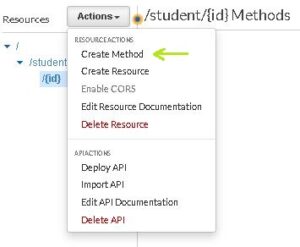
- The next step is to create the GET and POST method by clicking on Actions, Create Method.
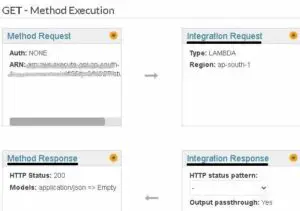
Configure HTTP GET Request in API Gateway
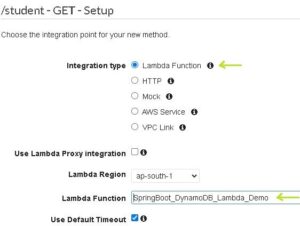
- To configure a GET request in the API Gateway, Click on Actions->Create Method. Select GET from the dropdown box.
- Select Lambda Function as the Integration Type and paste the name of the Lambda function that we have created. Click on Save.
- Later, click on Integration request in the Method Execution chart of the GET Request.
- Scroll down to Mapping Templates and set the Content-Type to application/json.
- Generate an empty template as follows and click on Save.
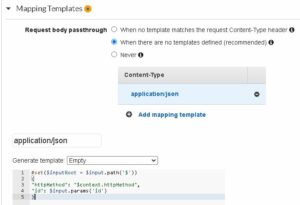
- A popup to add permission appears. Click on OK to enable the GET method of API Gateway to access the Lambda Function.
Configure HTTP POST Request in API Gateway
- Similarly, configure a POST request in the API Gateway by clicking on Actions->Create Method. Select POST from the dropdown box.
- Select Lambda Function as the Integration Type and paste the name of the Lambda function that we have created. Click on Save.
- Later, click on Integration request in the Method Execution chart of the POST Request.
- Scroll down to Mapping Templates and set the Content-Type to application/json.
- Generate an empty template as follows and click on Save.

- Click on OK to enable the POST method of the API Gateway to access the Lambda Function.
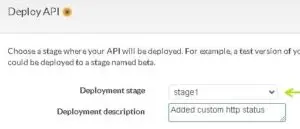
Deploying API Gateway
- Next, deploy the API Gateway by clicking on Actions -> Deploy API.
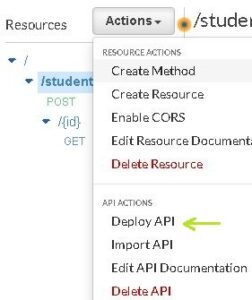
- Fill in the deployment stage details and click on Deploy.

- After deployment is complete, you will be able to see the endpoint.
- Copy the link address and send a POST request as follows.
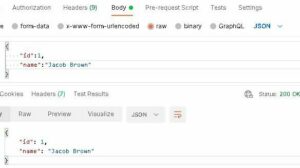
- Go to the DynamoDB dashboard. You can see that the data has been inserted into the table successfully.
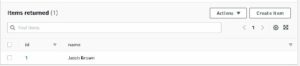
- Now send a GET request with the id parameter set to 1.
- You can see that the data is fetched successfully.
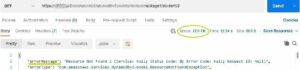
- However, when you send a GET request with the id parameter set to 2, the Lambda function returns a Resource Not Found error as no student with id – 2 is present in the database. Yet, the API returns a 200 OK Status.
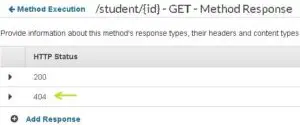
Adding a new status code
- To modify this, click on the Get method. In the Method execution chart, click on Method Response and add a new response with HTTP Status 404.
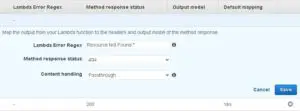
- Now go back and click on Integration Response.
- Add an integration response with regex ‘Resource Not Found.*’ and Method response status 404. Click on Save.
- Finally, deploy the API again as follows and test the GET request with id parameter 2.

You can see that the response Status is now set to 404 Not Found.
Link to Code : GitHub
That is the end. Hope this tutorial has helped you. Stay tuned for more such tutorials.