By default, Xcode will automatically create a screenshot of the app if UI Test fails. If needed, we can also create a screenshot programmatically and include it in a Test Report with the help of the XCTAttachment class. In this tutorial, you will learn how to create a screenshot of a specific UI element as well as a screenshot of the entire app view.
If you are interested in video lessons on how to write Unit tests and UI tests to test your Swift mobile app, check out this page: Unit Testing Swift Mobile App
Creating a Screenshot of a Single UI Element
To create a screenshot XCUIScreenshot of a specific UI element regardless of whether our test method has failed or not we can call the screenshot() method on a UI element. The below code snippet will create a screenshot of a single UITextField element that has an accessibility identifier firstName.
let firstNameTextFieldScreenshot = XCUIApplication().textFields["firstName"].screenshot()
To include XCUIScreenshot in a Test Report with a custom message, we will need to create an attachment.
let attachment = XCTAttachment(screenshot: firstNameTextFieldScreenshot)
    attachment.name = "First Name UITextField screenshot"
    attachment.lifetime = .keepAlways
    add(attachment)
Take a Screenshot of Current Device Screen
To create a screenshot of the current device screen you can use the XCUIScreen class.
let mainScreenScreenshot = XCUIScreen.main.screenshot()
or you can also use an object of XCUIApplication.
let mainScreenScreenshot = XCUIApplication().screenshot()
and then once you have a screenshot, you can add it to a Test Report. Below is a complete Swift code example.
let mainScreenScreenshot = XCUIScreen.main.screenshot()
let attachment = XCTAttachment(screenshot: mainScreenScreenshot)
attachment.name = "Signup Form Screenshot"
attachment.lifetime = .keepAlways
add(attachment)
Take a Screenshot of App’s First Window
You can also take a screenshot of the very first window of the app. To do that you will need to create an instance of XCUIApplication class, then refer to a list of windows, and then take a screenshot of the first window in the list.
 let app = XCUIApplication()
     app.launch()

let firstWindowScreenshot = app.windows.firstMatch.screenshot()
Once you have a screenshot, add it as an attachment to a test report.
Finding Screenshots in the Test Report
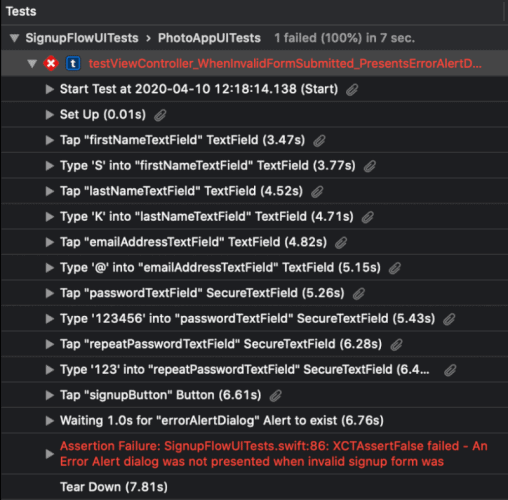
All automatically created screenshots 0r programmatically created attachments can be found in a Test Report. For example, the below image is a Test Report of a failed UI Test. When the UI Test fails the XCTest framework keeps on created screenshots. On the image below you can see that each step in a Test Report has an attachment included.
I hope this tutorial was of some help to you. If you are interested in a series of step-by-step video lessons that teach Unit testing and UI testing, have a look at this series.