This tutorial is a high-level overview of the Spring Web MVC framework.
Below is a high-level diagram of how things work in a Spring MVC Web application built with Spring Boot.
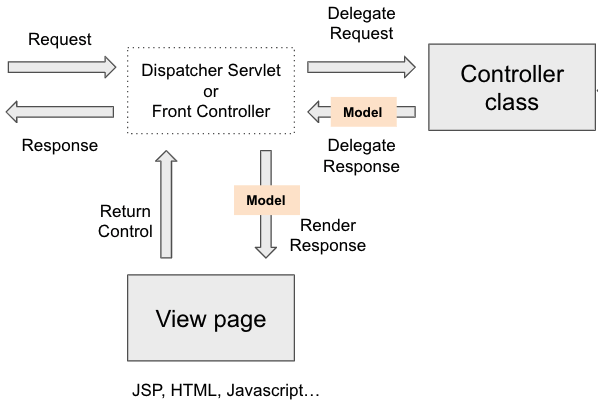
Most online tutorials or books will show you a similar diagram that is designed around the Dispatcher Servlet. Because this Dispatcher servlet is an expression of a Front Controller design pattern, you might also see it is called a Front Controller.
When the Spring MVC Web application receives a request, this request is first handled by this central, dispatcher Servlet. Now, even though this servlet is at the center in all diagrams, you will not be actually creating this servlet yourself. It is there. It is provided for you. And it just works.
Controller
The dispatcher servlet will dispatch, or it will delegate the request to a registered Controller class for processing. This controller class is a Java class that you will need to create and annotate with @Controller annotation. Inside of this class, you will create a method, that will handle HTTP requests, read HTTP parameters, perform some business logic, create a return value object, and will return a name of the view page, that needs to be used to display this return value to a user.
Model
The return value object, that you will create is also called a Model. A Model is a simple Java object that contains information you want to display in a View page.
View
The View page is also a page that you create. It can be a JSP page or it can be an HTML page. It is a page that can contain Javascript, CSS, and beautiful images.
Spring MVC architecture allows you to use different technologies to create a view page. In the following video lessons, I will show you how to create this page with JSP(Java Server Pages) and I will also show you how to use Thymeleaf templates and have your HTML pages display information that is inside of the Model object.
Once the View page is rendered, behind the scenes, the control is passed to a dispatcher servlet which finalizes the response. But again, as we build our Spring MVC Web application in the following lessons, you will not be creating a dispatcher servlet yourself. It is just there and it works.
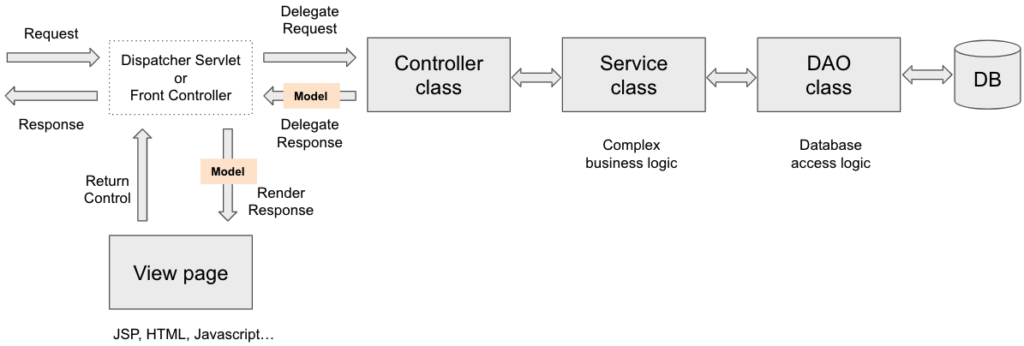
3-Tier Architecture
Now, I have mentioned that the controller class you create is responsible for handling HTTP requests and performing the business logic of your application. In most cases, developers do not write complex business logic in the controller class. Complex business logic will go into a Service class. If your code needs to work with a database, then you will create a Data Access object or JPA repositories. But it will be a Service class that will work with Data Access Objects. Not a controller class. The controller class will be responsible for receiving an HTTP request and creating a model object to be rendered in a View page.
Alright, so I hope this lesson was helpful to you!
Let’s continue and let’s learn more about building Web applications with the Spring framework.
Happy learning!