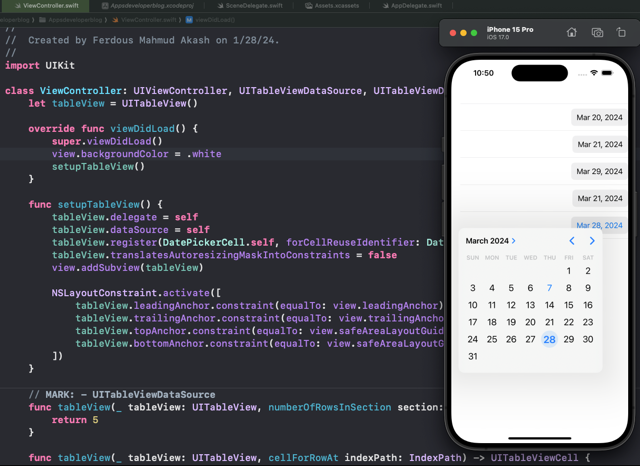
Inline UIDatePicker allows you to integrate a date picker directly into your table view cells.
In this tutorial, you will learn how to create a simple application that displays a UIDatePicker within a table view cell.
Step 1: Setup TableView
To begin, you’ll need to set up a UITableView in your view controller. This involves creating an instance of UITableView, setting its delegate and data source, and adding it to your view hierarchy. Here’s how you can do it:
import UIKit

class ViewController: UIViewController, UITableViewDataSource, UITableViewDelegate {
    let tableView = UITableView()

    override func viewDidLoad() {
        super.viewDidLoad()
        view.backgroundColor = .white
        setupTableView()
    }

    func setupTableView() {
        tableView.delegate = self
        tableView.dataSource = self
        tableView.register(DatePickerCell.self, forCellReuseIdentifier: DatePickerCell.identifier)
        tableView.translatesAutoresizingMaskIntoConstraints = false
        view.addSubview(tableView)

        NSLayoutConstraint.activate([
            tableView.leadingAnchor.constraint(equalTo: view.leadingAnchor),
            tableView.trailingAnchor.constraint(equalTo: view.trailingAnchor),
            tableView.topAnchor.constraint(equalTo: view.safeAreaLayoutGuide.topAnchor),
            tableView.bottomAnchor.constraint(equalTo: view.safeAreaLayoutGuide.bottomAnchor)
        ])
    }
}
This code initializes a UITableView and sets it up within the view controller’s view. It also registers a custom cell class DatePickerCell for use within the table view.
Step 2: Implement TableView Delegate Methods
Next, implement the required delegate methods for UITableView. Specifically, you’ll need to define the number of rows in the table view and the cell for each row. You can also specify the height for each row if you want the date picker cell to be taller than the default:
// MARK: - UITableViewDataSource
func tableView(_ tableView: UITableView, numberOfRowsInSection section: Int) -> Int {
    return 5 // Number of rows in your table view
}

func tableView(_ tableView: UITableView, cellForRowAt indexPath: IndexPath) -> UITableViewCell {
    let cell = tableView.dequeueReusableCell(withIdentifier: DatePickerCell.identifier, for: indexPath) as! DatePickerCell
    return cell
}

// MARK: - UITableViewDelegate
func tableView(_ tableView: UITableView, heightForRowAt indexPath: IndexPath) -> CGFloat {
    return 60 // Adjust the height as needed to accommodate the date picker
}
Step 3: Create DatePickerCell
Now, create a custom UITableViewCell subclass called DatePickerCell. This cell will contain a UIDatePicker. You’ll set up the date picker in the setupViews method and add it to the cell’s content view:
class DatePickerCell: UITableViewCell {
    static let identifier = "DatePickerCell"

    let datePicker: UIDatePicker = {
        let picker = UIDatePicker()
        picker.datePickerMode = .date
        picker.translatesAutoresizingMaskIntoConstraints = false
        return picker
    }()

    override init(style: UITableViewCell.CellStyle, reuseIdentifier: String?) {
        super.init(style: style, reuseIdentifier: reuseIdentifier)
        setupViews()
    }

    required init?(coder: NSCoder) {
        fatalError("init(coder:) has not been implemented")
    }

    func setupViews() {
        contentView.addSubview(datePicker)

        NSLayoutConstraint.activate([
            datePicker.leadingAnchor.constraint(equalTo: contentView.leadingAnchor),
            datePicker.trailingAnchor.constraint(equalTo: contentView.trailingAnchor),
            datePicker.topAnchor.constraint(equalTo: contentView.topAnchor),
            datePicker.bottomAnchor.constraint(equalTo: contentView.bottomAnchor)
        ])
    }
}
This code allows users to select a date. You initialize the date picker with a .date mode, which means it will display a date picker interface. The date picker is added to the cell’s content view, and constraints are set to ensure it fills the entire cell.
Complete Code Example
Putting it all together, here’s the complete code example:
import UIKit

class ViewController: UIViewController, UITableViewDataSource, UITableViewDelegate {
    let tableView = UITableView()

    override func viewDidLoad() {
        super.viewDidLoad()
        view.backgroundColor = .white
        setupTableView()
    }

    func setupTableView() {
        tableView.delegate = self
        tableView.dataSource = self
        tableView.register(DatePickerCell.self, forCellReuseIdentifier: DatePickerCell.identifier)
        tableView.translatesAutoresizingMaskIntoConstraints = false
        view.addSubview(tableView)

        NSLayoutConstraint.activate([
            tableView.leadingAnchor.constraint(equalTo: view.leadingAnchor),
            tableView.trailingAnchor.constraint(equalTo: view.trailingAnchor),
            tableView.topAnchor.constraint(equalTo: view.safeAreaLayoutGuide.topAnchor),
            tableView.bottomAnchor.constraint(equalTo: view.safeAreaLayoutGuide.bottomAnchor)
        ])
    }

    // MARK: - UITableViewDataSource
    func tableView(_ tableView: UITableView, numberOfRowsInSection section: Int) -> Int {
        return 5
    }

    func tableView(_ tableView: UITableView, cellForRowAt indexPath: IndexPath) -> UITableViewCell {
        let cell = tableView.dequeueReusableCell(withIdentifier: DatePickerCell.identifier, for: indexPath) as! DatePickerCell
        return cell
    }

    // MARK: - UITableViewDelegate
    func tableView(_ tableView: UITableView, heightForRowAt indexPath: IndexPath) -> CGFloat {
        return 60 // Adjust the height as needed to accommodate the date picker
    }
}


class DatePickerCell: UITableViewCell {
    static let identifier = "DatePickerCell"

    let datePicker: UIDatePicker = {
        let picker = UIDatePicker()
        picker.datePickerMode = .date
        picker.translatesAutoresizingMaskIntoConstraints = false
        return picker
    }()

    override init(style: UITableViewCell.CellStyle, reuseIdentifier: String?) {
        super.init(style: style, reuseIdentifier: reuseIdentifier)
        setupViews()
    }

    required init?(coder: NSCoder) {
        fatalError("init(coder:) has not been implemented")
    }

    func setupViews() {
        contentView.addSubview(datePicker)

        NSLayoutConstraint.activate([
            datePicker.leadingAnchor.constraint(equalTo: contentView.leadingAnchor),
            datePicker.trailingAnchor.constraint(equalTo: contentView.trailingAnchor),
            datePicker.topAnchor.constraint(equalTo: contentView.topAnchor),
            datePicker.bottomAnchor.constraint(equalTo: contentView.bottomAnchor)
        ])
    }
}

Conclusion
I hope this tutorial was helpful for you. There are a lot more Swift code examples on this website if you check the Swift Code Examples page.
Happy coding!