In a real-world scenario, when testing a system, there are some instances in which a test should only be executed under a specific environment. Integration tests that rely on a third-party system such as Operating System are one example. If that system goes down, we’ll omit the tests that need it to avoid build failure. This article explains the conditional tests execution using JUnit5 annotations and walks through the conditions that the JUnit Jupiter API supports.
Visit Testing Java code tutorials page, to learn more about JUnit5.
Conditional Test Execution
The conditional disabling of the tests is the way using which the tests could be disabled based on certain conditions like the Java Runtime Environment (JRE) used, the Operating system (OS) used, the user logged into the system, etc.
To dig into the conditional tests execution using JUnit5 annotations, let’s first create a Maven, Spring Boot Project. Refer to this article for more details.
To begin with, add the following dependencies to your Maven project:
<dependency>
    <groupId>org.junit.jupiter</groupId>
    <artifactId>junit-jupiter-params</artifactId>
    <version>5.8.2</version>
    <scope>test</scope>
</dependency>
The above-mentioned dependency includes all annotations to enable or disable a test depending on certain conditions. The org.junit.jupiter.api.condition package contains these annotations.
Operating System Conditions
The @EnabledOnOs and @DisabledOnOs annotations allow you to activate or disable a container or test on a given operating system. The following are the main factors to remember while using these annotations:
- These annotations need a value for the OS type, as well as the ability to take an array parameter if several operating systems are to be targeted.
- The annotations are applicable on both the class level and test level.
- Internally, these annotations look up operating system information using the System property “os.name.”
- The supported Operating Systems are mentioned in the enum class.
Following example demonstrates the usage of the mentioned annotations:
package com.appsdeveloper.junitexamples;

import org.junit.jupiter.api.Test;
import org.junit.jupiter.api.condition.DisabledOnOs;
import org.junit.jupiter.api.condition.EnabledOnOs;
import org.junit.jupiter.api.condition.OS;

public class OperatingSystemConditionsTest {

    @Test
    @EnabledOnOs(OS.WINDOWS)
    public void testRunOnWindowsOnly() {
        System.out.println("Run this on Windows OS!");
    }

    @Test
    @EnabledOnOs(OS.LINUX)
    public void testRunOnLinuxOnly() {
        System.out.println("Run this on Linux OS!");
    }

    @Test
    @EnabledOnOs(OS.MAC)
    public void testRunOnMacOnly() {
        System.out.println("Run this on Mac OS!");
    }


    @Test
    @EnabledOnOs({OS.WINDOWS, OS.LINUX})
    public void testRunOnWindowsAndLinux() {
        System.out.println("Run this on Windows or Linux OS!");
    }

    @Test
    @DisabledOnOs(OS.LINUX)
    public void testDisableOnLinuxOS() {
        System.out.println("Do not run this on Linux OS!");
    }

    @Test
    @DisabledOnOs(OS.WINDOWS)
    public void testDisableOnWindowsOS() {
        System.out.println("Do not run this on Windows OS!");
    }

}
The following image shows the output of the executed test class:
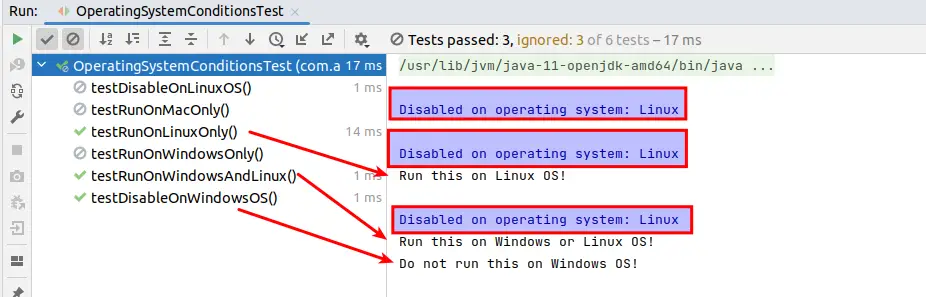
Because we have a Linux operating system on the machine in our example, tests are only run when the condition of having a Linux OS meets. The test does not run when the @DisabledOnOs annotation is applied with the Linux OS as the argument.
Java Runtime Environment Conditions
The @EnabledOnJre and @DisabledOnJre annotations can be used to enable or disable a container or test on certain versions of the Java Runtime Environment (JRE), or on a specific range of JRE versions using the @EnabledForJreRange and @DisabledForJreRange annotations. JRE.JAVA 8 is set as the lower boundary (min) and JRE.OTHER is set as the upper border (max), allowing half-open ranges to be used. The following are the main factors to remember while using these annotations:
- These annotations can take a single JRE version parameter or an array of JRE versions as arguments.
- These annotations, use the System property “java. version“ to determine the operating system information internally.
- The supported JRE versions can be found in the latest enum class.
The following example test class demonstrates the usage of the mentioned annotations:
package com.appsdeveloper.junitexamples;

import org.junit.jupiter.api.Test;
import org.junit.jupiter.api.condition.*;

public class JREConditionalTest {

    @Test
    @EnabledOnJre(JRE.JAVA_8)
    public void testEnableOnJRE8() {
        System.out.println("Run on JRE8!");
    }

    @Test
    @EnabledOnJre(JRE.JAVA_11)
    public void testEnableOnJRE11() {
        System.out.println("Run on JRE11!");
    }

    @Test
    @DisabledOnJre(JRE.JAVA_8)
    public void testDisableOnJRE8() {
        System.out.println("Do not run on JRE8!");
    }

    @Test
    @DisabledOnJre(JRE.JAVA_11)
    public void testDisableOnJRE11() {
        System.out.println("Do not run on JRE11!");
    }

    @Test
    @EnabledOnJre({JRE.JAVA_11, JRE.JAVA_13})
    public void testRunOnJRE11or13() {
        System.out.println("Run on JRE 11 or JRE 13");
    }

    @Test
    @EnabledForJreRange(min = JRE.JAVA_11, max = JRE.JAVA_15)
    public void testEnableForJRERange11To15() {
        System.out.println("Run on all JREs from JRE 11 to JRE 15");
    }

    @Test
    @DisabledForJreRange(max = JRE.JAVA_11)
    public void testDisableForJRERange8To11() {
        System.out.println("Do not run on JREs from JRE 8 (Default) to JRE 11");
    }
}
The following image shows the output of the above test class:
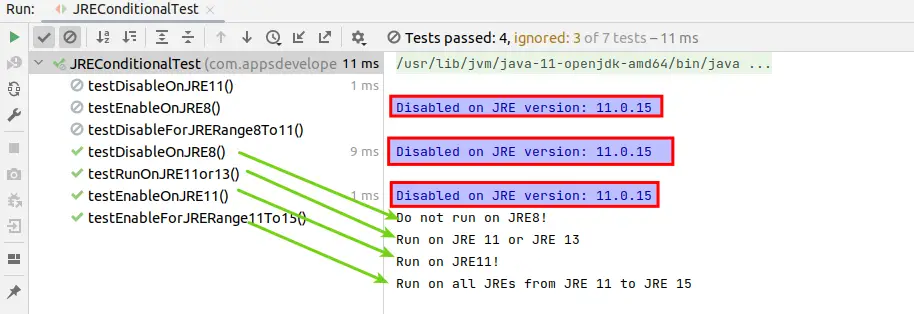
Because the tests are conducted against JRE 11, only those tests are executed that fulfill the JRE requirements.
System Property Conditions
The @EnabledIfSystemProperty and @DisabledIfSystemProperty annotations can be used to activate or disable a container or test based on the value of a specific JVM system property. The match attribute’s value is parsed as a regular expression. The following are the main factors to remember while using these annotations:
- These annotations take two parameters; named and matches parameters.
- The named parameter specifies a specific system characteristic while the matches argument is used to define a property value pattern using a regular expression.
- These annotations are repeatable, which means that these annotations can be specified on a test interface, test class, or test method numerous times.
The following code demonstrates the usage of the annotations discussed:
package com.appsdeveloper.junitexamples;

import org.junit.jupiter.api.Test;
import org.junit.jupiter.api.condition.DisabledIfSystemProperty;
import org.junit.jupiter.api.condition.EnabledIfSystemProperty;

public class SystemPropertyConditionTests {

    @Test
    @EnabledIfSystemProperty(named = "os.arch", matches = ".*64.*")
    public void testRunOn64BitMachineOnly() {
        System.out.println("Run on 64 bit machine!");
    }

    @Test
    @DisabledIfSystemProperty(named = "os.arch", matches = ".*64.*")
    public void testDoNotRunOn64BitMachine() {
        System.out.println("Do not run on 64 bit machine!");
    }
}
The output of the above test class is shown below:
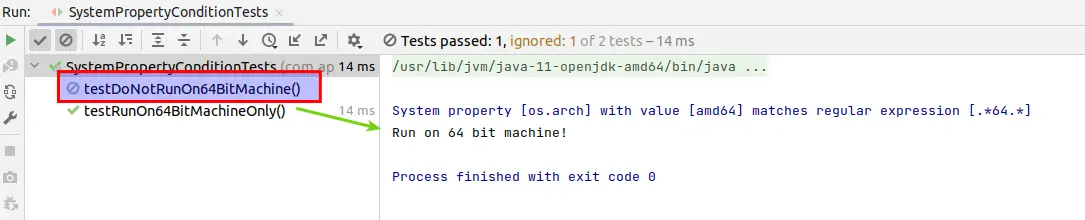
Please note that the tests are run against the 64 Bit Intel machine.
Environment Variable Conditions
The @EnabledIfEnvironmentVariable and @DisabledIfEnvironmentVariable annotations can activate or disable a container or test based on the value of a specific environment variable from the underlying operating system. The value passed inside a ‘matches‘ property is parsed as a regular expression. Below are the important things to note regarding these annotations:
- These annotations take two arguments: (a) named to specify the environment variable name and (b) matches: a regular expression to match against the values of environment variables.
- The existence of this annotation will have no impact if the provided environment variable is undefined.
- These are repeated annotations, which means they may be applied to a test method or class several times.
The following code demonstrates the usage of the annotations discussed above:
package com.appsdeveloper.junitexamples;

import org.junit.jupiter.api.Test;
import org.junit.jupiter.api.condition.DisabledIfEnvironmentVariable;
import org.junit.jupiter.api.condition.EnabledIfEnvironmentVariable;


public class EnvironmentalVariableConditionsTest {

@Test
@EnabledIfEnvironmentVariable(named = "USERNAME", matches = "XYZ")
public void testRunWhenUserNameMatches() {
System.out.println("Run test only when user XYZ executes!");
}

@Test
@DisabledIfEnvironmentVariable(named = "ENVIRONMENT", matches = "Staging")
public void disableTestOnStageEnv() {
System.out.println("Do not run on Staging environment!");
}
}
The following is the output of the above test class:

For the sake of testing, we have declared environment variables; USERNAME set to the value of ‘XYZ’ and ENVIRONMENT set to ‘development‘.
Custom Conditions
With the @EnabledIfEnvironmentVariable and @DisabledIfEnvironmentVariable annotations, a container or test can be enabled or disabled based on the value of a specific environment variable from the underlying operating system. The matches attribute’s value will be parsed as a regular expression. The next are the key points to keep in mind when utilizing these annotations:
- A condition method must return a boolean value and can take either no parameters or one ExtensionContext argument.
- The conditioning method can reside in the test class as well as outside the test class.
- If the condition method lies outside the test class, we have to supply the full qualified name to the annotation.
- The condition method must always be static when @EnabledIf or @DisabledIf is used at the class level. Condition methods in external classes must be static as well.
- These annotations can only be declared once because they are not repeatable.
The code below shows how to use the annotations mentioned earlier:
package com.appsdeveloper.junitexamples;

import org.junit.jupiter.api.Test;
import org.junit.jupiter.api.condition.DisabledIf;
import org.junit.jupiter.api.condition.EnabledIf;

public class CustomConditionTest {

    @Test
    @EnabledIf("customCondition")
    public void testEnableCustomCondition() {
        System.out.println("Run if custom condition criteria meets!");
    }

    @Test
    @DisabledIf("customCondition")
    public void testDisableCustomCondition() {
        System.out.println("Do not run if custom condition criteria meets!");

    }

    public boolean customCondition() {
        return true;
    }
}
Following is the output of the above test class:

For the sake of simplicity, we have created a hard-coded method customCondition() that simply returns true. In complex systems, we can add a condition which may be a combination of several statements.
Conclusion
In this article, we have covered a detailed guide regarding conditional tests execution using JUnit5 annotations. We’ve gone through the structure of the built-in condition annotations, as well as how to use them to activate or disable tests based on certain situations.
The JUnit Jupiter API has a lot of functionality for disabling or enabling tests based on certain conditions. When our test cases are reliant on external elements like OS, Java Version, UserName, and so forth, it’s quite useful. Explore the Testing Java Code page for a collection of valuable tutorials that delve into the art of structuring and optimizing your test cases, empowering you to write efficient and reliable code.
