Underline Text on UILabel in Swift

In this tutorial, you will learn how to underline text on UILabel in Swift programmatically.

To make the text on UILabel underlined we will need to use the NSMutableAttributedString together with NSUnderlineStyleAttributeName. The Swift code snippet below demonstrates how to create a new UILabel programmatically and then use the NSMutableAttributedString to underline the text on the label.

Create a UILabel Programmatically

The first Swift code snippet will be to create a new UILabel, so we can set an attributed text on it. You could also create UILabel using interface builder.

Plain text
Copy to clipboard
Open code in new window
EnlighterJS 3 Syntax Highlighter
let label = UILabel()
label.frame = CGRect(x: 20, y: 20, width: 200, height: 20)
let label = UILabel() label.frame = CGRect(x: 20, y: 20, width: 200, height: 20)
let label = UILabel()
label.frame = CGRect(x: 20, y: 20, width: 200, height: 20)

Underline Text on UILabel

The below code snippet in Swift will create a new attributed string and will use the NSUnderlineStyleAttributeName to make the text on UILabel underlined.

Plain text
Copy to clipboard
Open code in new window
EnlighterJS 3 Syntax Highlighter
// Create a new Attributed String
let attributedString = NSMutableAttributedString.init(string: "Text on label")
// Add Underline Style Attribute.
attributedString.addAttribute(NSAttributedString.Key.underlineStyle, value: 1, range:
NSRange.init(location: 0, length: attributedString.length));
label.attributedText = attributedString
// Create a new Attributed String let attributedString = NSMutableAttributedString.init(string: "Text on label") // Add Underline Style Attribute. attributedString.addAttribute(NSAttributedString.Key.underlineStyle, value: 1, range: NSRange.init(location: 0, length: attributedString.length)); label.attributedText = attributedString
// Create a new Attributed String 
let attributedString = NSMutableAttributedString.init(string: "Text on label")

// Add Underline Style Attribute.
attributedString.addAttribute(NSAttributedString.Key.underlineStyle, value: 1, range:
    NSRange.init(location: 0, length: attributedString.length));
label.attributedText = attributedString

Complete Code Example

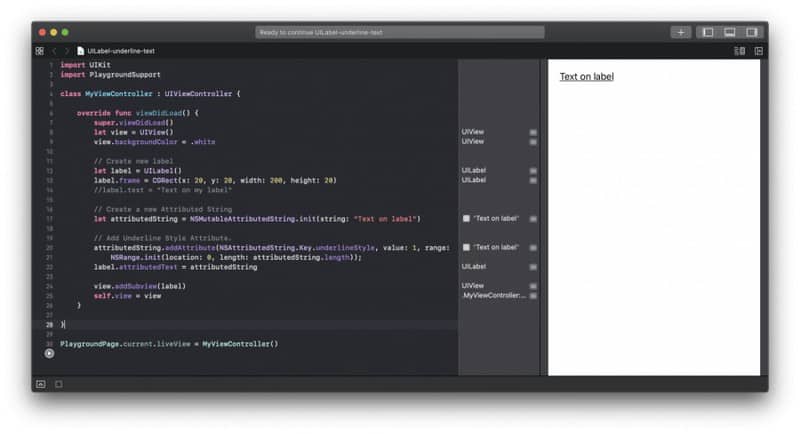
Here here is a complete code example created in Xcode Playground.

Plain text
Copy to clipboard
Open code in new window
EnlighterJS 3 Syntax Highlighter
import UIKit
import PlaygroundSupport
class MyViewController : UIViewController {
override func viewDidLoad() {
super.viewDidLoad()
let view = UIView()
view.backgroundColor = .white
// Create new label
let label = UILabel()
label.frame = CGRect(x: 20, y: 20, width: 200, height: 20)
//label.text = "Text on my label"
// Create a new Attributed String
let attributedString = NSMutableAttributedString.init(string: "Text on label")
// Add Underline Style Attribute.
attributedString.addAttribute(NSAttributedString.Key.underlineStyle, value: 1, range:
NSRange.init(location: 0, length: attributedString.length));
label.attributedText = attributedString
view.addSubview(label)
self.view = view
}
}
PlaygroundPage.current.liveView = MyViewController()
import UIKit import PlaygroundSupport class MyViewController : UIViewController { override func viewDidLoad() { super.viewDidLoad() let view = UIView() view.backgroundColor = .white // Create new label let label = UILabel() label.frame = CGRect(x: 20, y: 20, width: 200, height: 20) //label.text = "Text on my label" // Create a new Attributed String let attributedString = NSMutableAttributedString.init(string: "Text on label") // Add Underline Style Attribute. attributedString.addAttribute(NSAttributedString.Key.underlineStyle, value: 1, range: NSRange.init(location: 0, length: attributedString.length)); label.attributedText = attributedString view.addSubview(label) self.view = view } } PlaygroundPage.current.liveView = MyViewController()
import UIKit
import PlaygroundSupport

class MyViewController : UIViewController {
    
    override func viewDidLoad() {
        super.viewDidLoad()
        let view = UIView()
        view.backgroundColor = .white
        
        // Create new label
        let label = UILabel()
        label.frame = CGRect(x: 20, y: 20, width: 200, height: 20)
        //label.text = "Text on my label"
        
        // Create a new Attributed String 
        let attributedString = NSMutableAttributedString.init(string: "Text on label")
        
        // Add Underline Style Attribute.
        attributedString.addAttribute(NSAttributedString.Key.underlineStyle, value: 1, range:
            NSRange.init(location: 0, length: attributedString.length));
        label.attributedText = attributedString
        
        view.addSubview(label)
        self.view = view
    }
    
}

PlaygroundPage.current.liveView = MyViewController()

If you run this code snippet in Xcode Playground it will look and work like on the image below:

Underline Text on UILabel

I hope this short Swift code tutorial was of some help to you. This blog contains many other useful Swift code snippets and tutorials if you look around or search for a Swift keyword. Many of those tutorials contain video lessons as well.

Happy learning 🙋🏻‍♂️

Leave a Reply

Your email address will not be published. Required fields are marked *