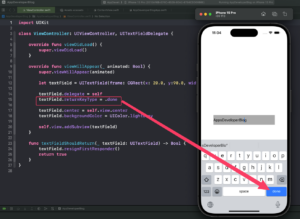
In this tutorial, you will learn how to set the UITextField keyboard return button as the Done button and handle the Done button to dismiss the keyboard. Simply the UITextField is a control that displays editable text and sends an action message to a target object when the user presses the return button.
If you are new to UITextField you can check the detailed tutorial about Create UITextField programmatically. In this tutorial, I will focus on the keyboard return key as a done button and how to dismiss the keyboard.
Set UITextField Keyboard Return Key as Done button
To set the keyboard return key as the “Done” button and dismiss the keyboard when tapped, you can follow these steps:
First, set the returnKeyType property of the UITextField to .done. This will change the return key to a “Done” button.
textField.returnKeyType = .done
Then, set the delegate UITextField to your ViewController class. This allows the ViewController to respond to actions performed in the UITextField.
textField.delegate = self
Dismiss Keyboard
To dismiss the keyboard you have to implement the textFieldShouldReturn: method in your ViewController class. This method is called when the return key is pressed. Inside this method, call the resignFirstResponder() function on the textField to dismiss the keyboard.
func textFieldShouldReturn(_ textField: UITextField) -> Bool {
    textField.resignFirstResponder()
    return true
}
This solution works for both Objective-C and Swift, and it ensures that the keyboard is dismissed whenever the “Done” button is pressed.
Complete Code Example
Here is a complete code example using UIKit and programmatic implementation of UITextField.
import UIKit

class ViewController: UIViewController, UITextFieldDelegate {

    override func viewDidLoad() {
        super.viewDidLoad()
    }

    override func viewWillAppear(_ animated: Bool) {
        super.viewWillAppear(animated)

        let textField = UITextField(frame: CGRect(x: 20.0, y:90.0, width: 280.0, height: 44.0))

        textField.delegate = self
        textField.returnKeyType = .done

        textField.center = self.view.center
        textField.backgroundColor = UIColor.lightGray

        self.view.addSubview(textField)
    }

    func textFieldShouldReturn(_ textField: UITextField) -> Bool {
        textField.resignFirstResponder()
        return true
    }
}
In this code, I create a UITextField in a UIViewController. Let’s break down the code:
- At first, I create a
UITextFieldand place in the center of the screen. - Then I give
UITextFielda delegate (self, referring to theViewController), which allows it to handle the event. - I set the return key type of the keyboard to
.done, meaning it will display as a “Done” button. - I also set a function for
UITextField.When the “Done” button is pressed, thetextFieldShouldReturn(_:)function is called, which makes the keyboard disappear.

SwiftUI Implementation
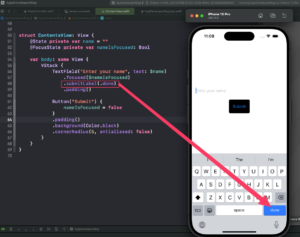
For SwiftUI, starting from iOS 15, you can use the .submitLabel(.done) modifier to change the return key to Done. To dismiss the keyboard, you can use the @FocusState property wrapper and the focused modifier. Here is an example:
struct ContentView: View {
    @State private var name = ""
    @FocusState private var nameIsFocused: Bool

    var body: some View {
        VStack {
            TextField("Enter your name", text: $name)
                .focused($nameIsFocused)
                .submitLabel(.done)

            Button("Submit") {
                nameIsFocused = false
            }
        }
    }
}

Conclusion
In this tutorial, you learned how to set the UITextField Keyboard return key as the Done button and handle the Done button to dismiss the keyboard. I also covered the SwiftUI implementation of this feature.
These techniques ensure that the keyboard is dismissed whenever the Done button is pressed, enhancing the user experience by providing a clear indication of when input is accepted. You can check the guide for keyboard layout WWDC video.
To learn more about Swift and find other helpful code examples and tutorials, check the Swift Code Examples page.
Happy Coding!