When developing Spring Boot applications, we need to tell the Spring Framework where to look for the custom code that we wrote. Using component scan is one method of asking Spring to detect the components of our application which Spring will then manage for us from Initialization to Execution. Spring needs the information to locate and register all the Spring components with the IoC container when the application starts up. How does Spring manage these components? Have a look at this article. In this article, we will learn how Spring locates these components.
What is Component Scanning in Spring Boot?
Component Scanning in String Boot is the mechanism through which Spring Boot is able to auto-scan, detect, and instantiate components from pre-defined project packages. By default, the Spring framework will scan the root package and all sub-packages looking for classes with stereotype annotations @Component, @Controller, @Service, and @Repository.
We can change this default behavior and tell Spring Framework which packages to scan. This is done with the help of @ComponentScan annotation which is explained in detail in this blog post.
Let’s consider an example to get a better understanding of how Component Scanning works.
An Example Application
Let’s create a simple Spring Boot application to understand how component scanning works in Spring. We will start by writing a few components.
ExampleBeanA
This will be a simple spring bean defined in its own package named exampleBeanA
package com.example.blog.examplepackageA;

import org.springframework.stereotype.Component;

@Component("exampleBeanA")
public class ExampleBeanA {
}
ExampleBeanB1
This is another simple spring bean defined in its own package named exampleBeanB
package com.example.blog.examplePackageB;

import org.springframework.stereotype.Component;

@Component("exampleBeanB1")
public class ExampleBeanB1 {
}
ExampleBeanB2
This is another bean that extends ExampleBeanB1 and is defined in package named exampleBeanB
package com.example.blog.examplePackageB;

import org.springframework.stereotype.Component;

@Component("exampleBeanB2")
public class ExampleBeanB2 extends ExampleBeanB1 {
}
ExampleBeanB3
This is another bean that extends ExampleBeanB2 and is defined in package named exampleBeanB
package com.example.blog.examplePackageB;

import org.springframework.stereotype.Component;

@Component("exampleBeanB3")
public class ExampleBeanB3 extends ExampleBeanB2 {
}
ExampleBeanC
This is another simple spring bean that is defined in its own package named exampleBeanC
package com.example.blog.examplepackageC;

import org.springframework.stereotype.Component;

@Component("exampleBeanC")
public class ExampleBeanC {
}
ExampleBeanD
This is another simple spring bean that is defined in its own package named exampleBeanD
package com.example.blog.examplePackageD;

import org.springframework.stereotype.Component;

@Component("exampleBeanD")
public class ExampleBeanD {
}
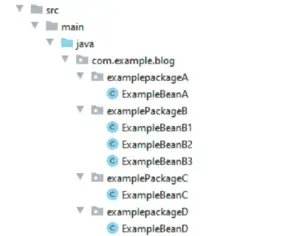
After defining each of the beans in their respective packages, here is what the folder structure looks like:
The Main Class
Spring needs to know which packages to scan for annotated components in order to add them to the Inversion of Control (IoC) container. In a Spring Boot project, we typically set the main application class with the @SpringBootApplication annotation (which is the combination of @ComponentScan, @Configuration, and @EnableAutoConfiguration annotations). With this default setting, Spring Boot will auto scan for components in the current package (containing the @SpringBootApplication main class) and its sub-packages.
It is recommended that the main application class should be placed in a root package above the component classes of the application. To better explain the concept of component scanning, I have used a combination of @ComponentScan, @Configuration, and @EnableAutoConfiguration annotations instead of a single @SpringBootApplication annotation.
Below is the code to create the main class and access components:
@ComponentScan
@Configuration
@EnableAutoConfiguration
public class ComponentScanApplication {

    public static void main(String[] args) {
        ApplicationContext context = SpringApplication.run(ComponentScanApplication.class,args);
        System.out.println("Contains A  "+ context.containsBeanDefinition("exampleBeanA"));
        System.out.println("Contains B3  " + context.containsBeanDefinition("exampleBeanB3"));
        System.out.println("Contains C   " + context.containsBeanDefinition("exampleBeanC"));
    }
}
The output of running the main class is:
...
Contains A  true
Contains B3  true
Contains C   true
As you can see, all the classes in the sub-packages of the main class ComponentScanApplication are auto scanned by Spring.
Specifying Base Packages with @ComponentScan
Under the hood, @SpringBootApplication is a composition of the @Configuration, @ComponentScan, and @EnableAutoConfiguration annotations.
The @ComponentScan annotation is used with the @Configuration annotation to tell Spring Boot the packages to scan for annotated components. @ComponentScan is also used to specify base packages and base package classes to look in using the basePackageClasses or basePackages attributes of @ComponentScan.
The basePackageClasses attribute is a type-safe alternative to basePackages. When you specify basePackageClasses, Spring will scan the package (and sub-packages) of the classes you specify.
The example below uses the basePackages and basePackageClasses attributes of @ComponentScan to specify what packages to look in.
@Configuration
@ComponentScan(basePackages = {
        "com.example.blog.examplepackageA",
        "com.example.blog.examplepackageD"
},
        basePackageClasses = ExampleBeanB1.class)
public class ComponentScanApplicationWithSpecificBasePackages {
    public static void main(String[] args) {
        ApplicationContext context = SpringApplication.
                run(ComponentScanApplicationWithSpecificBasePackages.class, args);
        System.out.println("Contains A  " + context.containsBeanDefinition("exampleBeanA"));
        System.out.println("Contains B2  " + context.containsBeanDefinition("exampleBeanB2"));
        System.out.println("Contains C   " + context.containsBeanDefinition("exampleBeanC"));
        System.out.println("Contains D   " + context.containsBeanDefinition("exampleBeanD"));

    }
}
The output:
...
Contains A  true
Contains B2  true
Contains C   false
Contains D   true
Since the basePackage attribute specified examplepackageA and examplepackageD, therefore exampleBeanA and exampleBeanD were found. Also, basePackageClasses specified ExampleBeanB1.class and since exampleBeanB2 is in the same package, it was found as well. Lastly, exampleBeanC was not found as examplepackageC is not specified.
Thanks for following the tutorial till the end. I hope that this adds to your knowledge. Happy Learning!